
Landscaping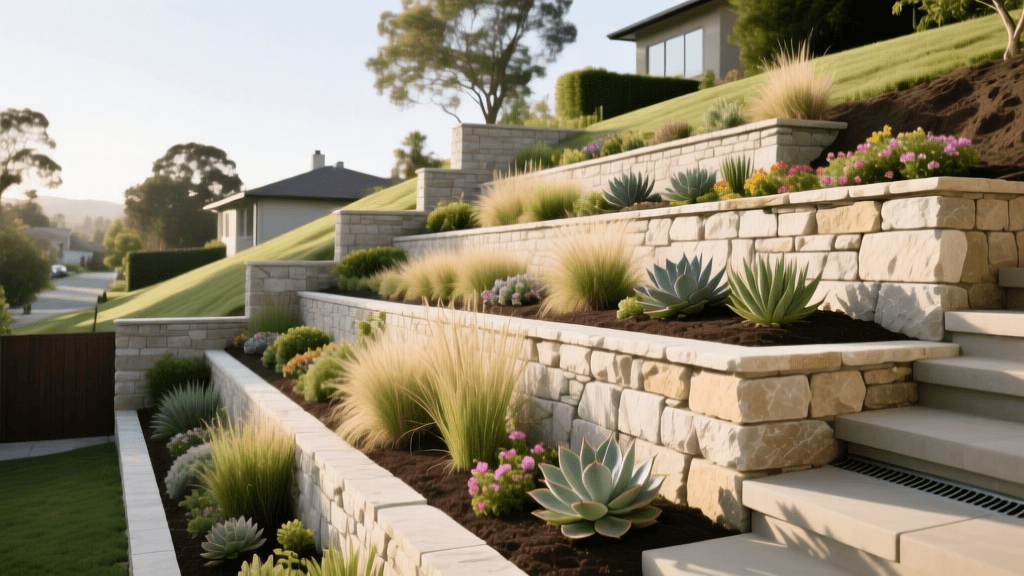
Before & After: Transforming Steep Slopes Into Tiered Garden Beds
The 'Before': A Dangerous, Erosion-Prone Slope
For many homeowners, a sloped backyard is less of a landscaping feature and more of a weekly burden. In our featured 'Before & After' transformation, the property owner was dealing with a 30-degree incline that spanned 400 square feet behind their patio. The 'Before' state was a textbook example of poor grading and severe soil erosion. Every heavy rainstorm washed premium hardwood mulch, topsoil, and fertilizer directly onto the concrete patio and into the municipal storm drain. Furthermore, maintaining the patchy turfgrass on such a steep incline was a dangerous chore; pushing a heavy lawnmower up the slope posed a significant slip-and-fall hazard, while string-trimming the edges resulted in muddy, uneven patches.
The goal of this transformation was clear: eliminate the erosion hazard, capture stormwater runoff, and convert a useless, muddy incline into a series of functional, tiered garden beds that would boost the home's curb appeal and provide a serene outdoor living backdrop.
Assessing the Damage and Planning the 'After'
Before moving a single shovel of dirt, it is crucial to understand the hydrology of your yard. Uncontrolled residential runoff is a major environmental issue. According to the Environmental Protection Agency (EPA), nonpoint source pollution—such as sediment, fertilizers, and pesticides washing off residential lawns—is the leading cause of water quality problems in local waterways. By terracing this slope, we not only reclaim usable yard space but also create natural catchment areas that allow rainwater to percolate slowly into the water table rather than scouring the topsoil.
The 'After' vision involved three distinct terraced levels, each held back by a 2-foot-high segmental concrete retaining wall. This design breaks the 6-foot total elevation change into manageable, flat planting zones perfect for deep-rooted native perennials and ornamental grasses.
Material Comparison for Retaining Walls
Choosing the right hardscape material is the most critical decision in any slope transformation. Below is a comparison of the most common retaining wall materials considered for this project.
| Material Type | Avg. Cost (per sq. ft. face) | Estimated Lifespan | DIY Friendliness | Best Application |
|---|---|---|---|---|
| Segmental Concrete (e.g., Allan Block) | $10 - $15 | 50+ Years | Moderate | Tiered beds, curved walls, structural support |
| Natural Stone Boulders | $15 - $25 | 100+ Years | Low (Requires heavy machinery) | Rustic, naturalistic, woodland designs |
| Pressure-Treated Timber | $5 - $8 | 15 - 20 Years | High | Budget-friendly, straight runs, temporary fixes |
The Verdict: We selected segmental concrete wall blocks. They offer a perfect balance of structural integrity, longevity, and DIY accessibility. Their interlocking lip system naturally creates the necessary 'batter' (the backward lean into the slope) required to hold back thousands of pounds of saturated soil.
The Transformation: Step-by-Step Build
1. Excavation and Base Preparation
The most common reason retaining walls fail is a poorly prepared base. For our 2-foot-tall walls, we excavated a trench 24 inches wide and 8 inches deep. The first course of blocks must be buried below grade to prevent the soil from pushing the wall outward at its base. We filled the trench with 6 inches of 3/4-inch crushed angular gravel (often called 57 stone). Pro Tip: Never use round pea gravel for a wall base, as the round stones roll and shift under pressure. We used a mechanical plate compactor to vibrate the gravel into a rock-solid, level foundation.
2. Laying the First Course and Drainage
Water pressure (hydrostatic pressure) is the ultimate enemy of retaining walls. If water builds up behind the blocks, the wall will bulge and collapse. Behind the first course of blocks, we laid a 4-inch perforated PVC drainage pipe, wrapped in landscape filter fabric to prevent soil clogging. This pipe was graded slightly downward to daylight at the edge of the property, ensuring that any water trapped behind the wall is safely evacuated away from the hardscape.
3. Geogrid Reinforcement and Backfilling
For walls exceeding 3 feet, or tiered walls where the upper wall's surcharge load impacts the lower wall, synthetic reinforcement is mandatory. The National Concrete Masonry Association (NCMA) provides strict engineering guidelines for using geogrid—a high-tensile synthetic mesh that layers into the soil behind the wall. We installed geogrid every two courses, extending it 4 feet back into the slope. This effectively ties the wall blocks to the earth behind them, turning the soil itself into a massive, cohesive anchor. We then backfilled the space immediately behind the blocks with clean, washed drainage gravel to ensure water flows freely down to the perforated pipe.
Softscaping: Planting for Permanent Erosion Control
With the hardscape complete, the 'After' phase shifted to softscaping. The flat, terraced beds were filled with a premium blend of topsoil and organic compost. To ensure long-term slope stabilization, we followed the sustainable design principles championed by the American Society of Landscape Architects (ASLA), which heavily advocate for the use of native, deep-rooted plants to manage stormwater and prevent erosion.
While traditional turfgrass roots only reach 2 to 3 inches deep, native prairie plants and ornamental grasses can send roots 5 to 8 feet into the earth, acting as a living, subterranean rebar that holds the soil together during torrential downpours.
- Switchgrass (Panicum virgatum): Placed at the back of the upper terrace for vertical interest and massive root structures.
- Purple Coneflower (Echinacea purpurea): Used in the middle tier for drought tolerance and pollinator support.
- Creeping Juniper (Juniperus horizontalis): Planted along the lip of the retaining walls to cascade over the concrete edges, softening the hardscape and providing evergreen winter coverage.
Project Breakdown: Costs and Timeline
Transforming a 400-square-foot sloped area into a three-tiered retaining wall garden is a significant investment of time and capital, but the return on investment regarding property value and usable outdoor space is immense. Here is the breakdown for this specific 'Before & After' project:
- Segmental Wall Blocks (120 sq. ft. of facing): $1,440
- Crushed Gravel Base & Drainage Stone (4 tons): $280
- Geogrid & Filter Fabric: $180
- Perforated Drain Pipe & Fittings: $95
- Premium Topsoil & Compost Blend (6 cubic yards): $240
- Native Plants & Mulch: $650
- Equipment Rental (Plate Compactor & Mini-Excavator): $450
- Total Material & Rental Cost: $3,335
Timeline: For a weekend DIY warrior with two helpers, excavation and base prep took two full weekends. Laying the block, geogrid, and drainage took another two weekends. Planting and final grading were completed in a single Saturday. Total active time: approximately 60 man-hours spread over five weekends.
The 'After' Reveal: A Functional Outdoor Oasis
The 'After' photos reveal a breathtaking transformation. The dangerous, muddy slope has been replaced by architectural tiers that draw the eye upward, making the backyard feel twice as large. The creeping juniper softens the concrete edges, while the switchgrass sways in the breeze, masking the neighboring fence. Most importantly, the next time a heavy thunderstorm rolls through, the homeowner can sit on their dry patio and watch the rain safely percolate into the terraced garden beds, knowing their soil—and their investment—is firmly in place.

