
Landscaping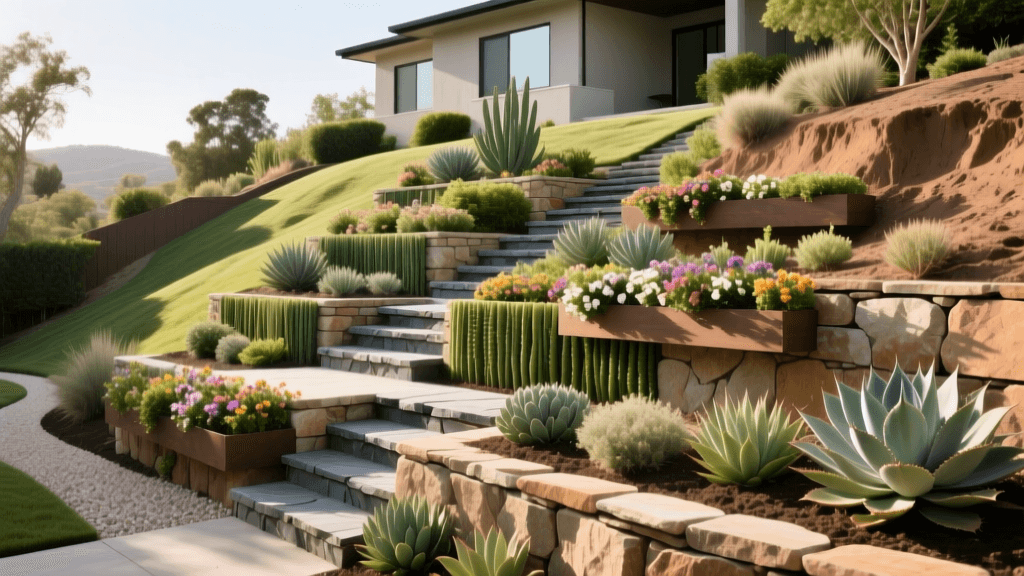
Steep Slope to Tiered Oasis: A Backyard Transformation Guide
The 'Before' State: Diagnosing a Problematic Slope
For many homeowners, a steep backyard slope is less of a landscaping feature and more of a persistent nuisance. In its 'Before' state, a sloped yard often presents a host of functional and aesthetic challenges. Turf grass struggles to establish roots on inclines steeper than a 3:1 ratio, leading to patchy, weed-choked dirt patches. During heavy rainstorms, water rushes down the incline, carrying precious topsoil with it, exposing tree roots, and depositing muddy runoff onto lower patios or into neighboring properties.
Beyond the aesthetic eyesore, unmanaged slopes pose a serious structural risk to your home's foundation and surrounding hardscapes. Transforming this unusable, erosion-prone incline into a tiered, multi-level garden oasis requires a strategic approach to hardscaping, drainage, and horticulture. This comprehensive before-and-after guide will walk you through the exact steps, materials, and costs required to terrace a steep slope into a stunning, sustainable landscape.
Phase 1: Planning and Engineering the Tiered Layout
The first step in any major slope transformation is calculating the 'rise' and 'run' of your terrain. The rise is the vertical height from the bottom to the top of the slope, while the run is the horizontal distance. To create usable, flat planting beds, you will need to design a series of retaining walls that step up the hill.
Crucial Rule of Thumb: Most local building codes require a licensed engineer's stamp for any retaining wall exceeding 3 to 4 feet in height. To avoid the expense and red tape of engineered walls, the best DIY approach is to design multiple, shorter terraced walls (e.g., three 2-foot walls instead of one 6-foot wall). This not only simplifies the permitting process but also creates a more visually appealing, cascading garden effect.
Phase 2: Choosing the Right Retaining Wall Materials
Selecting the right material dictates the longevity, cost, and aesthetic of your 'After' transformation. Below is a comparison chart of the most common retaining wall materials used in residential landscaping.
| Material | Est. Cost (Per Sq. Ft.) | Lifespan | DIY Friendliness | Aesthetic Profile |
|---|---|---|---|---|
| Treated Timber | $15 - $25 | 15 - 20 Years | High | Rustic, Natural |
| Segmental Concrete Blocks | $20 - $35 | 50+ Years | Moderate | Clean, Modern/Classic |
| Natural Boulders | $40 - $60+ | 100+ Years | Low (Requires Machinery) | Organic, Woodland |
For this transformation project, we recommend segmental concrete retaining wall blocks (such as those from Pavestone or Belgard). They feature a built-in lip or pin system that makes alignment straightforward for DIYers, and they offer unparalleled durability against moisture and soil pressure.
Phase 3: Excavation, Base Preparation, and Drainage
The most common reason retaining walls fail, bulge, or collapse is improper base preparation and neglected drainage. Hydrostatic pressure—the buildup of water-saturated soil behind the wall—can easily push over a poorly constructed barrier.
Step 1: The Base Trench
Dig a trench that is at least 6 inches deep and twice as wide as your retaining wall blocks. Fill this trench with a 4-to-6-inch layer of 3/4-inch crushed angular gravel. Do not use round pea gravel, as the round stones roll and shift under pressure. Angular gravel locks together when compacted with a mechanical plate compactor, creating a concrete-like foundation that resists frost heave.
Step 2: Installing the French Drain
Behind the first course of blocks, lay a 4-inch perforated corrugated drain pipe (such as NDS brand). This pipe must be wrapped in a non-woven geotextile fabric (like Mirafi) to prevent soil from clogging the perforations. Ensure the pipe maintains a slight downward slope (1/8 inch per foot) and 'daylights' (exits) at the lowest end of the wall to safely divert water away from the landscape.
Phase 4: Backfilling and Geogrid Reinforcement
As you stack your concrete blocks, backfill the space immediately behind the wall with more 3/4-inch crushed gravel. This creates a permeable zone that allows water to quickly drop down to your drain pipe. If your terraced walls exceed 3 feet in height, you must incorporate layers of geogrid mesh. Geogrid is laid horizontally between courses of blocks and extends back into the compacted soil, effectively tying the wall to the earth and distributing the lateral load.
The 'After' Reveal: Soil Amendment and Planting
Once the hardscaping is complete, the 'Before' and 'After' contrast truly begins to take shape. The newly created flat terraces are now ready for soil and plantings. Fill the planting beds with a high-quality amended soil mix: 60% screened topsoil, 30% organic compost, and 10% coarse sand to ensure optimal drainage.
Planting for Erosion Control
When selecting plants for a newly terraced slope, prioritize species with deep, fibrous root systems that act as a biological net, holding the soil in place. According to the National Wildlife Federation's Garden for Wildlife guidelines, utilizing native plants is the most effective way to stabilize slopes while simultaneously providing essential habitat for local pollinators and birds. Native grasses like Switchgrass (Panicum virgatum) and groundcovers like Creeping Juniper or Phlox Subulata are excellent choices that require minimal maintenance once established.
Furthermore, managing the water that falls on these new garden beds is critical. Terracing naturally slows down stormwater, allowing it to percolate into the ground rather than rushing into municipal sewers. The EPA's Green Infrastructure program highly advocates for terraced planting beds and permeable landscapes as a primary method for reducing urban runoff, filtering pollutants, and recharging local groundwater tables.
Phase 5: Mulching and Final Touches
To complete the transformation, apply a 2-to-3-inch layer of mulch to the planted terraces to retain moisture and suppress weeds. However, avoid lightweight pine bark nuggets or straw, which will float away during the first heavy rain. Instead, opt for shredded hardwood mulch or dyed cedar mulch. The shredded fibers interlock and mat together, staying firmly in place even on the edges of your retaining walls.
Project Timeline and Cost Breakdown
Transforming a 500-square-foot sloped area into a three-tiered garden is a significant but rewarding undertaking. Here is what you can expect regarding time and investment:
- DIY Timeline: 3 to 4 full weekends. (Day 1-2: Excavation and base prep; Day 3-4: Block laying and drainage; Day 5-6: Soil delivery, backfilling, and planting).
- DIY Material Cost: $2,500 to $4,000. This includes concrete blocks, gravel, drain pipe, geotextile fabric, topsoil, compost, and native plants.
- Professional Installation Cost: $8,000 to $15,000+. Hiring a licensed landscaping contractor ensures rapid completion, heavy machinery assistance, and structural warranties, though it significantly increases the overall budget.
Conclusion
The journey from a muddy, unusable hillside to a structured, blooming tiered oasis is one of the most impactful landscaping transformations a homeowner can undertake. By respecting the engineering principles of base compaction and hydrostatic drainage, and by finishing the project with deep-rooted native flora, you not only solve your erosion problems permanently but also add significant functional square footage and curb appeal to your property. Your 'After' landscape will stand as a beautiful, sustainable testament to thoughtful design and hard work.

