
Before & After: Transforming a Thirsty Lawn Into a Xeriscape
The Shift from Turf to Sustainable Landscaping
The traditional American front lawn is undergoing a massive cultural and environmental shift. For decades, a uniform carpet of Kentucky Bluegrass or Bermuda grass was the ultimate symbol of suburban curb appeal. However, as water scarcity issues rise and maintenance costs soar, homeowners are increasingly looking toward energy-efficient landscaping and drought-tolerant alternatives. According to the Environmental Protection Agency (EPA), outdoor water use accounts for nearly 30% of total household water consumption, with a significant portion lost to evaporation, wind, and runoff due to inefficient irrigation.
In this before-and-after transformation guide, we will walk through the complete overhaul of a 500-square-foot, water-wasting front lawn into a stunning, eco-friendly xeriscape. This project bridges the gap between aesthetic curb appeal, smart home integration, and long-term sustainability.
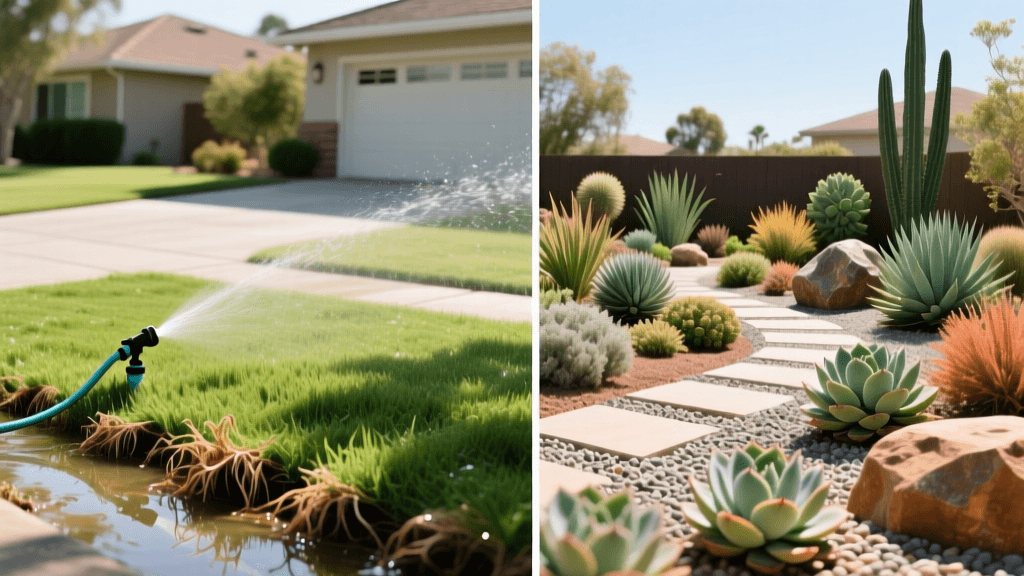
The "Before": Assessing the Thirsty Turf
Our subject property featured a classic but failing 500-square-foot front lawn. The existing grass was a patchy mix of cool-season turf and invasive crabgrass. The soil was heavily compacted clay, leading to severe water runoff onto the driveway during irrigation cycles. The homeowner was spending approximately $45 per month on water alone just to keep this small patch green during the summer, alongside weekly mowing, seasonal aeration, and chemical fertilization. The goal was to eliminate the turf, reduce water usage by 80%, and create a dynamic, multi-season landscape that requires minimal weekend maintenance.
Step-by-Step Transformation Guide
Step 1: Turf Removal and Soil Solarization
Ripping out sod with heavy machinery can destroy the existing soil structure and bring dormant weed seeds to the surface. Instead, we utilized the "sheet mulching" or "lasagna gardening" method to smother the grass while enriching the soil microbiome.
- Cardboard Layer: We laid down overlapping sheets of plain, brown corrugated cardboard (removing all tape and labels) directly over the mowed-down grass. Overlaps were at least 6 inches to prevent weeds from finding a gap.
- Compost and Mulch: Over the cardboard, we applied a 2-inch layer of organic compost, followed by 3 inches of shredded hardwood mulch.
- Timing: This process was started in early fall, allowing 6 months for the turf to decompose and the earthworms to naturally till the soil before spring planting.
Step 2: Installing Smart Drip Irrigation
Traditional spray heads are incredibly inefficient for garden beds. We capped the existing spray heads and converted the zones to a low-volume drip irrigation system controlled by a smart home hub.
- Smart Controller: We installed a Rain Bird ST8I-2.0 smart controller, which connects to local Wi-Fi and automatically adjusts watering schedules based on real-time hyper-local weather data, preventing watering during rain or high-wind events.
- Drip Lines: We used 1/2-inch poly tubing for the main lines and 1/4-inch micro-tubing for individual plant runs. Netafim drip lines with 2 GPH (gallons per hour) emitters were placed at the base of shrubs, while 1 GPH emitters were used for smaller perennials.
Step 3: Hardscaping and Pathways
To break up the visual space and provide functional access to the porch, we introduced permeable hardscaping. A dry creek bed was installed using 3-to-5-inch river rocks to capture and slowly percolate stormwater runoff from the roof gutters. For the main walkway, we excavated 4 inches of soil, laid down a heavy-duty geotextile weed barrier, and filled the space with 3/8-inch minus decomposed granite (DG). The DG was lightly moistened and compacted with a hand tamper, then treated with a permeable soil binder to lock it in place while still allowing rainwater to reach the subsoil.
Step 4: Plant Selection and Hydro-Zoning
The cornerstone of any successful xeriscape is grouping plants with similar water and sun requirements together, a practice known as hydro-zoning. We selected a mix of structural succulents, native perennials, and ornamental grasses to provide year-round visual interest.
- Focal Points: Agave parryi (Parry's Agave) was placed near the porch for dramatic architectural structure. These require virtually no supplemental water once established.
- Mid-Level Color: Salvia greggii (Autumn Sage) and Achillea millefolium (Yarrow) were planted in mass groupings. These native perennials bloom from late spring through fall and are highly attractive to pollinators. The National Wildlife Federation emphasizes that replacing turf with native flowering plants is one of the most effective ways to restore local biodiversity and support declining bee and butterfly populations.
- Texture and Groundcover: Festuca glauca (Blue Fescue) and creeping Sedum rupestre were used to fill gaps, suppress weeds, and provide a soft, grass-like texture without the water demands of traditional turf.
The "After": Cost Breakdown and ROI
While the initial investment for a xeriscape transformation is higher than simply re-sodding a lawn, the return on investment (ROI) is realized quickly through slashed water bills and eliminated maintenance costs. Below is a comparison of the 500-square-foot project over a three-year period.
| Category | Before (Traditional Turf) | After (Xeriscape) |
|---|---|---|
| Initial Materials | $150 (Sod & Soil Prep) | $850 (Plants, DG, Drip, Mulch) |
| Initial Labor/Installation | $300 | $450 (DIY/Helper) |
| Year 1 Water Cost | $350 | $90 (Establishment watering) |
| Year 2 Water Cost | $350 | $45 |
| Year 3 Water Cost | $350 | $25 (Deep summer soaks) |
| Annual Maintenance | $250 (Mowing, Fertilizer, Aeration) | $50 (Pruning, Mulch refresh) |
| 3-Year Total Cost | $2,450 | $1,810 |
By year three, the xeriscape has already paid for itself, and the homeowner saves over $500 annually in water and maintenance costs moving forward. Furthermore, many local municipalities offer "Cash for Grass" rebates, which can offset the initial material costs by up to $2 per square foot of removed turf.
Energy Efficiency and Microclimate Benefits
The transformation extended beyond water conservation into energy-efficient landscaping. On the west-facing side of the garden, we planted a deciduous Lagerstroemia indica (Crape Myrtle). During the blazing summer months, the tree's canopy casts a vital shadow over the front living room windows, reducing solar heat gain. According to the U.S. Department of Energy, strategic placement of shade trees can reduce a home's air conditioning costs by up to 25%. In the winter, the tree drops its leaves, allowing passive solar heating to warm the home's interior.
"Transforming your front yard isn't just about saving water; it's about redefining your relationship with your outdoor space. A well-designed xeriscape becomes a living gallery that evolves with the seasons, rather than a static carpet that demands constant upkeep."
Final Thoughts on the Transformation
The "after" reveals a vibrant, textural, and deeply sustainable landscape. The dull, flat green of the failing lawn has been replaced by the silvery-blues of the fescue, the fiery reds of the autumn sage, and the structural elegance of the agave. The smart drip system operates silently and efficiently in the early morning hours, entirely hidden beneath the mulch. By embracing the before-and-after process of turf removal and xeriscaping, homeowners can dramatically increase their property's resilience, lower their carbon and water footprints, and reclaim their weekends from the tyranny of the lawnmower.

