
Gardening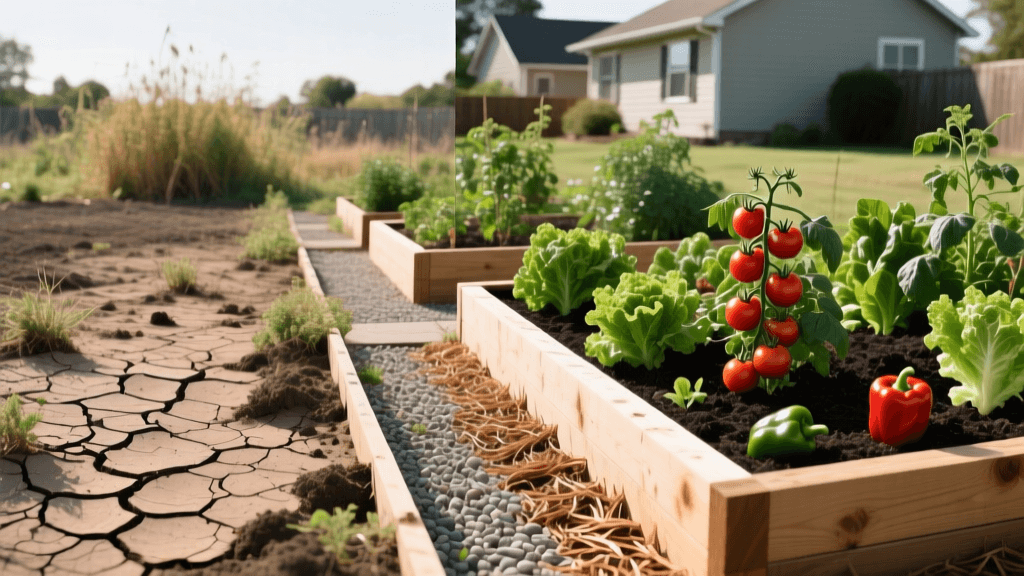
Transforming Clay Soil Into A Thriving Raised Bed Garden
The 'Before': A Compacted Clay Nightmare
Three years ago, my backyard was a barren expanse of heavy, compacted clay. Every time it rained, the low-lying areas turned into shallow ponds that took days to drain. When the summer sun finally baked the moisture away, the ground hardened into a concrete-like crust that snapped the blades of my garden tiller. My initial attempts at in-ground vegetable gardening were disastrous. Tomatoes suffered from severe blossom end rot due to poor calcium mobility, carrots grew into stunted, forked nubs, and the sheer physical labor of weeding and turning the soil left me exhausted. The 'before' photos of this space show a patchy, weed-choked lot with stunted, yellowing plants struggling to survive in an anaerobic environment.
The Assessment: Why In-Ground Amendment Wasn't Enough
Before deciding on a transformation strategy, I conducted a simple percolation test. I dug a 12-inch deep hole and filled it with water. It took nearly 48 hours for the water to fully drain—a clear indicator of severe drainage issues. According to the Environmental Protection Agency (EPA), while adding organic matter like compost is essential for long-term soil health and structure, amending heavy native clay on a large scale requires massive volumes of organic material and years of consistent effort to achieve proper tilth.
Because I wanted a productive vegetable garden immediately, I realized that attempting to rototill hundreds of pounds of gypsum and compost into the native clay was a losing battle. The roots of my crops would still hit the hardpan layer just inches below the surface. The solution was clear: build upwards. Raised beds would allow me to bypass the native clay entirely, control the soil texture, and guarantee perfect drainage from day one.
The Transformation Plan: Raised Beds vs. In-Ground
To justify the initial investment of time and money, I created a comparison chart weighing the immediate impact of raised beds against continuing to fight the in-ground clay.
| Feature | In-Ground Clay | Raised Bed Gardening |
|---|---|---|
| Drainage | Poor (Puddling, anaerobic) | Excellent (Custom soil mix) |
| Spring Soil Temp | Cold, slow to warm up | Warms 2-3 weeks faster |
| Weed Pressure | High (Bindweed, Nutsedge) | Low (Weed-free imported soil) |
| Soil Compaction | High (Foot traffic, rain) | None (No stepping in beds) |
| Initial Labor | Extreme (Tilling, amending) | Moderate (Assembly, filling) |
As noted by The Old Farmer's Almanac, raised beds are particularly advantageous in areas with poor native soil, as they allow gardeners to create an ideal, loamy environment tailored specifically to the needs of vegetable crops.
The 'During': Step-by-Step Construction
Step 1: Site Prep and Sheet Mulching
In early April, I mowed the existing patchy grass as short as possible. Instead of back-breaking sod removal, I utilized a sheet mulching technique. I laid down overlapping layers of plain, uncoated corrugated cardboard directly over the grass and weeds, wetting it thoroughly with a hose. This cardboard layer serves two purposes: it smothers the existing vegetation by blocking sunlight, and it creates a biodegradable barrier that prevents deep-rooted perennial weeds from invading the new beds while allowing earthworms to migrate upward as the cardboard breaks down.
Step 2: Building the Cedar Frames
I opted for untreated, rough-sawn cedar due to its natural rot resistance and longevity (lasting 10-15 years without chemical leaching). The dimensions chosen were 4 feet wide by 8 feet long, and 24 inches deep. The 4-foot width is crucial, as it allows you to reach the center of the bed from either side without ever stepping on the soil, thereby preventing compaction. The 24-inch depth provides ample room for deep-rooting crops like tomatoes and parsnips to thrive, even with the cardboard barrier at the bottom.
I anchored the corners using 4x4 cedar posts cut into 2-foot lengths, driving them partially into the native clay and screwing the 2x12 cedar boards into them using 3.5-inch exterior-grade wood screws.
Step 3: The Ultimate Soil Mix
A 4x8 bed that is 2 feet deep holds roughly 64 cubic feet of soil (about 2.4 cubic yards). To ensure a light, moisture-retentive, and nutrient-dense environment, I adapted the famous 'Mel's Mix' formula:
- 1/3 Coarse Vermiculite: For aeration and moisture retention.
- 1/3 Coconut Coir: A sustainable alternative to peat moss that holds water beautifully and resists compaction.
- 1/3 High-Quality Compost: I sourced a blend of mushroom compost and local leaf mold to provide a broad spectrum of nutrients and beneficial microbes.
I mixed the ingredients on a tarp in batches before wheelbarrowing them into the beds, watering lightly between layers to ensure the coir was fully expanded and the mix was evenly moist.
Companion Planting in the New Beds
With the pristine soil in place, I implemented a strategic companion planting layout to maximize yield and deter pests naturally. On the north-facing side of the bed (to prevent shading smaller plants), I installed a heavy-duty cattle panel trellis for indeterminate 'Cherokee Purple' tomatoes and 'Sugar Snap' peas. In the center, I planted bush beans, which fix nitrogen in the soil, benefiting the heavy-feeding tomatoes. Finally, I bordered the entire perimeter of the raised bed with French Marigolds. The marigolds not only provided a vibrant 'after' visual contrast but also released alpha-terthienyl from their roots, a compound known to suppress harmful root-knot nematodes in the soil.
The 'After': First Season Results and Yield
Looking at the 'after' photos from late August, the transformation is almost hard to believe. Where there was once a cracked, waterlogged clay pit, there now stood two lush, towering raised beds bursting with life. The drainage was flawless; even during a week of heavy summer downpours, the beds absorbed the rain effortlessly, and the soil surface remained friable and loose.
The yield was staggering. The deep, uncompacted soil allowed the tomato roots to establish massively, resulting in a 40% increase in fruit production compared to my previous in-ground attempts. The carrots, which had previously hit the clay hardpan and deformed, grew straight, deep, and sweet in the loose vermiculite-coir mix. Best of all, the maintenance was a fraction of what it used to be. Weeds were virtually non-existent thanks to the cardboard barrier and the weed-free compost, and watering was reduced because the coir and vermiculite held moisture in the root zone for days.
Cost Breakdown and ROI
While the upfront cost of raised beds is higher than in-ground gardening, the return on investment in terms of yield, saved labor, and plant health is substantial. Below is the exact cost breakdown for one 4x8x2 cedar raised bed, fully populated with the custom soil mix.
| Material | Quantity | Estimated Cost |
|---|---|---|
| 2x12 Untreated Cedar (8ft lengths) | 4 boards | $110.00 |
| 4x4 Cedar Corner Posts (4ft lengths) | 2 posts (cut in half) | $35.00 |
| Exterior Wood Screws (3.5 inch) | 1 box | $15.00 |
| Bulk Mushroom Compost | 1 cubic yard | $45.00 |
| Coconut Coir Bricks | 10 bricks (expands to ~15 cu ft) | $40.00 |
| Coarse Vermiculite | 4 cu ft bag | $35.00 |
| Corrugated Cardboard | Recycled (Free) | $0.00 |
| Total Estimated Cost | $280.00 |
Maintenance and Long-Term Soil Health
The beauty of this transformation is that the hard work is entirely front-loaded. In the 'after' years, maintenance is incredibly simple. Because the soil structure is already optimized, I never need to till or turn the beds. Each spring, I simply top-dress the beds with a 2-inch layer of fresh compost to replenish the nutrients consumed by the previous year's crops. The cardboard at the bottom will have completely decomposed by year two, allowing deep-rooting plants and native earthworms to seamlessly integrate the raised bed with the subsoil below, gradually improving the native clay over time through natural biological action.
If you are struggling with a backyard that looks more like a brickyard than a garden, stop fighting the clay. Embrace the vertical space, build your beds, and experience the profound before-and-after transformation that comes with taking control of your soil environment.

