
Gardening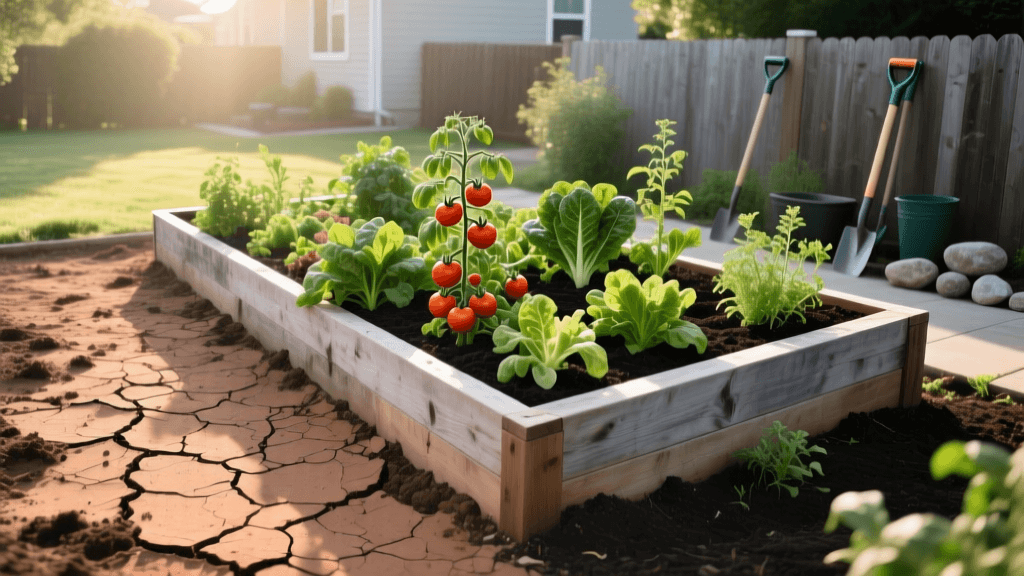
Transforming Dead Clay Into A Thriving Raised Bed Garden
The 'Before': Diagnosing a Compacted Clay Nightmare
Every passionate home gardener has encountered the dreaded 'concrete' soil. Before this transformation, the 20-by-30-foot backyard patch in question was a barren, compacted clay wasteland. During the spring, it turned into a waterlogged swamp that drowned plant roots and fostered fungal diseases. By mid-summer, the clay baked into rock-hard, cracked plates that repelled water and broke shovel blades. Native earthworms were virtually nonexistent, and the only things that thrived were stubborn, deep-rooted weeds like bindweed and thistle.
Attempting to amend heavy clay in-place is a multi-year battle that often yields frustrating results. According to the United States Department of Agriculture (USDA), healthy soil requires a delicate balance of pore space for oxygen and water infiltration—something heavily compacted clay inherently lacks. Rather than fighting a losing battle against the native soil profile, the decision was made to build upward. The goal was to completely bypass the native clay and construct a thriving, high-yield raised bed vegetable garden. This is the story of that dramatic before-and-after transformation.
Phase 1: Site Preparation and Sheet Mulching
The first step in any major garden transformation is clearing the canvas. Tilling the clay was strictly avoided; tilling brings dormant weed seeds to the surface and destroys the fragile, albeit struggling, soil structure beneath. Instead, we utilized a no-dig sheet mulching technique to smother the existing weeds and grass.
We mowed the area as short as possible and laid down overlapping layers of heavy-duty, uncoated corrugated cardboard. This was sourced for free from local appliance stores. The cardboard was wetted thoroughly to initiate the decomposition process and weighed down with a thin layer of wood chips. Over the next six weeks, the cardboard blocked sunlight, effectively killing the vegetation underneath while allowing beneficial microbes and earthworms to begin breaking down the organic matter at the soil interface.
Phase 2: Constructing the Cedar Raised Beds
With the site prepped, the structural transformation began. We designed four raised beds, each measuring 4 feet wide by 8 feet long, with a depth of 11 inches. The 4-foot width is crucial, as it allows the gardener to reach the center of the bed from either side without ever stepping on the soil, thus preventing future compaction.
For the materials, we chose rough-sawn Western Red Cedar. Cedar is naturally resistant to rot and decay, making it an ideal, chemical-free choice for edible gardens. The beds were constructed using two stacked 2x6x8 cedar boards per side, joined at the corners with heavy-duty galvanized steel brackets and 3-inch exterior deck screws.
- Lumber Cost: $160 per bed (four 2x6x8 cedar boards at $40 each)
- Hardware Cost: $30 per bed (corner brackets and exterior screws)
- Total Infrastructure Cost: $190 per bed ($760 for all four)
The visual shift was immediate. What was once a flat, muddy expanse was now defined by beautiful, geometric wooden structures that promised order and productivity.
Phase 3: The Ultimate Soil Recipe for Transformation
The most critical element of the 'after' state is the soil. Filling raised beds with native dirt or cheap 'topsoil' from big-box stores often leads to severe drainage issues and nutrient deficiencies. We engineered a custom, lightweight, and nutrient-dense soil mix specifically designed for vegetable production. The Environmental Protection Agency (EPA) highlights that incorporating high-quality compost into garden beds not only improves soil structure and moisture retention but also introduces vital microorganisms that suppress plant diseases.
Each 4x8 bed, at an 11-inch depth, requires approximately 30 cubic feet of soil. We mixed our components directly in a wheelbarrow before filling the beds to ensure even distribution.
| Soil Component | Volume Percentage | Primary Purpose | Estimated Cost (Per 4x8 Bed) |
|---|---|---|---|
| High-Quality Topsoil | 40% | Provides base structure and essential minerals | $45.00 |
| Organic Compost | 30% | Supplies slow-release nutrients and beneficial microbes | $60.00 |
| Coconut Coir | 20% | Retains moisture while preventing soil compaction | $35.00 |
| Coarse Vermiculite | 10% | Ensures aeration and improves drainage | $25.00 |
Transforming a barren clay patch into a productive garden is not about fighting your native soil; it is about building above it and fostering a completely new, controlled ecosystem.
Phase 4: Planting and Companion Strategies
With the beds filled, the true 'after' transformation began with planting. Because the custom soil mix was loose, friable, and rich in organic matter, we were able to plant intensively using the square-foot gardening method.
We implemented strict companion planting strategies to maximize the health of the new ecosystem. Indeterminate cherry tomatoes were planted alongside sweet basil and French marigolds. The basil helps to repel specific insect pests and is believed to improve the flavor of the tomatoes, while the marigolds secrete compounds from their roots that deter root-knot nematodes. Deep-rooted daikon radishes were planted in the empty corners to act as 'tillage radishes,' naturally aerating the lower layers of the new soil mix as they grew and eventually decomposed.
The 'After': One Season Later
The contrast between the 'before' and 'after' states at the end of the first growing season was nothing short of spectacular. Where water once pooled for days after a heavy rain, the raised beds now drained perfectly within hours, retaining just enough moisture in the coir and compost to keep the plants hydrated during dry spells.
The yields were staggering. The four beds produced over 150 pounds of tomatoes, dozens of cucumbers, and a continuous harvest of leafy greens and root vegetables. The soil surface, which started as a uniform brown mix, was now covered in a living mulch of clover and decomposing leaves, teeming with earthworms that had migrated up from the native clay layer below the cardboard barrier.
According to research published by Oregon State University Extension, raised beds can extend the growing season by warming up faster in the spring and provide significantly higher yields per square foot compared to traditional in-ground row gardening, especially in areas with poor native soils. Our transformation perfectly mirrored this data. The initial investment of roughly $1,100 for materials and soil paid for itself in the first year through grocery savings, but the true ROI was the creation of a beautiful, functional, and deeply rewarding outdoor living space. The dead clay nightmare was officially a thing of the past.

