
Gardening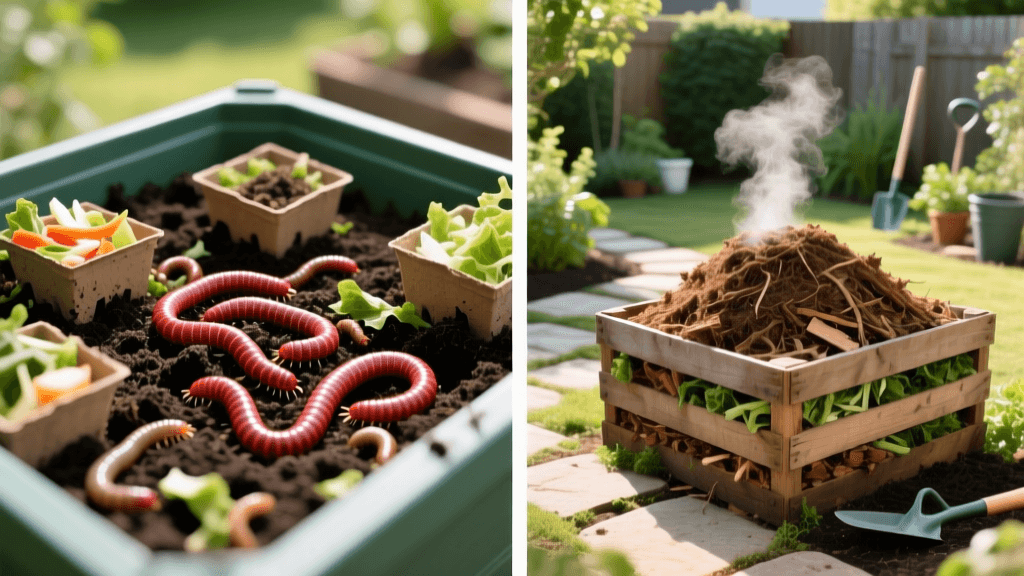
Vermicomposting vs Traditional Composting: Which is Best?
The Foundation of Garden Soil Health
Every thriving vegetable patch and vibrant flower bed begins beneath the surface. Soil health is the undisputed foundation of successful gardening, and incorporating high-quality compost is one of the most effective ways to build fertile, well-draining, and biologically active soil. Compost introduces essential macro and micronutrients, improves soil structure, and fosters a diverse microbiome that protects plant roots from disease. However, not all composting methods are created equal. For home gardeners, the two most prominent methods are traditional composting (hot and cold) and vermicomposting. Choosing the right method depends on your available space, climate, budget, and the volume of organic waste your household generates.
According to the Environmental Protection Agency (EPA), composting organic waste not only enriches soil but also significantly reduces the amount of methane-producing waste sent to landfills. In this comprehensive guide, we will break down the mechanics, costs, and practical applications of vermicomposting versus traditional composting to help you decide which soil-building strategy is best for your garden.
Traditional Composting: Hot and Cold Methods
Traditional composting relies on naturally occurring bacteria, fungi, and macroorganisms to break down organic matter. This method is generally divided into two categories: cold (passive) composting and hot (active) composting.
Cold Composting
Cold composting is the easiest method for beginners. You simply pile yard waste, leaves, and kitchen scraps in a designated corner of your yard or inside a stationary bin. Over 12 to 24 months, the materials slowly decompose. The primary drawback is that the pile never reaches high enough temperatures to kill weed seeds or harmful plant pathogens. It is an excellent, low-effort way to recycle autumn leaves into valuable leaf mold, but it requires patience.
Hot Composting
Hot composting is a managed, accelerated process. By maintaining a precise Carbon-to-Nitrogen (C:N) ratio of roughly 30:1—combining 'browns' like dried leaves and cardboard with 'greens' like grass clippings and vegetable scraps—you create an environment where thermophilic bacteria thrive. A properly managed hot compost pile will reach internal temperatures between 130°F and 160°F. This heat is crucial because it destroys weed seeds and soil-borne diseases. To maintain these temperatures, the pile must be at least one cubic yard (3x3x3 feet) and turned regularly with a pitchfork or compost aerator to introduce oxygen. Products like the Envirocycle Tumbler (approximately $130) or the FCMP Outdoor Dual-Chamber Tumbler (approximately $80) make turning hot compost significantly easier for urban and suburban gardeners.
Vermicomposting: Harnessing the Power of Worms
Vermicomposting utilizes specific species of earthworms—most commonly the Red Wiggler (Eisenia fetida)—to consume and digest organic waste. Unlike traditional composting, which relies on heat generated by bacteria, vermicomposting relies on the digestive tracts of worms to break down matter. The end product includes worm castings (vermicompost) and 'worm tea' (leachate), both of which are incredibly potent, nutrient-dense soil amendments.
Research from the University of Minnesota Extension highlights that worm castings contain higher levels of available nitrogen, phosphorus, and potassium compared to traditional compost, alongside beneficial plant growth hormones. Vermicomposting is typically done in enclosed, shallow bins, making it the premier choice for apartment dwellers, indoor gardeners, or those with limited outdoor space. To start, you need a specialized bin with ventilation and drainage, bedding material like shredded newspaper or coconut coir, and a starter population of worms. A pound of Red Wigglers (roughly 1,000 worms) from a reputable supplier like Uncle Jim's Worm Farm costs around $45 and can consume roughly half a pound of food scraps per day.
Comparison Chart: Traditional vs. Vermicomposting
Understanding the logistical differences between these methods will help you align your composting strategy with your lifestyle and gardening goals. Review the structured comparison below:
| Feature | Traditional (Hot) | Traditional (Cold) | Vermicomposting |
|---|---|---|---|
| Space Required | Minimum 3x3x3 ft outdoor area | Any outdoor corner or bin | Small indoor bin or shaded patio |
| Time to Harvest | 2 to 4 months | 12 to 24 months | 3 to 6 months |
| Initial Cost | $0 (pallets) to $150 (tumbler) | $0 to $80 (stationary bin) | $50 to $120 (bin + worms) |
| Temperature Range | 130°F - 160°F (internal) | Ambient outdoor temp | 55°F - 77°F (ambient) |
| Weed Seed Destruction | Yes (due to high heat) | No | No (seeds may pass through worms) |
| Odor Risk | Low (if turned regularly) | Low to Moderate | Low (if not overfed) |
| Best For | Large yards, heavy yard waste | Low-effort leaf recycling | Small spaces, kitchen scraps, indoor use |
Troubleshooting Common Soil and Compost Issues
Regardless of the method you choose, maintaining soil health through composting requires observation and occasional adjustments. Here is how to troubleshoot the most common issues encountered by home gardeners:
- The Pile Smells Like Ammonia: This indicates an excess of nitrogen-rich 'greens'. The microbial activity is producing ammonia gas because there is not enough carbon to balance the diet. Solution: Immediately mix in high-carbon 'browns' such as shredded corrugated cardboard, dry autumn leaves, or sawdust. Aim for a 3:1 ratio of browns to greens by volume.
- The Pile Smells Like Rotten Eggs (Sulfur): This is a sign of anaerobic conditions, meaning the pile is compacted, too wet, and lacking oxygen. Solution: Turn the pile vigorously with a pitchfork or compost crank to introduce air. If it is waterlogged, add dry browns to absorb excess moisture.
- Fruit Flies in the Worm Bin: Fruit flies are attracted to exposed, fermenting food scraps. Solution: Always bury food scraps at least 2 inches deep beneath the worm bedding. You can also place a damp layer of burlap or a thick layer of dry shredded newspaper over the top of the bedding to create a physical barrier.
- Worms Trying to Escape the Bin: Red wigglers will attempt to flee if their environment becomes hostile—usually due to high acidity, extreme moisture, or lack of food. Solution: Check the pH. Adding a handful of crushed eggshells or agricultural lime can buffer the acidity. Ensure the drainage holes are clear so the bin does not flood.
Actionable Steps to Start Your Compost Journey Today
Ready to improve your garden soil? Follow these actionable steps based on your chosen method.
Starting a Traditional Hot Compost Pile
- Build the Base: Start with a 4-inch layer of bulky twigs or straw at the bottom of your 3x3 ft enclosure to ensure drainage and airflow.
- Layer the Materials: Alternate 4-inch layers of 'browns' (dry leaves, shredded paper) and 'greens' (grass clippings, vegetable peels). Water each layer lightly as you build; the pile should feel like a wrung-out sponge.
- Inoculate (Optional): To speed up the initial heating phase, sprinkle a commercial activator like Espoma Organic Traditions Compost Starter ($15) or a few shovelfuls of finished compost or native garden soil over the layers to introduce beneficial microbes.
- Monitor and Turn: Insert a long-stemmed compost thermometer into the center of the pile. When the temperature peaks and begins to drop (usually after 7 to 10 days), turn the pile, moving the outer materials to the center. Repeat this process every 1-2 weeks until the pile no longer heats up and the material looks dark and crumbly.
Starting an Indoor Vermicompost Bin
- Prepare the Bedding: Shred non-glossy newspaper or soak a block of coconut coir in water. Squeeze out excess moisture and fluff it into your worm bin to create a 3-to-4-inch deep bedding layer.
- Introduce the Worms: Gently place your pound of Red Wigglers on top of the bedding. Leave the lid off and shine a bright light on the bin for an hour; the worms are photophobic and will burrow down into the bedding to escape the light.
- First Feeding: Wait 3 to 5 days before feeding to allow the worms to acclimate. Start with a small amount of soft scraps (e.g., melon rinds, coffee grounds, crushed eggshells). Bury the food in one corner of the bin and cover it completely with bedding.
- Harvesting: After 3 to 6 months, the bedding will be mostly converted into dark, rich castings. To harvest, push all the finished compost to one side of the bin and add fresh bedding and food to the empty side. Over the next two weeks, the worms will migrate to the new food source, allowing you to scoop out the pure castings to top-dress your houseplants or mix into your raised garden beds.
Conclusion: Feeding the Soil to Feed the Plants
Whether you opt for the high-heat, high-volume approach of traditional hot composting or the space-efficient, nutrient-dense method of vermicomposting, the ultimate goal remains the same: building resilient, biologically diverse soil. By recycling your household and yard waste, you close the nutrient loop in your garden, reduce your reliance on synthetic fertilizers, and cultivate a healthier environment for your plants to thrive. Evaluate your space, assess your waste output, and choose the composting method that seamlessly integrates into your gardening routine. Your soil—and your harvest—will thank you.
For more advanced techniques on soil amendments and cover cropping, consult local resources such as the University of California Agriculture and Natural Resources composting guidelines, which offer region-specific advice for optimizing soil health in diverse climates.

