
Grass Types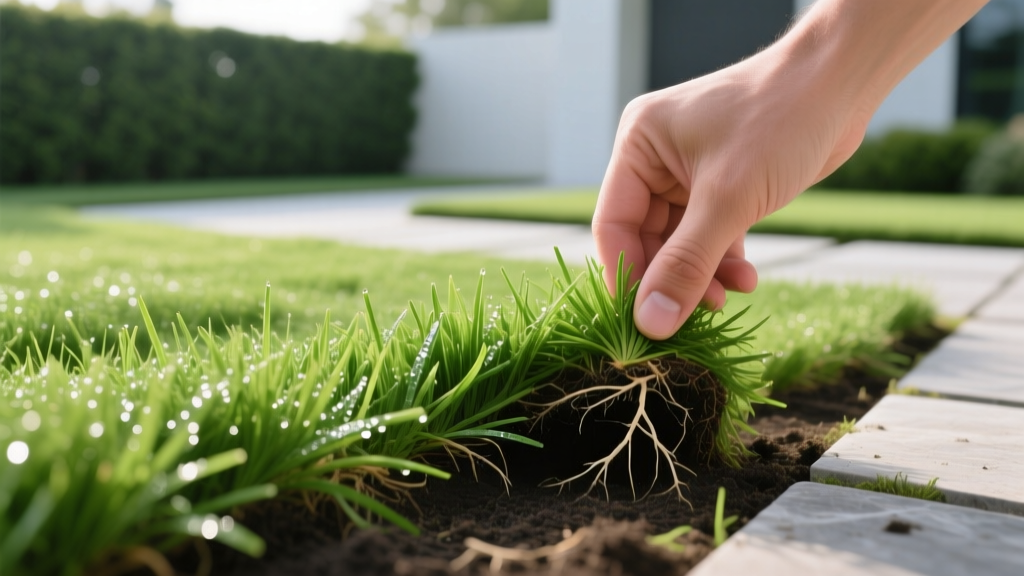
When Can You Mow New Sod? The Tug Test & First Cut Protocol
The Calendar vs. The Root System: Why Days Don't Matter
Homeowners frequently ask, "When can you mow new sod?" and expect a simple answer like "14 days." While 10 to 14 days is the industry average for initial root anchorage, relying strictly on a calendar is the leading cause of first-mow disasters. Sod establishment is dictated by soil temperature, moisture levels, and grass species metabolism—not an arbitrary countdown. Mowing before the stolons and rhizomes have physically penetrated the subgrade interface will result in the mower tires tearing the sod seams, lifting the slabs, and destroying the nascent root hairs.
According to the University of Minnesota Extension, the transition from shallow, frequent watering to deeper, less frequent irrigation is the primary trigger for root growth. Until the roots have physically locked the sod mat to the soil beneath, the turf is essentially a heavy, wet carpet resting on dirt. To determine the exact moment your sod is ready for its first cut, you must abandon the calendar and rely on physical verification.
The "Tug Test" Framework: Verifying Sod Anchorage
The tug test is a non-destructive, manual assessment of root tensile strength. Perform this test in at least four different zones of your lawn, paying special attention to shaded areas and sloped sections, which establish roots at different rates.
- Locate a Seam: Find where two rolls or slabs of sod meet. The seams are the weakest points and the most vulnerable to mower tire damage.
- Grasp the Turf: Pinch a 2x2 inch section of grass blades and the underlying thatch/mat firmly between your thumb and index finger.
- Apply Upward Force: Pull straight up with approximately 2 to 3 pounds of force (roughly the effort required to lift a full 1-liter water bottle).
- Evaluate Resistance: If the soil resists and you feel the distinct tension of root hairs stretching, the sod is anchored. If the slab lifts cleanly, exposing the bare subgrade or netting, the roots have not yet penetrated. Wait another 48 to 72 hours and test again.
⚠️ Warning: The Netting Trap
Many commercial sod farms use biodegradable plastic netting to hold the root zone together during harvest. If your tug test lifts the sod and you see white or green plastic mesh underneath, the roots have only grown into the netting, not the subgrade. Mowing now will rip the entire network of seams apart. You must wait until roots bypass the netting and bite into the native soil.
Establishment Timelines by Grass Species
While the tug test is the ultimate authority, understanding the biological baseline of your specific grass species helps set realistic expectations. Warm-season grasses generally establish faster in peak summer heat, while cool-season grasses require moderate temperatures to push roots.
| Grass Species | Avg. Days to First Mow | Optimal Soil Temp | Target Root Depth |
|---|---|---|---|
| Bermudagrass | 7 - 10 Days | 70°F - 85°F | 1.5 - 2.0 inches |
| Zoysiagrass | 14 - 21 Days | 75°F - 90°F | 1.0 - 1.5 inches |
| Kentucky Bluegrass | 14 - 18 Days | 60°F - 75°F | 2.0 - 2.5 inches |
| Tall Fescue | 12 - 16 Days | 60°F - 75°F | 2.5 - 3.0 inches |
| St. Augustine | 10 - 14 Days | 75°F - 90°F | 1.5 - 2.0 inches |
Data compiled from the NC State University Extension indicates that Zoysiagrass exhibits the slowest initial root penetration due to its dense, slow-growing rhizome structure, requiring patience to avoid catastrophic seam tearing during the first mow.
Precision Mower Setup for the First Cut
Once the tug test confirms anchorage, your mower must be configured to minimize upward lift and lateral shear forces. The Clemson University Home & Garden Information Center emphasizes that the first mow is about removing excess leaf blade to encourage lateral tillering, not achieving a manicured golf-course finish.
Deck Height and Blade Dynamics
Set your mower deck one full notch higher than your target maintenance height. For Tall Fescue, this means a deck height of 3.5 to 4.0 inches. For Bermuda, set it to 2.0 inches. Never remove more than 1/3 of the leaf blade tissue during the first cut. If the sod has grown to 5 inches, and your target is 3 inches, do not cut it down to 3 inches immediately. Cut it to 4 inches, wait three days, and bring it down to 3 inches on the second mow.
Blade Sharpness is Non-Negotiable: A dull mower blade does not cut; it shreds and pulls. A dull blade exerts up to 30% more upward lift force on the grass canopy. On newly rooted sod, this vacuum effect can literally pull the shallow roots out of the subgrade. Sharpen your blade or install a fresh one before the first mow.
Weight and Turning Radius Constraints
Avoid heavy commercial zero-turn mowers for the first cut. A 54-inch zero-turn can weigh over 800 pounds, exerting 12+ PSI on the turf, which causes severe subgrade rutting and shears the new roots when the caster wheels pivot. Use a lightweight, 21-inch rotary push mower (typically 60 to 85 lbs). When turning at the end of a row, do not pivot on the turf. Lift the front wheels slightly or execute wide, looping turns on a driveway or sidewalk to prevent twisting the sod mat.
The 48-Hour Hydration Shift Protocol
The most overlooked variable in first-mow timing is soil moisture. If you mow immediately after your standard establishment watering routine, the mower wheels will sink into the saturated subgrade, leaving deep ruts and compacting the soil.
- 48 Hours Pre-Mow: Shift your irrigation from frequent, shallow cycles (e.g., three 5-minute sessions daily) to a single, deeper watering delivering 0.25 inches of moisture. This allows the top 0.5 inches of the sod mat and the seam lines to dry out and firm up, creating a load-bearing surface for mower tires.
- The Morning of the Mow: Do not water. Mow in the late morning after the dew has burned off but before the heat of the day stresses the freshly cut leaf tissue.
- Post-Mow Hydration: Within two hours of completing the first cut, apply 0.2 inches of water to soothe the cut blades and replace transpiration loss. Resume your standard deep-and-infrequent watering schedule the following day.
Troubleshooting First-Cut Disasters
Even with careful planning, edge cases occur. Here is how to diagnose and fix common first-mow failures:
Symptom: Sod seams are lifting or tearing at the edges.
Cause: Mower tires are tracking directly over the seams, or the soil was too wet.
Fix: Stop immediately. Adjust your mowing pattern so the wheels run parallel to, but not directly on, the seams. Allow the lawn to dry for an additional 24 hours before attempting again.
Symptom: Grass tips are frayed, white, and ragged after cutting.
Cause: Dull mower blade or cutting wet grass.
Fix: The white tips will increase transpiration and invite fungal pathogens like Pythium blight. Sharpen the blade immediately and apply a preventative systemic fungicide (such as Azoxystrobin) if humidity is above 80%.
Symptom: Visible wheel ruts in the subgrade.
Cause: Mower too heavy, or subgrade was over-saturated prior to installation.
Fix: Do not attempt to roll or tamp the ruts while the sod is young, as this will crush the delicate new root hairs. Allow the soil to dry completely, then use a garden fork to gently aerate the compacted rut lines through the sod mat to relieve pressure.
Expert Insight: The first mow is a stress event. To mitigate shock, avoid applying fast-release synthetic nitrogen fertilizers within 5 days before or after the first cut. Instead, rely on the starter fertilizer applied during installation, or use a gentle, kelp-based biostimulant to promote root recovery and reduce oxidative stress on the cut leaf tissue.

