
Landscaping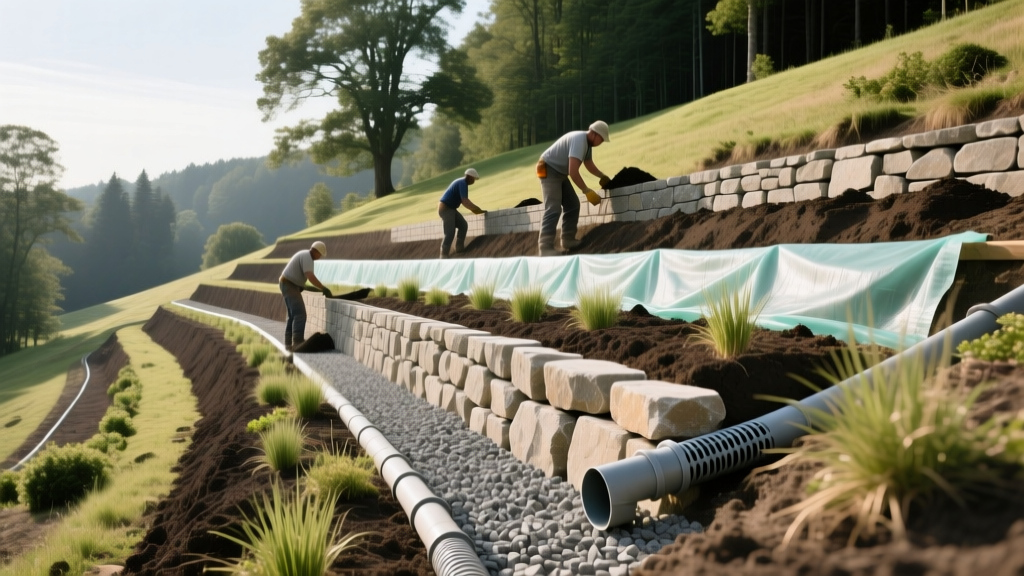
Landscaping for Hillsides: Step-by-Step Terracing and Drainage Guide
Successful landscaping for hillsides requires balancing aesthetic vision with structural engineering. Unmanaged slopes suffer from soil creep, hydrostatic pressure buildup, and topsoil washout during heavy precipitation. Transforming a steep incline into usable, stable outdoor living space demands precise grading, reinforced retaining structures, and strategic subsurface drainage. This guide details the exact specifications, materials, and construction sequences required to engineer a permanent hillside landscape.
Assessing Slope Geometry and Soil Bearing Capacity
Before moving a single yard of dirt, you must calculate the slope ratio and understand the native soil composition. The industry standard for unreinforced soil stability is the 3:1 rule: for every three feet of horizontal distance, the slope should rise no more than one foot vertically. Slopes steeper than 3:1 require mechanical reinforcement or terracing.
Field Percolation Test for Drainage Planning:
- Dig a test hole 12 inches deep and 6 inches wide on the hillside.
- Fill the hole with water and let it drain completely to saturate the soil.
- Refill the hole and measure the water level drop after 15 minutes.
- Interpretation: A drop of less than 1 inch indicates heavy clay (requires aggressive French drainage). A drop of 1-4 inches indicates loam (standard drainage). A drop over 4 inches indicates sandy soil (high erosion risk, requires deep-rooted planting and check dams).
According to the USDA Natural Resources Conservation Service, identifying the soil texture class is critical because clay soils expand when wet, exerting massive lateral earth pressure against retaining structures, while sandy soils lose cohesion and wash out from beneath wall footings.
Engineering Retaining Walls for Hillside Stability
For terracing steep yards, Segmental Retaining Walls (SRWs) made of interlocking concrete blocks are the most practical choice for residential applications. They offer flexibility, built-in drainage gaps, and compatibility with geogrid reinforcement. The National Concrete Masonry Association (NCMA) mandates specific base and reinforcement protocols for SRWs to prevent rotational failure.
| Material Type | Max Unreinforced Height | Base Preparation | Estimated Cost (2026) |
|---|---|---|---|
| Segmental Concrete (SRW) | 4 feet (with geogrid: 15+ ft) | 6-8 in. compacted 3/4-in. angular gravel | $25 - $40 per sq. ft. |
| Poured Concrete | 10 feet | 12 in. reinforced concrete footing below frost line | $60 - $90 per sq. ft. |
| Treated Timber | 3 feet | 4 in. compacted gravel with deadman anchors | $15 - $25 per sq. ft. |
The Geogrid Imperative
Any SRW exceeding 3 feet in height, or supporting a surcharge load (like a driveway or patio) at the top of the slope, requires biaxial geogrid reinforcement. Geogrid layers are placed between block courses and extended back into the compacted soil. The length of the geogrid must be at least 60% of the wall's total height. For a 5-foot wall, the geogrid must extend 3 feet back into the retained soil mass, creating a unified, reinforced earth structure that resists lateral pressure.
Hydrostatic Pressure and French Drain Specifications
Water is the primary enemy of hillside landscaping. When soil behind a retaining wall becomes saturated, hydrostatic pressure can increase by up to 30%, easily pushing a poorly drained wall outward. You must install a continuous French drain system directly behind the wall base.
Critical Warning: Fabric Selection
Never use standard woven landscape fabric to wrap your French drain aggregate. Woven fabrics trap fine silt and clay particles, leading to complete clogging within 2 to 3 years. You must use non-woven geotextile fabric (minimum 4 oz per square yard) which allows water to pass through while filtering out particulates.
Drainage Assembly Specifications:
- Pipe: Use rigid SDR 35 PVC or rigid corrugated pipe with a smooth interior (minimum 4-inch diameter). Avoid flexible black corrugated pipe; the ridges trap sediment and slow water velocity.
- Aggregate: Surround the pipe with 3/4-inch washed, angular gravel. Do not use rounded river rock, as it shifts and settles; angular gravel locks together to maintain void spaces for water flow.
- Weeep Holes: Ensure the bottom course of your retaining wall has open weep holes spaced every 4 feet to allow the French drain to daylight or exit the wall face.
Step-by-Step Terracing Construction Flow
When breaking a tall, steep slope into multiple smaller terraces, follow this exact construction sequence to ensure structural integrity from the bottom up.
- Excavate the Base Trench: Dig a trench for the lowest wall. The depth must be 1 inch of buried block for every 10 inches of total wall height, plus 6 inches for the gravel base. For a 40-inch wall, bury at least 4 inches of the first block.
- Compact the Base: Fill the trench with 3/4-inch minus crushed limestone. Use a mechanical plate compactor to achieve 95% Standard Proctor density. Check for level in three directions.
- Lay the First Course: Set the base blocks. This course dictates the alignment of the entire wall. Use a 4-foot torpedo level on every single block.
- Install Drainage and Backfill: Lay the SDR 35 pipe behind the first course. Backfill immediately behind the wall with 12 inches of 3/4-inch washed gravel.
- Stack and Reinforce: Stack subsequent courses, pulling the retaining pins or using the built-in shear keys. Lay geogrid at specified courses, pulling it taut before backfilling with native soil compacted in 8-inch lifts.
- Grade the Terrace Surface: The flat top of the newly created terrace must slope backward toward the hillside at a minimum 2% grade (1/4 inch per foot) to direct surface runoff away from the wall edge and toward a secondary swale or dry well.
Deep-Rooted Plant Selection for Slope Stabilization
Once the hardscaping is complete, the exposed soil between terraces must be armored against surface erosion. Shallow-rooted groundcovers are insufficient for steep inclines. You need plants with deep, fibrous root architectures that bind the soil matrix together.
- Switchgrass (Panicum virgatum): Roots can penetrate 8 to 10 feet deep, acting as subterranean soil nails. Highly drought-tolerant once established.
- Creeping Juniper (Juniperus horizontalis): Forms a dense, evergreen mat. Roots spread laterally up to 4 feet, holding the top 18 inches of soil firmly in place.
- Crownvetch (Securigera varia): A leguminous groundcover that fixes its own nitrogen. Grows aggressively on poor, rocky soils where turfgrass fails. (Note: Check local invasive species lists before planting).
- Daylilies (Hemerocallis): Thick, tuberous root systems excel at trapping sediment and slowing surface water velocity on moderate 2:1 slopes.
Cost Breakdown and ROI for Hillside Projects
Hillside stabilization is a premium landscaping investment. In 2026, homeowners can expect the following cost ranges for professional hillside terracing and drainage installation:
2026 Hillside Landscaping Cost Matrix
- Site Grading & Excavation: $1,500 - $3,500 per 1,000 sq. ft. (highly dependent on machinery access).
- Segmental Retaining Wall (Materials & Labor): $30 - $45 per sq. ft. of wall face.
- Subsurface French Drainage: $25 - $40 per linear foot.
- Geogrid Reinforcement: Adds $4 - $8 per sq. ft. of wall face.
ROI Note: Properly engineered terracing that creates flat, usable lawn or patio space typically recovers 70% to 85% of its cost in overall property value appraisal, while simultaneously eliminating annual erosion repair costs.
Frequently Asked Questions
Can I build a retaining wall over 4 feet tall without a permit?
In most municipalities, retaining walls exceeding 4 feet in height (measured from the bottom of the base block to the top of the wall) require a stamped engineering design and a building permit. Always check local zoning codes before excavating.
How far apart should multiple terrace walls be spaced?
To prevent the upper wall's surcharge load from compromising the lower wall, the horizontal distance between walls should be at least twice the height of the lower wall. If the lower wall is 3 feet tall, the upper wall must be set back at least 6 feet horizontally.

