
Pest Control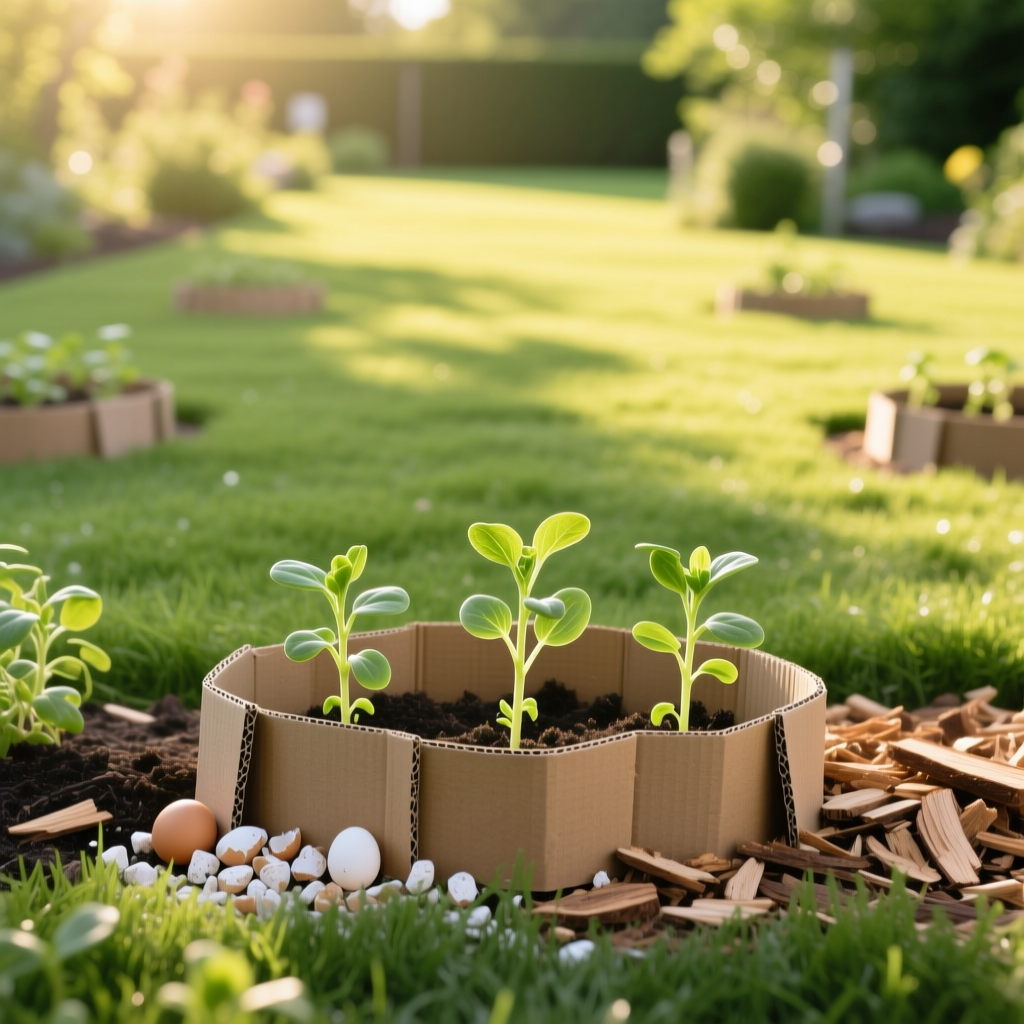
DIY Cutworm Collars & Natural Barriers for Seedling...
James MillerPublished
There are few things more frustrating for a gardener than watching tender seedlings get mowed down overnight by an invisible enemy. You plant them, water them, nurture them — and then one morning you find them severed at the base, lying limp on the soil like tiny fallen soldiers. The culprit is almost certainly a cutworm, one of the most destructive and stealthy pests in any garden or lawn.
Cutworms are the larval stage of various nocturnal moths, and they earn their name by literally cutting through plant stems at or just below the soil surface. They feed at night and hide during the day, which makes them difficult to spot and even harder to stop — unless you know what you are dealing with. Fortunately, one of the most effective defenses against cutworms requires nothing more than a few household items and a bit of ingenuity: DIY cutworm collars and natural barriers.
In this comprehensive guide, you will learn how to identify cutworm damage, understand the lifecycle of these pests, build simple but highly effective collars and barriers, and implement a complete integrated pest management strategy that keeps your seedlings safe without relying on harsh chemicals. Whether you are protecting a vegetable garden, flower beds, or newly seeded lawn areas, these techniques will give your young plants the fighting chance they deserve.
Identifying Cutworms & Understanding the Damage They Cause
Before you can fight cutworms effectively, you need to confirm they are the pest responsible for your damaged seedlings. Cutworm damage has a few telltale signs that distinguish it from other common garden pests like slugs, snails, or rabbits.
What Cutworms Look Like
Cutworms are caterpillars — typically one to two inches long — that come in shades of brown, gray, green, or black, often with subtle striping or mottling along their bodies. When disturbed, they characteristically curl into a tight C-shape, which is one of the easiest ways to confirm their identity. They have smooth, relatively hairless bodies and a somewhat greasy appearance, which is why they are sometimes called "greasy cutworms."
Because cutworms are nocturnal feeders, you will rarely see them during the day. To find them, dig gently in the top inch or two of soil near damaged plants in the early morning or evening. You will often find them curled up just beneath the surface, resting until nightfall.
Recognizing Cutworm Damage
The most classic sign of cutworm activity is a seedling that has been cleanly severed at or just above the soil line. The stem will look as though someone took a tiny pair of scissors to it. In some cases, the cutworm may partially chew through the stem, causing the plant to wilt and topple over without fully detaching. You may also notice:
- Seedlings that appear to have been pulled underground, with only a small stub remaining
- Irregular holes chewed into leaves near the base of the plant
- Stems that show signs of girdling, where the outer layer has been chewed away in a ring
- Multiple plants damaged in a single night, often in a row or cluster
- Small, pellet-like frass (caterpillar droppings) near the base of affected plants
The Cutworm Lifecycle
Understanding the cutworm lifecycle helps you time your defenses for maximum effectiveness. Adult moths lay eggs in the soil or on low-growing vegetation, often in late summer or early fall. These eggs may hatch immediately, producing larvae that feed through the autumn and into spring, or they may overwinter and hatch when temperatures warm up.
The larval stage is the destructive one. Cutworm caterpillars feed for several weeks, going through multiple growth stages called instars. They are most dangerous to seedlings in early spring when young plants are tender and vulnerable. After completing their larval development, they pupate in the soil and emerge as adult moths, starting the cycle anew.
Some species produce one generation per year, while others may produce two or even three. This means that cutworm pressure can persist throughout the growing season, making consistent protection essential. For more information on managing lawn and garden pests throughout the seasons, explore our complete pest control guides.
Which Plants Are Most at Risk
Cutworms are not particularly picky eaters, but they show a strong preference for young, tender plants. Seedlings of virtually any species are at risk, including:
- Vegetable transplants such as tomatoes, peppers, cabbage, broccoli, and beans
- Flower seedlings including petunias, marigolds, and zinnias
- Newly germinated grass seedlings in lawn establishment areas
- Herbs such as basil, cilantro, and dill
- Corn and sunflower seedlings, which are particular favorites
Mature plants with woody or tough stems are generally less susceptible, though heavy cutworm populations can still cause damage by climbing and feeding on leaves and fruit. If you are establishing a new lawn from seed, our lawn care guides offer tips on protecting young grass from a variety of pests during establishment.
Prevention Strategies: Making Your Garden Less Appealing to Cutworms
The best defense against cutworms starts long before you ever put a seedling in the ground. By making your garden environment less hospitable to these pests, you can significantly reduce the pressure your plants face from the very beginning.
Cultivate and Clear the Soil
Cutworm moths prefer to lay eggs in weedy, grassy, or undisturbed areas. One of the most effective preventive measures is to clear planting areas of weeds and grass at least two weeks before you plan to transplant seedlings. Tilling or turning the soil exposes cutworm larvae and pupae to predators such as birds, ground beetles, and parasitic wasps. It also disrupts the sheltered environment that cutworms need to thrive.
If you are converting a lawn area into a garden bed, allow enough time for the sod to break down before planting. Freshly turned sod can harbor large populations of cutworms that were feeding on grass roots. Our lawn maintenance resources can help you manage transitions between lawn and garden spaces effectively.
Delay Planting When Possible
Cutworms are most active and destructive in early spring when larvae are large and hungry after overwintering. If your growing season allows, delaying transplanting by a couple of weeks can help you avoid the peak of cutworm activity. Sturdier, slightly older seedlings are also more resistant to cutworm damage because their stems have begun to toughen.
Encourage Natural Predators
A healthy, biodiverse garden is your best ally against cutworm populations. Many beneficial organisms prey on cutworms at various life stages:
- Birds: Robins, starlings, and blackbirds will eagerly consume cutworm larvae, especially when they are exposed by cultivation
- Ground beetles: These nocturnal predators hunt cutworms in the soil and are among the most effective natural controls
- Parasitic wasps: Several species of wasps lay eggs on or inside cutworm larvae, eventually killing them
- Tachinid flies: These beneficial flies parasitize cutworm caterpillars and help keep populations in check
- Nematodes: Beneficial nematodes applied to the soil can infect and kill cutworm larvae underground
You can attract these allies by planting diverse flowering plants, providing shallow water sources, and avoiding broad-spectrum pesticides that kill beneficial insects alongside pests. Creating a welcoming habitat for natural predators is a cornerstone of sustainable natural pest control.
Maintain a Clean Garden Perimeter
Cutworm moths often lay eggs in weedy borders, fence lines, and areas with dense ground cover adjacent to garden beds. Keeping a buffer zone of at least two to three feet around your planting areas — free of tall grass, weeds, and debris — reduces the likelihood that moths will deposit eggs near your vulnerable seedlings. Regular mowing and edging of surrounding lawn areas also helps. Learn more about proper lawn mowing techniques that support overall pest management.
How to Make DIY Cutworm Collars: Step-by-Step Instructions
Cutworm collars are one of the oldest, simplest, and most effective physical barriers you can deploy to protect individual seedlings. The concept is straightforward: place a cylinder around the stem of each plant that extends both above and below the soil surface, preventing the cutworm from reaching the stem. Cutworms are not climbers by nature — they do their damage at the soil surface, so a well-placed collar effectively blocks their access.
Materials You Can Use
One of the best things about DIY cutworm collars is that you can make them from materials you likely already have at home. Here are the most popular and effective options:
- Cardboard toilet paper or paper towel tubes: Cut into two-to-three-inch sections. These are biodegradable and will break down naturally in the soil over several weeks, by which time your seedlings will be large enough to resist cutworm damage.
- Plastic cups: Cut the bottoms off of disposable plastic cups and press them into the soil around seedlings. These are durable and reusable across multiple seasons.
- Aluminum foil: Wrap a strip of heavy-duty aluminum foil around the base of each seedling, pressing the bottom edge into the soil. Foil has the added benefit of reflecting light, which can deter some pests.
- Waxed paper cups: Similar to plastic cups but biodegradable. Cut the bottoms out and press into the soil.
- PVC pipe sections: For a permanent, reusable solution, cut small-diameter PVC pipe into two-inch rings. These last for years and are ideal for protecting transplants season after season.
- Newspaper: Roll several layers of newspaper into a cylinder and secure with a piece of tape or a staple. These will decompose in the soil within a few weeks.
Step-by-Step Installation Guide
Follow these steps to properly install cutworm collars on your seedlings:
- Prepare your collars: Cut your chosen material into cylinders that are approximately two to three inches tall and two to three inches in diameter. If using cardboard tubes, a standard toilet paper tube cut in half gives you two perfect collars.
- Plant your seedling: Transplant or thin your seedling as you normally would, ensuring it is well-watered and settled into the soil.
- Position the collar: Place the collar around the seedling, centering the plant in the middle of the cylinder. The collar should surround the stem without touching it — leave about half an inch of space between the collar wall and the plant stem to allow for growth.
- Press into the soil: Push the bottom of the collar approximately one inch into the soil. This is critical because cutworms often attack at or just below the soil surface. The collar must create an unbroken barrier that extends below ground level.
- Firm the soil around the collar: Gently press the soil around the outside of the collar to eliminate gaps where a cutworm could squeeze through. The soil should be snug against the collar on all sides.
- Check the height: The collar should extend at least one to two inches above the soil surface. This prevents cutworms from simply reaching over the top of the barrier.
Tips for Maximum Effectiveness
To get the most out of your DIY cutworm collars, keep these tips in mind:
- Install collars at the time of transplanting, not after you notice damage. Prevention is always more effective than reaction.
- Check collars periodically to ensure they have not shifted or been displaced by rain, wind, or cultivation.
- Remove biodegradable collars once they begin to break down and your plants have developed sturdy stems, usually after three to four weeks.
- For larger transplants, you may need to gently slide the collar over the plant from the top rather than placing it around the base.
- If you are direct-seeding, wait until seedlings have emerged and are large enough to handle before placing collars around them.
Collars are especially important when establishing new garden beds in areas that were previously lawn, as these spaces often harbor residual cutworm populations. For guidance on transitioning lawn areas to productive garden spaces, see our lawn renovation resources.
Natural Barriers & Deterrents for Broader Seedling Protection
While individual collars are excellent for protecting transplanted seedlings, they are not always practical when you are dealing with large plantings, direct-seeded rows, or broadcast-sown areas like new lawns. In these situations, broader natural barriers and deterrents can provide area-wide protection against cutworms.
Diatomaceous Earth
Food-grade diatomaceous earth (DE) is one of the most popular natural barriers for cutworm control. This fine, powdery substance is made from the fossilized remains of diatoms — microscopic aquatic organisms with sharp, silica-based shells. When cutworms crawl across a band of DE, the sharp particles damage their waxy outer cuticle, causing them to dehydrate and die.
To use diatomaceous earth effectively:
- Sprinkle a generous band of DE around the base of seedlings or along planting rows, creating a circle at least two inches wide
- Apply when the soil surface is dry — DE loses its effectiveness when wet, though it regains its abrasive properties once it dries out
- Reapply after rain, heavy dew, or overhead irrigation
- Use only food-grade DE, not the pool-grade variety, which has been chemically treated and is unsafe for garden use
- Wear a dust mask when applying to avoid inhaling fine particles
Crushed Eggshells
Coarsely crushed eggshells create a sharp, abrasive barrier that cutworms are reluctant to cross. While not as consistently lethal as diatomaceous earth, eggshells are free, readily available, and add calcium to your soil as they break down. To use eggshells as a cutworm barrier:
- Save and rinse eggshells throughout the year, allowing them to dry completely
- Crush them into small, jagged pieces — not a fine powder, as the sharp edges are what deter the pests
- Spread a ring of crushed shells around each seedling or along rows, at least two inches wide
- Replenish as the shells break down or are worked into the soil
Coffee Grounds
Used coffee grounds can serve a dual purpose in the garden: they add organic matter and nitrogen to the soil while creating a textured barrier that many soft-bodied pests, including cutworms, find unpleasant to cross. Spread a ring of dried coffee grounds around seedlings, but avoid piling them too thickly, as a dense layer of wet grounds can become compacted and inhibit water penetration.
Wood Ash and Lime
A light sprinkling of wood ash or agricultural lime around seedlings can create a dry, alkaline barrier that deters cutworms. Both substances absorb moisture from the bodies of soft-bodied pests, making the environment inhospitable. However, use these materials sparingly and with caution:
- Wood ash raises soil pH and adds potassium — beneficial in acidic soils but potentially harmful in already alkaline conditions
- Agricultural lime significantly affects soil pH and should only be used if a soil test indicates your pH is too low
- Neither wood ash nor lime is effective once wet, so reapplication after rain is necessary
- Avoid direct contact with plant foliage, as concentrated ash or lime can burn leaves
Understanding your soil composition is essential before applying any amendment. Our soil testing guides can help you determine your soil pH and nutrient levels before you add any barrier materials.
Bran and Bt (Bacillus thuringiensis) Bait
For a natural, targeted approach, you can create a cutworm bait using wheat bran mixed with a solution of Bacillus thuringiensis var. kurstaki (Bt). Bt is a naturally occurring soil bacterium that produces proteins toxic to caterpillars but harmless to humans, pets, birds, and beneficial insects. When cutworms consume the bait, the Bt disrupts their digestive system, and they stop feeding within hours.
To make Bt bran bait:
- Mix one cup of wheat bran with one teaspoon of Bt powder or liquid concentrate
- Add enough water to create a moist, crumbly mixture — not soggy
- Scatter the bait on the soil surface around seedlings in the evening, when cutworms begin feeding
- Reapply every few days or after heavy rain
This method is particularly effective because it targets cutworms specifically without affecting other organisms in your garden ecosystem.
Copper Tape and Barriers
Copper creates a mild electrical reaction when it contacts the slime and moisture on a cutworm's body, acting as a natural repellent. While copper tape is more commonly associated with slug and snail control, it can also deter cutworms when wrapped around the base of raised beds or containers. Apply a strip of copper tape around the perimeter of raised beds, ensuring there are no gaps or overlaps that pests could bypass.
Row Covers and Protective Fabric
Lightweight floating row covers made from spun-bonded polyester or polypropylene create a physical barrier that prevents adult moths from accessing the soil to lay eggs. While row covers are most commonly used to protect against flying insects, they also help reduce cutworm pressure by preventing new egg-laying in protected areas.
Keep in mind that row covers will not protect against cutworms that are already present in the soil from eggs laid before the cover was installed. They are most effective when combined with pre-planting cultivation and soil preparation. For tips on protecting newly seeded lawns and garden beds during establishment, check out our seeding and establishment guides.
Monitoring, Maintenance & When to Call Professionals
Even with the best DIY barriers in place, ongoing monitoring is essential to catch cutworm problems early and adjust your strategy as needed. Integrated pest management is not a set-it-and-forget-it approach — it requires observation, adaptation, and sometimes escalation.
Regular Scouting Practices
Make it a habit to inspect your seedlings daily during the first few weeks after transplanting. Look for:
- Freshly cut or wilted seedlings
- Signs of chewing on stems near the soil line
- Displaced or damaged collars and barriers
- Cutworm larvae in the soil near damaged plants — dig in a two-inch radius around affected seedlings to find the culprits
Handpicking is a surprisingly effective control method for small gardens. Go out at night with a flashlight, spot the cutworms feeding on your plants, and drop them into a container of soapy water. A single cutworm can destroy multiple seedlings in one night, so removing even a few individuals can make a significant difference.
When DIY Methods Are Not Enough
There are situations where DIY collars and natural barriers may not be sufficient to control cutworm populations. Consider professional assistance if you encounter any of the following:
- Large-scale infestations: If you are losing dozens of seedlings per night across a large planting area, the cutworm population may be too large for physical barriers alone to manage
- Persistent damage despite barriers: If cutworms are consistently bypassing your collars and barriers, you may have a species that climbs or feeds differently than typical soil-surface cutworms
- Repeated seasonal problems: If you face severe cutworm pressure year after year despite preventive measures, a professional can help you develop a long-term management plan that may include targeted biological controls or soil treatments
- Commercial operations: Market gardeners and small farmers may need professional-grade solutions to protect economically significant plantings
A licensed pest control professional or your local cooperative extension service can provide soil sampling, species identification, and targeted treatment recommendations that go beyond what DIY methods can achieve. They may recommend applications of beneficial nematodes, targeted insecticide treatments, or pheromone-based monitoring traps to track moth activity and time interventions precisely.
Combining Methods for Best Results
The most effective cutworm management strategy combines multiple approaches into a layered defense:
- Before planting: Cultivate the soil, clear weeds, and allow time for exposed larvae to be consumed by predators
- At planting: Install DIY collars on every transplant and apply natural barrier materials around direct-seeded areas
- During the growing season: Scout daily, handpick larvae, replenish barriers after rain, and apply Bt bait as needed
- After harvest: Remove plant debris, cultivate the soil again, and consider planting a cover crop that discourages moth egg-laying
This integrated approach addresses cutworms at every stage of their lifecycle and from multiple angles, dramatically reducing the chance that any individual pest will survive to damage your plants. For a broader overview of maintaining a healthy, pest-resistant garden and lawn, visit our complete lawn and garden care hub.
Frequently Asked Questions About Cutworm Collars & Natural Barriers
How long do DIY cutworm collars need to stay in place?
Cutworm collars should remain in place for at least three to four weeks after transplanting, or until the seedling has developed a sturdy, somewhat woody stem that is less appealing to cutworms. Biodegradable collars made from cardboard or newspaper will naturally break down during this period, so there is no need to remove them manually. Plastic or PVC collars can be removed once the plant is established and then cleaned and stored for reuse in the following season. If cutworm activity persists later in the season due to a second generation of moths, you may want to leave collars in place longer or replace biodegradable ones that have decomposed.
Do cutworm collars work for all types of seedlings?
Cutworm collars are effective for virtually any type of seedling that is vulnerable to stem-cutting damage, including vegetables, flowers, herbs, and even young tree saplings. The key is sizing the collar appropriately — larger transplants may need wider collars, while tiny seedlings can be protected with smaller-diameter tubes. For very small or closely spaced seedlings like carrots or lettuce, individual collars may be impractical, and area-wide barriers like diatomaceous earth or Bt bait are more suitable alternatives. Collars work best on plants that are spaced far enough apart to accommodate the collar without crowding neighboring plants.
Can I use cutworm collars on a newly seeded lawn?
Individual cutworm collars are not practical for lawn seedlings due to the sheer number of plants involved. However, the principles behind collars — physical barriers and environmental modification — can still apply. For newly seeded lawns, focus on preventive measures such as cultivating the soil before seeding to expose and eliminate existing larvae, applying beneficial nematodes to the soil, and using Bt-based products if cutworm damage appears in young grass. Row covers can also be used over small lawn patches to prevent moth access during the germination period. For detailed guidance on establishing a healthy new lawn, see our lawn seeding guides.
Are there any plants that naturally repel cutworms?
While no plant provides a guaranteed repellent effect against cutworms, some companion plants are believed to help deter the adult moths from laying eggs nearby. Tansy, sage, and lavender are often cited as plants that moths find unappealing, possibly due to their strong aromatic oils. Planting these around the borders of your garden may provide a modest level of deterrence. Additionally, planting sunflowers or other trap crops at the perimeter of your garden can attract cutworms away from your more valuable seedlings — you then monitor and destroy the cutworms on the trap crop before they spread. Companion planting works best as part of a broader integrated pest management strategy rather than as a standalone solution.
What is the fastest way to get rid of cutworms already in my garden?
The fastest way to reduce an active cutworm population is a combination of handpicking and targeted baiting. Go out to your garden after dark with a flashlight and physically remove any cutworms you find feeding on plants — drop them into soapy water to kill them. Simultaneously, apply Bt bran bait to the soil surface around affected plants in the evening. The Bt will kill any cutworms that consume it within one to three days. For severe infestations, drenching the soil around affected plants with a solution of beneficial nematodes (specifically Steinernema carpocapsae or Heterorhabditis bacteriophora) can provide rapid biological control by infecting and killing larvae in the soil within 48 to 72 hours. This multi-pronged approach addresses both the cutworms you can see and those hiding underground, providing the quickest possible relief for your besieged seedlings.