
Tree Care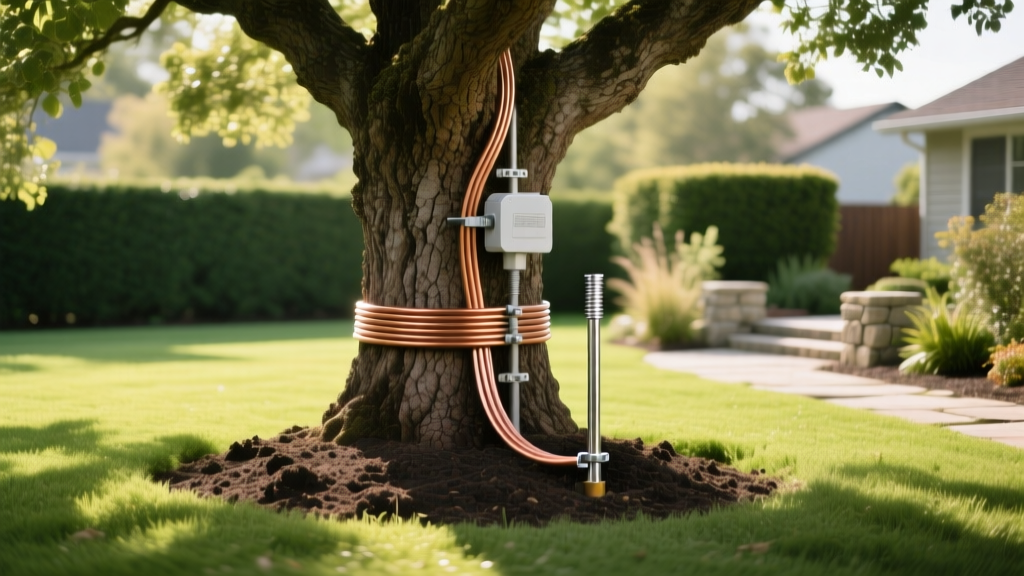
How to Choose & Install Lightning Protection Systems for Large Trees
David ParkPublished
Large trees are among the most valuable assets on any property. They provide shade, improve air quality, increase property values, and create a sense of permanence in the landscape. Yet these towering specimens face a threat that many homeowners overlook entirely: lightning strikes. When a bolt of lightning hits an unprotected tree, the results can be catastrophic — bark explodes, trunks split, and decades of growth are destroyed in a fraction of a second.
Lightning protection systems for trees are not a new concept. Arborists and historic preservationists have been installing them for well over a century. However, many property owners remain unaware that such systems exist, let alone understand how to select and install one properly. If you have mature trees on your property — particularly tall, isolated, or historically significant specimens — understanding lightning protection is an essential part of responsible tree care.
This comprehensive guide walks you through everything you need to know about choosing and installing a lightning protection system for large trees, from understanding why certain trees are more vulnerable to the step-by-step installation process.
Why Large Trees Need Lightning Protection
Lightning seeks the path of least resistance to the ground, and tall trees often serve as natural conductors. When lightning strikes a tree, the electrical current travels through the moisture-laden sapwood just beneath the bark. The intense heat — which can exceed 50,000 degrees Fahrenheit — instantly converts this moisture to steam, creating explosive pressure that can shred bark, shatter limbs, and split trunks from top to bottom.
Which Trees Are Most at Risk?
Not all trees face equal lightning risk. Several factors determine vulnerability:
- Height: Taller trees are more likely to be struck because they reduce the distance between the storm cloud and the ground. Trees that rise above the surrounding canopy or nearby structures are especially vulnerable.
- Species: Some species are struck more frequently than others. Oaks, elms, pines, tulip poplars, maples, and ash trees are among the most commonly struck species in North America. This is partly due to their height, bark texture, and internal moisture content.
- Isolation: A solitary tree standing alone in an open yard, field, or hilltop is far more likely to attract a lightning strike than a tree surrounded by other trees of equal or greater height.
- Proximity to structures: Large trees near homes, garages, or other buildings pose a dual risk. A lightning strike to the tree can jump — or "side flash" — to a nearby structure, causing fire or electrical damage.
- Location: Properties in regions with frequent thunderstorm activity face elevated risk. The southeastern United States, the Gulf Coast, and parts of the Midwest experience higher lightning densities than other regions.
If your property features any trees that meet these criteria, investing in a lightning protection system is a wise decision. Proper lawn and landscape maintenance includes protecting the largest and most valuable specimens from this unpredictable threat.
The True Cost of Lightning Damage
When lightning strikes an unprotected tree, the damage can range from a narrow scar running down the trunk to the complete destruction of the tree. Even a partial strike can compromise the tree's structural integrity, leaving it vulnerable to wind damage, disease, and insect infestation. Removing a large, damaged tree can cost thousands of dollars, and the loss of a mature specimen that took decades to grow is often irreplaceable in our lifetime.
By comparison, a professionally installed lightning protection system is a one-time investment that can protect a tree for decades with minimal maintenance. The cost-benefit analysis is compelling, especially for heritage trees, historic specimens, and trees that provide critical shade over your home or outdoor living areas.
Understanding How Tree Lightning Protection Systems Work
A tree lightning protection system operates on the same fundamental principle as a lightning rod on a building: it provides a preferred, low-resistance path for the electrical current to follow from the point of strike to the ground. By channeling the current through a copper conductor rather than through the tree's living tissue, the system prevents the explosive steam generation that causes structural damage.
Key Components of a Lightning Protection System
A properly designed system consists of several essential components:
- Air terminal (lightning rod): This is the pointed metal rod installed at the highest point of the tree. It serves as the strike receptor, intercepting the lightning bolt before it contacts the tree directly. Air terminals are typically made of copper or copper alloys and are designed to extend above the topmost branches.
- Main conductor cable: A heavy-gauge copper cable that runs from the air terminal down the trunk to the ground. This cable must be thick enough to carry the enormous current of a lightning strike without melting or breaking. Professional-grade systems typically use stranded copper cable rated for lightning protection use.
- Fasteners and attachments: Specialized clips, lag screws, and brackets secure the conductor to the tree without girdling or damaging the bark. Proper attachment hardware allows for tree growth and sway without putting stress on the cable or the tree.
- Ground rod(s): One or more copper-clad ground rods are driven deep into the soil at a safe distance from the tree's trunk. The conductor cable connects to these rods, allowing the electrical current to dissipate safely into the earth.
- Connectors and splices: All connections between cable segments, air terminals, and ground rods must be made with approved lightning protection connectors. Soldered or crimped connections ensure continuity and low resistance throughout the system.
System Design Principles
Effective lightning protection for trees follows established engineering principles. The conductor path should be as straight and direct as possible, avoiding sharp bends that could cause the current to arc. The ground rod should be placed at least ten feet from the trunk to prevent the dissipated current from damaging the root system. For very large trees with wide canopies, multiple air terminals and conductor paths may be necessary to ensure adequate coverage.
It is also important to consider nearby structures. If a protected tree stands close to your home, the tree's grounding system should be bonded to the building's grounding system to prevent potential differences that could cause side flashing. Consulting with a certified arborist or a tree risk assessment professional can help you determine the best system design for your specific situation.
How to Choose the Right Lightning Protection System
Selecting the appropriate lightning protection system depends on several factors, including the size and species of the tree, its location on your property, your local climate, and your budget. Here is a systematic approach to making the right choice.
Assess Your Tree's Risk Level
Begin by evaluating which trees on your property are most at risk. Prioritize trees that are:
- The tallest specimens on your property
- Standing alone in open areas
- Located within ten feet of your home or other structures
- Historically significant or irreplaceable due to age or species
- Species known to attract lightning, such as oaks, pines, and tulip poplars
You do not necessarily need to protect every tree on your property. Focus your investment on the highest-risk, highest-value specimens. A professional tree pruning and care specialist can help you identify which trees would benefit most from protection.
Choose Quality Materials
Not all lightning protection components are created equal. When selecting materials, look for:
- Copper or copper-alloy components: Copper offers excellent conductivity and corrosion resistance. Avoid aluminum components for tree installations, as aluminum corrodes more rapidly when in contact with tree sap and moisture.
- UV-resistant cable jackets: If the conductor cable will be exposed to sunlight, ensure it has a protective jacket rated for outdoor UV exposure.
- Tree-friendly fasteners: Choose attachment hardware specifically designed for living trees. These fasteners allow for trunk expansion and natural movement without cutting into the bark or cambium layer. Avoid using nails, staples, or wire wraps that can girdle the tree over time.
- UL-listed or certified components: Whenever possible, use components that meet recognized lightning protection standards. This ensures the materials have been tested to withstand the extreme currents associated with lightning strikes.
Decide Between Professional Installation and DIY
While it is technically possible to install a tree lightning protection system yourself, professional installation is strongly recommended for several reasons. Certified arborists have the climbing skills and equipment necessary to safely install air terminals at the tops of tall trees. They understand system design principles that ensure effective protection. They can also assess the overall health of the tree and recommend any additional disease prevention or structural support measures that may be needed.
If you do choose to install a system yourself, limit your efforts to trees that are accessible from the ground or with a ladder. Never climb a tree without proper training and safety equipment. For trees taller than thirty feet, professional installation is the safest and most effective option.
Step-by-Step Installation Guide
Whether you are working with a professional or tackling the installation yourself on a smaller tree, understanding the process helps ensure the job is done correctly. Below is a detailed overview of the installation steps.
Step 1: Plan the Conductor Route
Before any hardware is attached to the tree, plan the route the conductor cable will follow from the top of the tree to the ground. The route should be as straight as possible, following the natural contours of the trunk. Avoid routing the cable over large branches or through dense clusters of limbs, as this can create sharp bends that reduce the system's effectiveness.
Identify the location for the ground rod. It should be placed at least ten feet from the base of the trunk, in an area where the soil is reasonably moist (which improves grounding). Avoid placing the ground rod near underground utilities, septic systems, or irrigation lines.
Step 2: Install the Air Terminal
The air terminal must be installed at the highest point of the tree, extending at least twelve inches above the topmost branch or leader. This typically requires climbing to the top of the tree or using an aerial lift. The terminal is secured to the tree using a lag screw or through-bolt driven into the heartwood. Ensure the connection between the terminal and the conductor cable is tight and secure, using an approved connector.
For trees with multiple leaders or wide, spreading canopies, additional air terminals may be needed. As a general rule, any branch tip that extends higher than the surrounding canopy and is more than six feet from a protected terminal should have its own air terminal.
Step 3: Run the Conductor Cable
Attach the conductor cable to the tree using tree-friendly clips or brackets spaced approximately every four to six feet along the trunk. The cable should be snug against the bark but not so tight that it restricts growth. Many professional-grade clips feature a spring-loaded or sliding design that accommodates trunk expansion over time.
When the cable reaches the base of the tree, transition it to a below-ground section or route it along the ground surface to the ground rod location. If running the cable along the surface, protect it from lawn equipment damage by burying it in a shallow trench or covering it with a protective conduit. This is particularly important if you maintain your lawn regularly with mowers and trimmers.
Step 4: Install the Ground Rod
Drive the copper-clad ground rod into the earth using a ground rod driver or sledgehammer. The rod should extend at least eight to ten feet into the ground to reach moist soil layers that provide good conductivity. In areas with rocky or compacted soil, you may need to pre-drill a pilot hole or use multiple shorter rods connected together.
Connect the conductor cable to the ground rod using an approved clamp or exothermic weld. The connection must be tight, clean, and corrosion-resistant. After connecting, backfill any trench and tamp the soil firmly around the ground rod.
Step 5: Test and Inspect the System
Once the system is fully installed, test the continuity of the entire circuit using a multimeter or a specialized ground resistance tester. The resistance reading should be very low, indicating a continuous, low-resistance path from the air terminal to the ground rod. Any high-resistance readings indicate a loose connection or damaged cable that must be corrected.
After testing, document the installation with photographs and notes, including the location of the ground rod, the type and gauge of cable used, and the date of installation. This documentation will be valuable for future maintenance and for any insurance claims related to lightning damage.
Ongoing Maintenance and Seasonal Considerations
A lightning protection system is not a "set it and forget it" installation. Trees grow, sway in the wind, and change with the seasons, all of which can affect the integrity of the system. Regular maintenance ensures your system continues to provide reliable protection year after year.
Annual Inspections
Inspect your lightning protection system at least once per year, ideally in early spring before the peak thunderstorm season begins. During your inspection, check the following:
- Cable attachments: Ensure all clips and brackets are still securely fastened to the tree. Look for signs of bark growth over the hardware, which may require loosening or repositioning the fasteners.
- Cable condition: Examine the entire length of the conductor cable for fraying, corrosion, or damage from wildlife, lawn equipment, or falling branches.
- Air terminal: Verify that the air terminal is still upright and extends above the highest branches. If the tree has grown significantly since installation, you may need to extend the terminal or add a new one.
- Ground connections: Check the connection at the ground rod for corrosion or looseness. Clean any corrosion with a wire brush and tighten the clamp as needed.
- Continuity test: Repeat the continuity test with a multimeter to confirm the system still provides a complete, low-resistance path.
Seasonal Care Tips
Different seasons present different challenges for both your trees and their lightning protection systems:
- Spring: This is the ideal time for your annual inspection and any needed repairs. Thunderstorm season is approaching, and you want the system in peak condition. Combine your inspection with your spring tree care routine, including pruning dead or damaged branches that could interfere with the conductor cable.
- Summer: Monitor the system after any severe storms. Lightning can strike even a protected tree, and while the system should prevent major damage, it is wise to inspect the hardware after any nearby strike. Also watch for rapid summer growth that may engulf cable clips or outgrow the air terminal.
- Fall: As leaves drop and the tree enters dormancy, take the opportunity to inspect the full length of the conductor cable without foliage obscuring your view. Fall is also an excellent time for deep-root fertilization to help the tree maintain vigor and recover from any stress.
- Winter: Ice and heavy snow can damage cables and hardware. After major winter storms, check the system for broken clips, sagging cable, or ice damage to the air terminal. Winter dormancy is also the best time for major pruning and structural work on large trees.
When to Call a Professional
While routine inspections can be performed by a knowledgeable homeowner, certain situations call for professional intervention:
- The tree has been struck by lightning, even if the protection system appears intact
- Major pruning or tree surgery is needed near the conductor cable
- The tree has grown significantly, requiring system modifications
- Ground resistance readings are higher than expected
- You notice signs of disease, decay, or structural weakness in the tree
A certified arborist with experience in lightning protection can assess the situation and recommend appropriate action. Remember that a healthy, well-maintained tree is better able to withstand and recover from environmental stress, including lightning strikes. Integrating lightning protection into your overall lawn and landscape care plan ensures your most valuable trees receive the comprehensive attention they deserve.
Frequently Asked Questions
How much does a tree lightning protection system cost?
The cost of a professionally installed lightning protection system for a large tree typically ranges from several hundred to a few thousand dollars, depending on the height of the tree, the complexity of the installation, and the number of air terminals and ground rods required. For a single, tall tree requiring a climb to install the air terminal, expect the cost to be on the higher end of that range. While this may seem like a significant investment, it is generally far less than the cost of removing and replacing a large tree destroyed by lightning. Many homeowners find the investment worthwhile for irreplaceable heritage trees or trees that provide critical shade over their homes.
Can a lightning protection system guarantee my tree will not be damaged?
No lightning protection system can offer an absolute guarantee against all damage. However, a properly designed and installed system dramatically reduces the likelihood of severe structural damage. The system channels the majority of the electrical current around the tree rather than through it, preventing the explosive steam generation that splits trunks and shatters bark. In most documented cases, trees with functioning lightning protection systems sustain little to no visible damage after a strike, while unprotected trees in the same area suffer catastrophic destruction.
Will installing a lightning protection system harm my tree?
When installed correctly using tree-friendly hardware, a lightning protection system causes minimal harm to the tree. The small lag screws used to attach clips penetrate only the outer bark and a small portion of the sapwood, which the tree can compartmentalize and seal. The most important consideration is to use attachment hardware that accommodates trunk growth. Avoid wrapping wire or cable tightly around the trunk or branches, as this can girdle the tree and cut off the flow of nutrients, eventually killing it. If you are unsure about proper installation techniques, consult a certified arborist.
Do I need lightning protection for every tree on my property?
Most properties do not require lightning protection for every tree. Focus on the tallest, most isolated, and most valuable specimens, particularly those near your home or other structures. Trees that are part of a dense, uniform forest canopy are generally at lower risk because the lightning risk is distributed across many trees of similar height. However, if you have a single dominant tree that towers above everything else on your property, it should be your top priority for protection. An arborist can help you conduct a risk assessment to prioritize your investment.
How long does a tree lightning protection system last?
A well-installed lightning protection system using quality copper components can last twenty years or more with proper maintenance. The primary factors that affect longevity are corrosion at connection points, damage from tree growth or wildlife, and physical damage from storms or lawn equipment. Annual inspections and timely repairs can extend the life of the system indefinitely. Ground rods may eventually corrode and need replacement, particularly in acidic soils, but this is a straightforward repair. The conductor cable and air terminals, being made of copper, are highly resistant to corrosion and can remain functional for decades.
Can I install a lightning protection system on a tree that has already been struck?
Yes, a lightning protection system can be installed on a tree that has previously been struck, provided the tree is still alive and structurally sound. In fact, trees that have survived a lightning strike are often good candidates for protection because they have demonstrated their vulnerability. Before installing the system, have a certified arborist evaluate the tree's health and structural integrity. The arborist may recommend wound treatment, cabling, or other supportive measures in addition to the lightning protection system. Keep in mind that a previously struck tree may have internal decay that compromises its stability, and this must be addressed before investing in a protection system.

