
Tree Care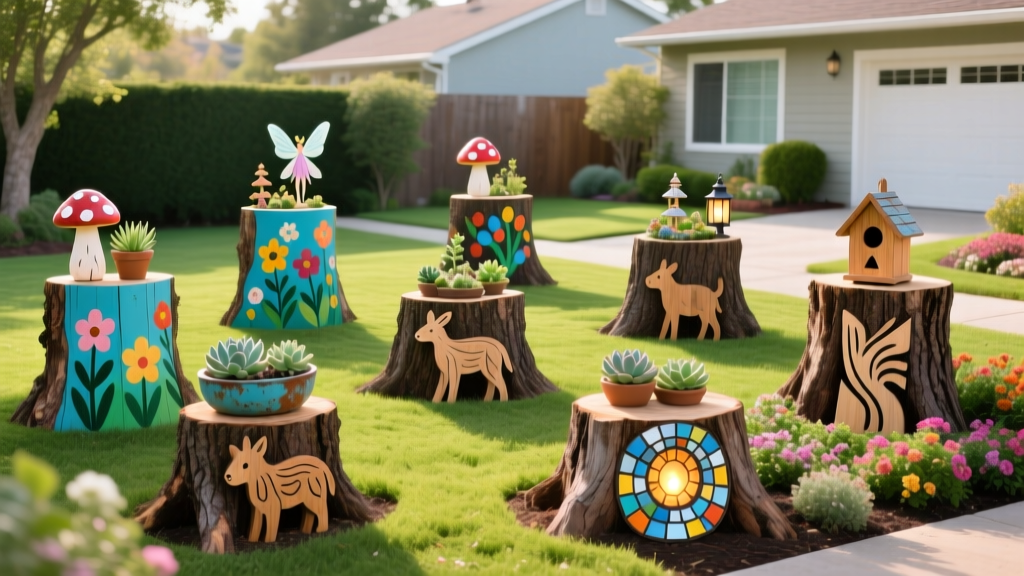
9 Creative Tree Stump Decoration Ideas for Removed Trees
When a hazardous or dying tree is removed from your property, you are typically left with a stubborn stump. While stump grinding is the default solution, it costs between $3 and $5 per inch in diameter—meaning a 24-inch oak stump will cost $72 to $120 just to obliterate. Before you pay to erase it, consider that a retained stump offers unique landscaping opportunities. According to the University of Minnesota Extension, leaving a stump intact can prevent soil erosion and preserve the complex root microbiome while serving as a striking focal point.
Below is a comprehensive guide to the best tree stump decoration ideas, complete with material costs, structural preparation, and ecological benefits.
Decision Matrix: Grind, Remove, or Decorate?
Before committing to a decoration project, evaluate the stump's health and location. If the tree was removed due to aggressive root rot (like Armillaria) or termite infestation, decoration is not advised, as the pathogens can spread to nearby healthy plants.
| Method | Avg. Cost (24' Stump) | Time to Complete | Ecological Impact |
|---|---|---|---|
| Professional Grinding | $150 - $250 | 1 - 2 Hours | Destroys root microbiome; leaves woodchips that temporarily tie up soil nitrogen. |
| Chemical Removal | $15 - $30 | 4 - 8 Weeks | Introduces potassium nitrate to soil; leaves a spongy, unstable mess. |
| Stump Decoration | $25 - $85 | 2 - 4 Hours | Preserves soil structure; provides micro-habitats and gradual nutrient cycling. |
Botanical & Planter Tree Stump Decoration Ideas
Transforming a stump into a living planter is one of the most popular tree stump decoration ideas, but it requires specific preparation to prevent the wood from rotting prematurely and killing your plants.
1. The Succulent Fairy Garden
Succulents require shallow soil and excellent drainage, making them perfect for stump tops. Using a 2-inch spade bit, hollow out the center of the stump to a depth of 4 inches. Critical step: Drill three 3/8-inch drainage holes at a 45-degree angle from the outer bark into the hollowed center. Fill the cavity with a 50/50 mix of pumice and cactus potting soil (such as Miracle-Gro Cactus, Palm & Citrus). Plant shallow-rooted varieties like Sempervivum (Hens and Chicks) and Sedum morganianum (Burro's Tail).
2. Shade-Loving Fern & Moss Oasis
If your stump is located under a dense canopy, skip the hollowing. Instead, score the top of the stump with a chainsaw or axe to create crevices. Pack these crevices with a mix of peat moss and compost, then press in live sheet moss and bare-root ferns like the Autumn Fern (Dryopteris erythrosora). Mist daily for the first two weeks to encourage the moss to anchor to the wood grain.
3. Cascading Annual Spillway
For a vibrant seasonal display, hollow the stump and line the inside with a heavy-duty pond liner or thick landscaping fabric to separate the damp soil from the raw wood. Plant trailing annuals like Creeping Jenny, Sweet Alyssum, and trailing Petunias. The liner prevents the wet potting mix from accelerating the stump's decomposition.
Functional Hardscape & Furniture Ideas
If you prefer structured garden features over planters, a sturdy hardwood stump (like oak, hickory, or maple) can be repurposed into functional hardscaping.
4. Natural Pedestal & Display Stand
A flat-topped stump makes an excellent pedestal for potted topiaries or garden sculptures. To prevent the wood from splitting (checking) and rotting, sand the top surface to 120-grit. Apply two coats of a penetrating marine-grade epoxy, such as TotalBoat Penetrating Epoxy, to seal the end-grain. Finish with a UV-resistant spar urethane like Minwax Helmsman to protect against sun degradation.
5. Rustic Garden Seating
A stump with a diameter of at least 18 inches can serve as a natural stool. Ensure the stump is cut perfectly level. If it is uneven, use a chainsaw to make a fresh, level cut, followed by a belt sander. Weight limit warning: Only use stumps from solid hardwoods for seating. Pine or poplar stumps will compress and splinter under adult weight within a single season.
6. Pathway Lighting Base
Drill a 1-inch hole down the center of the stump and feed the wiring for a low-voltage LED pathway light through the root system underground. Mount a brass or copper pathway light fixture directly to the top. This hides the wiring completely and integrates the hardscape lighting seamlessly into the natural landscape.
Ecological & Wildlife Habitats
Dead wood, known in forestry as a 'snag' when standing, is a vital component of a healthy ecosystem. The National Park Service notes that dead wood provides essential habitat for over 1,000 species of wildlife. You can accelerate this ecological benefit with targeted decorations.
7. Toad Abode & Amphibian Shelter
Amphibians require cool, damp hiding spots. Carve a 4-inch wide, 3-inch deep archway into the side of the stump at ground level. Place the stump near a water feature or in a heavily mulched, shaded bed. Line the inside of the carved cave with damp sphagnum moss to attract toads and salamanders that will naturally control your garden's slug and mosquito populations.
8. Pollinator Bee Hotel Base
Mount a wooden bee hotel (filled with bamboo reeds and drilled nesting blocks) directly to the flat top of the stump using exterior-grade lag screws. Elevating the bee hotel on a stump keeps it above ground-level moisture and splashing rain, which prevents mold from destroying the solitary bee larvae inside the reeds.
9. Bird Feeder & Bath Station
Secure a heavy copper or ceramic bird bath basin to the top of the stump using a bead of exterior construction adhesive (like Liquid Nails Landscape) and three stainless steel screws driven from underneath. The stump provides a stable, predator-elevated platform that keeps birds safe from ground-dwelling cats while they bathe.
'Leaving a stump to decay naturally while integrating it into your garden design mimics the forest floor's nutrient cycle, slowly feeding the surrounding soil biology over a decade or more.' — Sustainable Landscaping Principles, Audubon Society
Step-by-Step: Prepping a Fresh Stump for Decoration
Regardless of which tree stump decoration ideas you choose, proper preparation is mandatory to ensure longevity and prevent pest infestations.
- Level the Cut: If the arborist left a jagged top, rent a 14-inch gas chainsaw and make a clean, horizontal cut 1 inch below the lowest point of the jagged wood.
- Bark Removal (Optional):strong> If you want a clean, rustic look, use a drawknife or a flat pry bar to peel the bark off. Leaving the bark on invites carpenter ants and bark beetles.
- End-Grain Sealing: Wood loses moisture rapidly through the end-grain, causing severe radial cracking. Within 24 hours of cutting, seal the top with a commercial green wood sealer like Anchorseal, or apply the marine epoxy mentioned above.
- Pest Deterrent: Drill three 1/2-inch holes into the side of the stump and fill them with diatomaceous earth or a natural borate wood preservative to deter termites from using the stump as a bridge to your home's foundation.
By viewing a removed tree not as yard waste, but as raw landscaping material, you can save hundreds of dollars on grinding fees while adding permanent, functional character to your outdoor space.

