
Tree Care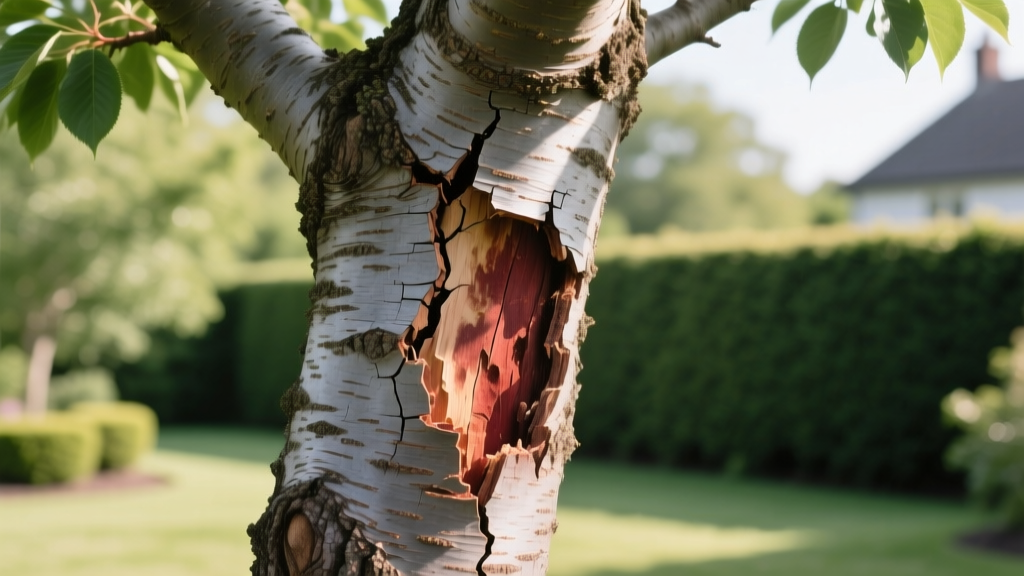
How to Diagnose and Repair Bark on Cherry Tree Trunks
Cherry trees (Prunus spp.) are highly valued for their spring blooms and fruit production, but their bark is notoriously thin and vulnerable to environmental and biological stressors. The bark on cherry tree trunks serves as the primary vascular highway; damage to the phloem and cambium layers can girdle and kill the tree within a single growing season. Whether you are managing a fruiting Bing cherry or an ornamental Kwanzan, understanding how to read, protect, and repair trunk bark is critical for long-term survival.
Normal vs. Abnormal: Reading the Bark on Cherry Tree Trunks
Homeowners frequently panic when noticing texture changes on their cherry trees. However, not all peeling is pathological. As Prunus species mature, the outer bark expands and sheds. Use this diagnostic matrix to differentiate between natural aging and active decline.
| Characteristic | Normal Aging Process | Pathological or Environmental Damage |
|---|---|---|
| Texture | Smooth with prominent horizontal lenticels; papery shedding on mature trunks | Deep vertical fissures, missing plates, or spongy, waterlogged tissue |
| Color | Uniform gray, silver, or mahogany beneath peeled strips | Blackened wound margins, bright amber gum oozing, or white fungal mycelium |
| Location | Evenly distributed across the upper trunk and primary scaffolds | Concentrated on the lower 12 inches, south-facing side, or at branch unions |
| Canopy Impact | Leaves remain fully sized, green, and turgid | Undersized, chlorotic (yellow) leaves, or sudden branch dieback in mid-summer |
The 3 Most Common Threats to Cherry Tree Bark
1. Peachtree Borer (Synanthedon exitiosa)
Despite the name, this clearwing moth aggressively targets cherry trees. The larvae tunnel through the bark into the cambium, typically within the lower 10 inches of the trunk and the upper root flare. Diagnostic sign: Sawdust-like frass mixed with amber sap at the soil line. According to Penn State Extension, untreated infestations will girdle and kill a mature cherry tree in 2 to 3 seasons. Treatment: Apply a trunk spray of Permethrin (10% concentrate, mixed at 3 oz per gallon of water) in early August and again in early September. Expect to pay $25 to $35 per pint for commercial-grade Permethrin.
2. Sunscald and Frost Cracking
Thin-barked cherries, particularly young Yoshino and Weeping varieties, suffer from winter sunscald. Afternoon winter sun heats the south-facing bark, activating the cambium. When temperatures plummet at night, the active cells freeze and rupture, causing vertical splits. Diagnostic sign: A vertical crack on the south or southwest side of the trunk, often with peeling bark revealing dead, brown wood beneath. The Morton Arboretum recommends wrapping trunks with white commercial tree wrap in late November to reflect solar radiation.
3. Bacterial Canker and Gummosis
Caused by Pseudomonas syringae, this pathogen enters through bark micro-fissures or pruning wounds. Diagnostic sign: Profuse oozing of sour-smelling, dark amber gum from the bark, often accompanied by sunken, necrotic cankers. Unlike mechanical damage, bacterial canker margins appear water-soaked and dark red. The Clemson University Home & Garden Information Center notes that copper-based bactericides applied during autumn leaf drop can reduce surface populations, but surgical removal of the canker is required for trunk infections.
Step-by-Step Repair Protocol for Damaged Cherry Bark
If your cherry tree has suffered mechanical damage (e.g., string trimmer impact, storm breakage) or localized frost cracking, execute this wound-tracing protocol to facilitate compartmentalization. Trees do not 'heal' wounds; they seal them internally via the CODIT (Compartmentalization of Decay in Trees) process.
- Assess the Girdle Ratio: Measure the circumference of the trunk damage. If the damaged bark exceeds 50% of the trunk's total circumference, the tree's survival rate drops below 20%. Consult a certified arborist for potential removal or bridge grafting.
- Sterilize Your Tools: Use a sharp Horlacher grafting knife or a sterile razor blade. Wipe the blade with 70% isopropyl alcohol before every cut to prevent cross-contamination.
- Trace the Wound: Cut away the loose, dead bark around the perimeter of the wound. Make smooth, continuous, elliptical cuts (pointed at the top and bottom) rather than jagged circles. This shape encourages rapid callus roll formation.
- Remove Necrotic Tissue: Gently scrape away any brown, dead cambium tissue inside the wound margin until you reach firm, white/green healthy wood. Do not gouge deeply into the xylem (heartwood).
- Leave the Wound Exposed: Do not apply pruning sealers, tar, or paint. These products trap moisture and anaerobic decay fungi against the exposed wood, accelerating rot.
CRITICAL WARNING: Never use black asphalt-based pruning sealers on cherry tree bark wounds. Research confirms that sealers inhibit callus tissue formation and trap Cytospora spores inside the wound cavity, turning a minor bark scrape into a fatal structural decay column.
Preventative Maintenance Calendar
Protecting the bark on cherry tree trunks requires proactive seasonal adjustments. Implement this schedule to minimize abiotic stress.
- March (Wrap Removal): Remove white tree wrap as soon as the risk of hard freezes passes. Leaving wrap on during spring traps moisture against the bark, inviting fungal cankers and providing a hiding spot for borers.
- April (Mulch Management): Apply the 3-3-3 rule. Create a mulch ring 3 feet in radius, 3 inches deep, but keep it 3 inches away from the actual trunk bark. Volcano mulching against the bark suffocates the root flare and invites rodent girdling.
- July (Trunk Inspection): Inspect the lower 12 inches of the trunk with a flashlight. Look for fresh frass or sap weeping. If borers are active, apply Spinosad (e.g., Monterey Garden Insect Spray) as an organic trunk drench.
- November (Winterization): Paint the lower trunk with a 50/50 mixture of white interior latex paint and water, or apply commercial white tree wrap to prevent winter sunscald.
Decision Framework: DIY Repair vs. Professional Arborist
Determining when to intervene yourself versus calling an ISA Certified Arborist depends on the severity and location of the bark damage.
- Execute DIY Repair When: The bark damage is localized (less than 25% of trunk circumference), confined to the upper trunk or scaffolds, and the tree canopy remains fully leafed out. Tool costs are minimal (under $50 for a grafting knife and isopropyl alcohol).
- Hire a Professional When: The bark is splitting at the root flare, you observe extensive sawdust-like frass indicating a deep borer infestation, or the canopy shows sudden, asymmetric dieback. Professional diagnostic visits and trunk injections typically range from $150 to $250 per hour in 2026, but early intervention can save a mature specimen tree that would cost $2,500+ to remove and replace.

