
Landscaping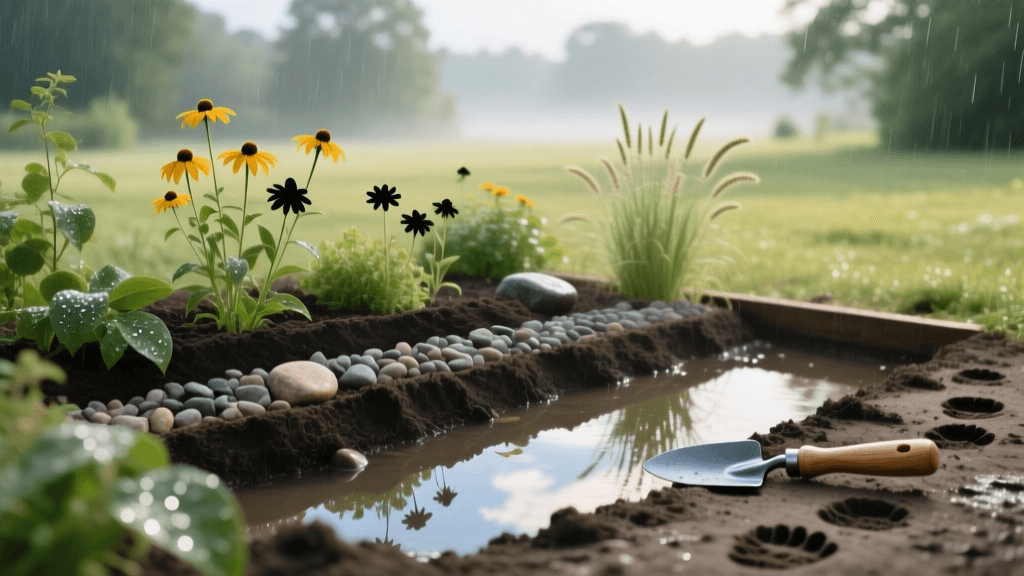
How to Build a Rain Garden for Sustainable Stormwater Management
The Environmental Impact of Stormwater Runoff
When rain falls on impervious surfaces like driveways, roofs, and compacted lawns, it cannot soak into the earth. Instead, it becomes stormwater runoff, picking up pollutants such as motor oil, fertilizers, pesticides, and sediment along the way. This contaminated water flows directly into local storm drains and ultimately pollutes our rivers, lakes, and oceans. According to the Environmental Protection Agency (EPA), implementing green infrastructure solutions at the residential level is one of the most effective ways to mitigate this environmental hazard.
A rain garden is a strategically placed, shallow depression planted with deep-rooted native plants and grasses. It acts as a natural biofilter, capturing stormwater runoff and allowing it to slowly percolate into the ground. Not only does this recharge local aquifers and reduce the burden on municipal sewer systems, but it also creates a vital micro-habitat for local wildlife and pollinators. Building a rain garden is a highly rewarding landscaping project that merges aesthetic beauty with profound ecological responsibility.
Step 1: Site Selection and Safety Precautions
Choosing the right location is the most critical step in rain garden design. A poorly placed rain garden can cause foundation damage or interfere with underground utilities. Follow these eco-friendly site selection guidelines:
- Distance from Structures: Place your rain garden at least 10 feet away from your home's foundation to prevent water seepage into basements or crawl spaces.
- Avoid Septic Systems: Never build a rain garden over or immediately adjacent to a septic tank or drain field.
- Sunlight Requirements: Select a spot that receives full to partial sun (at least 6 hours of direct sunlight daily) to support a diverse range of native flowering plants.
- Utility Check: Always call 811 (the national 'Call Before You Dig' hotline) at least a few days before excavation to have underground utility lines marked.
- Natural Flow: Observe your yard during a heavy rainstorm. Identify the natural pathways where water flows from your downspouts or driveway, and position the garden to intercept this flow.
Step 2: The Percolation Test
Before you start digging, you must ensure your soil can absorb water efficiently. A rain garden should drain completely within 24 to 48 hours to prevent mosquito breeding. Perform a simple percolation test to measure your soil's infiltration rate:
- Dig a test hole about 8 inches deep and 6 inches wide in the proposed location.
- Fill the hole with water and let it drain completely. This pre-soaks the soil and mimics natural conditions.
- Refill the hole with water to the top.
- Using a ruler, measure the water level drop every hour for four hours.
Interpreting Results: If the water drops at a rate of 1 inch or more per hour, your soil is ideal for a rain garden. If it drains slower than 0.5 inches per hour, you have heavy clay soil. You will need to amend the soil heavily or consider an alternative eco-friendly drainage solution, such as a French drain or a dry creek bed.
Step 3: Sizing, Slope, and Excavation
The size of your rain garden depends on the square footage of the impervious surface draining into it. A general rule of thumb for residential properties is that the rain garden should be about 15% to 20% the size of the roof or driveway area draining into it. For most homeowners, a garden measuring 100 to 300 square feet is highly effective and manageable.
When excavating, aim for a depth of 4 to 8 inches. The bottom of the basin must be perfectly level to ensure even water distribution and prevent erosion. Use the excavated soil to build a berm on the downhill side of the garden. The berm should be gently sloped at a 3:1 ratio (3 feet of horizontal distance for every 1 foot of vertical rise) to stabilize the edges and allow easy access for maintenance. Include a small, level overflow notch in the berm, lined with river rock, to allow excess water to safely exit the garden during extreme downpours without washing away the soil.
Step 4: Engineering the Bioretention Soil Mix
Native topsoil alone is rarely sufficient for a rain garden, as it often contains too much clay or organic matter that slows drainage. To create an optimal eco-friendly biofilter, you must replace the native soil with a specialized bioretention mix. Research from Rutgers University highlights that a precise blend of sand, topsoil, and compost maximizes both filtration and plant health.
| Component | Volume Ratio | Ecological Purpose |
|---|---|---|
| Coarse Washed Sand | 50% | Provides structural integrity, prevents compaction, and ensures rapid water infiltration. |
| Unscreened Topsoil | 30% | Supplies essential minerals and a base for root anchorage without excessive clay content. |
| Leaf Mold or Compost | 20% | Retains moisture during dry spells, feeds soil microbes, and provides slow-release nutrients. |
Mix these components thoroughly before backfilling the excavated basin. Leave about 2 to 3 inches of space at the top of the basin to allow for temporary water pooling during heavy storms.
Step 5: Selecting Native Plants for Biofiltration
The plants you choose are the engine of your rain garden. Native plants are uniquely adapted to your local climate, require zero synthetic fertilizers, and have deep root systems that break up compacted soil and create channels for water infiltration. Furthermore, they provide essential nectar and host environments for local pollinators. The National Wildlife Federation strongly advocates for native plantings to restore declining biodiversity in suburban landscapes.
When designing your planting plan, divide your garden into three zones based on moisture levels: the wet bottom, the moist slopes, and the dry upper edges. Below is a curated list of highly adaptable native plants suitable for various rain garden zones:
| Common Name | Botanical Name | Garden Zone | Pollinator Benefit |
|---|---|---|---|
| Blue Flag Iris | Iris versicolor | Bottom (Wet) | Attracts hummingbirds and native bees; excellent water filter. |
| Swamp Milkweed | Asclepias incarnata | Bottom/Middle | Crucial host plant for Monarch butterfly caterpillars. |
| New England Aster | Symphyotrichum novae-angliae | Slopes (Moist) | Provides vital late-season nectar for migrating butterflies. |
| Switchgrass | Panicum virgatum | Edges/Berm (Dry) | Deep roots stabilize soil; provides overwintering shelter for insects. |
| Wild Bergamot | Monarda fistulosa | Edges/Berm (Dry) | Highly attractive to bees, butterflies, and hummingbirds. |
Planting Timing: The best time to plant your rain garden is in the spring or early fall. This allows the root systems to establish themselves during cooler, wetter months before facing the stress of summer heat or winter freezes.
Step 6: Eco-Friendly Mulching and Maintenance
Mulch is essential for retaining soil moisture, suppressing weeds, and protecting plant roots. However, not all mulches are suitable for rain gardens. Avoid lightweight mulches like pine bark or straw, as they will float away during the first heavy rainstorm and clog your overflow notch.
The Best Mulch Choice: Use 2 to 3 inches of triple-shredded hardwood mulch. The interlocking fibers of hardwood mulch hold together beautifully against flowing water while slowly breaking down to enrich the bioretention soil mix. Avoid dyed or chemically treated mulches, as these can leach harmful toxins into the groundwater you are trying to protect.
Long-Term Sustainable Maintenance
One of the greatest benefits of a native rain garden is its low maintenance requirements once established. To keep your garden thriving without resorting to harsh chemicals:
- Weeding: Hand-pull weeds during the first two years while native plants are establishing. Avoid all synthetic herbicides, as they will wash into the groundwater and harm the aquatic ecosystems you are trying to protect.
- Watering: Water deeply once a week during the first growing season. By year two, the deep root systems will make the garden entirely self-sustaining, relying solely on natural rainfall.
- Pruning: Leave dead plant stalks standing through the winter. They provide crucial overwintering habitat for native bees and add visual interest to the winter landscape. Cut them back in early spring just as new growth begins to emerge.
- Sediment Removal: Occasionally check the inflow area for accumulated sediment or debris that might block water from entering the garden. Scoop it out by hand to maintain optimal infiltration rates.
Cost Analysis: DIY vs. Professional Installation
Building a rain garden is an investment in your property's ecological health and curb appeal. Costs can vary widely based on soil conditions, garden size, and whether you choose to hire professionals or tackle it as a weekend DIY project.
| Expense Category | DIY Cost (150 sq ft) | Professional Cost (150 sq ft) |
|---|---|---|
| Excavation & Labor | $0 (Sweat Equity) | $800 - $1,500 |
| Bioretention Soil Mix | $150 - $250 | $300 - $450 |
| Native Plants (Plugs & 1-Gallon) | $200 - $400 | $500 - $800 |
| Hardwood Mulch & River Rock | $75 - $125 | $150 - $250 |
| Total Estimated Cost | $425 - $775 | $1,750 - $3,000 |
While professional installation guarantees precise grading and immediate aesthetic impact, the DIY route offers immense personal satisfaction and a deeper connection to your local ecosystem. Furthermore, many local municipalities and watershed organizations offer eco-rebates or grant programs that can reimburse homeowners for a portion of their rain garden installation costs, making this sustainable landscaping project even more financially accessible.
Conclusion
Transforming a problematic, waterlogged area of your yard into a thriving rain garden is a powerful step toward sustainable landscaping. By managing stormwater runoff at the source, you protect local waterways, reduce neighborhood flooding, and cultivate a vibrant sanctuary for native wildlife. With careful planning, the right bioretention soil mix, and a diverse palette of deep-rooted native plants, your rain garden will serve as a beautiful, functional, and eco-friendly cornerstone of your landscape for decades to come.
