
Landscaping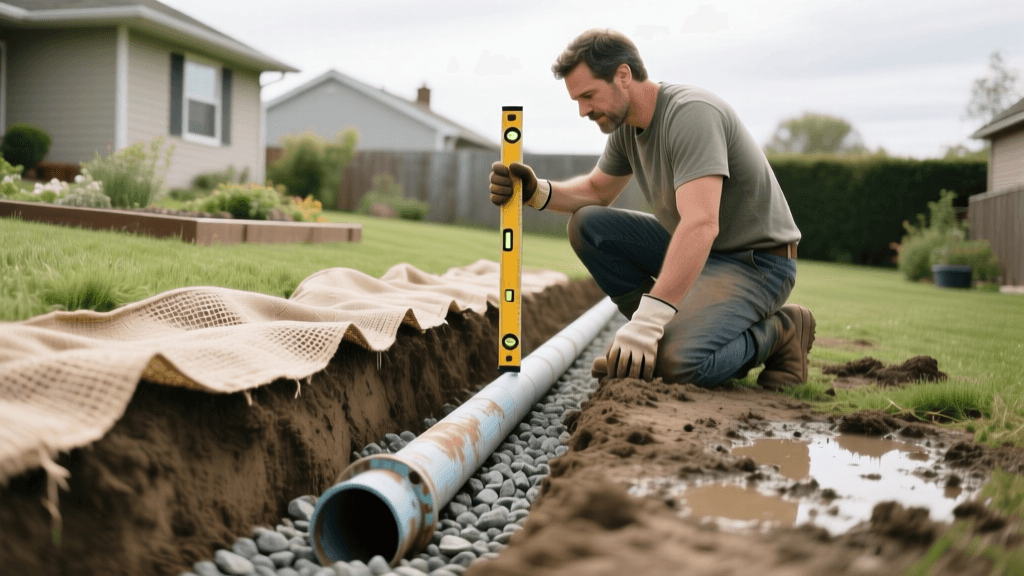
How to Install a DIY French Drain for Yard Drainage
Introduction: Solving Yard Drainage with a French Drain
Dealing with a soggy yard, pooling water after heavy rains, or a damp basement? Poor surface and subsurface drainage can wreak havoc on your landscaping and threaten your home's foundation. One of the most effective, time-tested solutions for redirecting excess groundwater is the French drain. Originally popularized by Henry Flagg French in 1859, this system utilizes a gravel-filled trench and a perforated pipe to intercept and redirect water away from vulnerable areas.
While hiring a professional landscaping crew to install a drainage system can cost anywhere from $20 to $30 per linear foot, a DIY French drain installation is a highly manageable weekend project. By sourcing your own materials and putting in the manual labor, you can reduce the cost to roughly $10 to $15 per linear foot. This comprehensive, step-by-step guide will walk you through the exact measurements, material selections, and grading techniques required to build a permanent drainage solution for your property.
Tools and Materials Required
Before breaking ground, you need to gather the right supplies. Using the correct type of gravel and pipe is critical to preventing future clogs and system failures. Below is a breakdown of the essential materials and estimated costs for a standard 50-foot French drain system.
| Item | Specifications | Estimated Cost | Purpose |
|---|---|---|---|
| Perforated PVC Pipe | 4-inch diameter, Schedule 20 or 40 | $45.00 | Main subsurface water conduit (rigid and durable) |
| Corrugated Flexible Pipe | 4-inch diameter, perforated | $25.00 | Alternative conduit (cheaper but prone to crushing) |
| Geotextile Landscape Fabric | Non-woven, 4 oz to 6 oz weight | $65.00 | Separates soil from gravel to prevent clogging |
| Washed Drain Rock | 3/4-inch crushed stone (washed) | $110.00 | Creates porous void space for water percolation |
| Catch Basin | 9x9 inch plastic basin with grate | $28.00 | Surface water entry point for heavy runoff |
| Trenching Shovel | Sharp, narrow blade | $35.00 | Digging narrow, deep trenches efficiently |
| Line Level and String | Standard masonry string line | $12.00 | Ensuring the precise 1% drainage slope |
Step 1: Plan the Route and Call 811
The most critical phase of any hardscaping or drainage project happens before you dig. You must identify where the water is pooling and determine the most logical 'daylight' exit point. Daylighting is the term used when the drain pipe emerges above ground to discharge water safely into a storm drain, a dry well, or a lower-elevation sloped area of your property.
Once you have mapped your route using landscaping marking paint, you must call 811 (the national 'Call Before You Dig' hotline in the United States). This free service will have local utility companies mark underground gas, water, and electrical lines. Striking a utility line is not only dangerous but can result in massive financial liability. Additionally, avoid routing your trench directly beneath large, established trees, as severing major structural roots can kill the tree and destabilize your landscape.
Step 2: Dig the Trench with the Proper Slope
Water relies on gravity to move through a French drain. If your trench is perfectly level, water will stagnate inside the pipe. The industry standard for drainage slope is a 1% grade, which translates to a 1/8 inch drop per linear foot of trench. For a 50-foot drain, your trench must drop exactly 6.25 inches from the starting point to the exit point.
To achieve this, drive two wooden stakes into the ground at the start and end of your route. Tie a masonry string between them and attach a line level to the center. Adjust the string on the exit stake until the bubble is perfectly centered. Measure down from the string to the soil to ensure your 1% drop is maintained as you dig. The trench should be 9 to 12 inches wide and 12 to 24 inches deep, depending on your local frost line and the severity of the water table. Use a trenching shovel to carve out the soil, and a hand tamper to compact the earthen floor of the trench so it does not settle unevenly over time.
Step 3: Line the Trench and Add Base Gravel
Before adding any stone, you must line the trench with non-woven geotextile landscape fabric. Do not use cheap, woven weed barrier fabric from a big-box store; woven fabrics are designed to block water and weeds, which will cause your drain to fail. Non-woven fabric allows water to pass through while filtering out fine silt and clay particles.
Drape the fabric into the trench, ensuring you have at least 12 inches of excess material hanging over both sides of the trench edges. This excess will be folded over the top of the gravel later to create a complete 'burrito' wrap around your drain. Once the fabric is laid, shovel in 2 to 3 inches of washed drain rock to create a stable, porous base for the pipe. It is vital that the gravel is 'washed.' Unwashed gravel contains fine stone dust that will turn into a concrete-like sludge when wet, clogging the pipe holes and ruining the system.
Step 4: Lay the Perforated Drain Pipe
When selecting your pipe, rigid PVC (Schedule 20 or 40) is vastly superior to flexible corrugated pipe. According to drainage experts and home inspectors, corrugated pipe is prone to crushing under the weight of heavy soil and its interior ridges catch debris, leading to severe clogs. Rigid PVC is smooth on the inside, allowing water and debris to flush through freely.
Lay the perforated PVC pipe on top of your gravel base. Here is a crucial rule that many DIYers get wrong: the perforated holes must face DOWN, toward the bottom of the trench. Many assume the holes should face up to 'catch' falling water. However, a French drain works by allowing water to rise through the gravel bed. When the water level reaches the bottom of the pipe, it enters the downward-facing holes. If the holes face up, water must fill the entire pipe and surrounding gravel bed before it can enter the top of the pipe, defeating the purpose and allowing soil to wash down into the tube.
Step 5: Cover, Fold, and Backfill
With the pipe in place, cover it with another 3 to 5 inches of washed drain rock. The top of the gravel bed should sit about 2 to 3 inches below the surface grade of your lawn. Once the gravel is leveled, take the excess landscape fabric hanging over the edges and fold it tightly over the top of the gravel, overlapping the layers to seal the system. This prevents topsoil, grass roots, and surface debris from migrating down into the stone void spaces.
Finally, backfill the remaining 2 to 3 inches of the trench with native topsoil and plant grass seed, or lay down matching sod to seamlessly blend the drain into your existing lawn. If your system includes a catch basin for surface water, install it at the lowest pooling point, connecting it to the main PVC line using solid (non-perforated) pipe for the first few feet to prevent surface debris from washing directly into the gravel bed.
French Drain vs. Alternative Drainage Solutions
While French drains are excellent for subsurface water management, they are not the only tool in a landscape architect's toolkit. Consider these alternatives based on your specific yard conditions:
- Dry Creek Bed: Best for managing surface runoff on sloped properties. It uses decorative river rock and boulders to slow down water velocity, preventing soil erosion while adding a natural, aesthetic hardscape feature to the garden.
- Bioswale or Rain Garden: Ideal for sustainable landscaping and eco-friendly stormwater management. A bioswale is a shallow, vegetated depression that captures roof or driveway runoff, allowing it to slowly percolate into the soil while native plants filter out pollutants and heavy metals.
- Surface Channel Drain: The best choice for intercepting heavy, fast-moving water across flat, paved surfaces like concrete driveways or patios before it reaches your lawn or garage.
Maintenance and Longevity
A properly installed French drain using rigid PVC, washed gravel, and non-woven fabric can last 30 to 40 years with minimal maintenance. To ensure longevity, avoid planting water-loving trees with aggressive root systems (like Willows or Poplars) near the drain line. Every two to three years, you can use a garden hose or a plumber's snake to flush out the exit point of the pipe, clearing away any accumulated silt, spider webs, or small debris that may have entered the daylight opening.
Authoritative Sources and Further Reading
For more information on sustainable water management, soil percolation, and protecting your home's foundation from hydrostatic pressure, consult the following expert resources:
- University of Minnesota Extension: Yard Drainage Solutions - Comprehensive guidelines on evaluating soil types and choosing the right drainage interventions for residential landscapes.
- International Association of Certified Home Inspectors (InterNACHI): French Drains - Expert insights on foundation protection, pipe materials, and common installation failures identified during home inspections.
- Environmental Protection Agency (EPA): Soak Up the Rain - Federal guidance on reducing stormwater runoff through permeable surfaces, rain gardens, and integrated landscape drainage systems.
