
Landscaping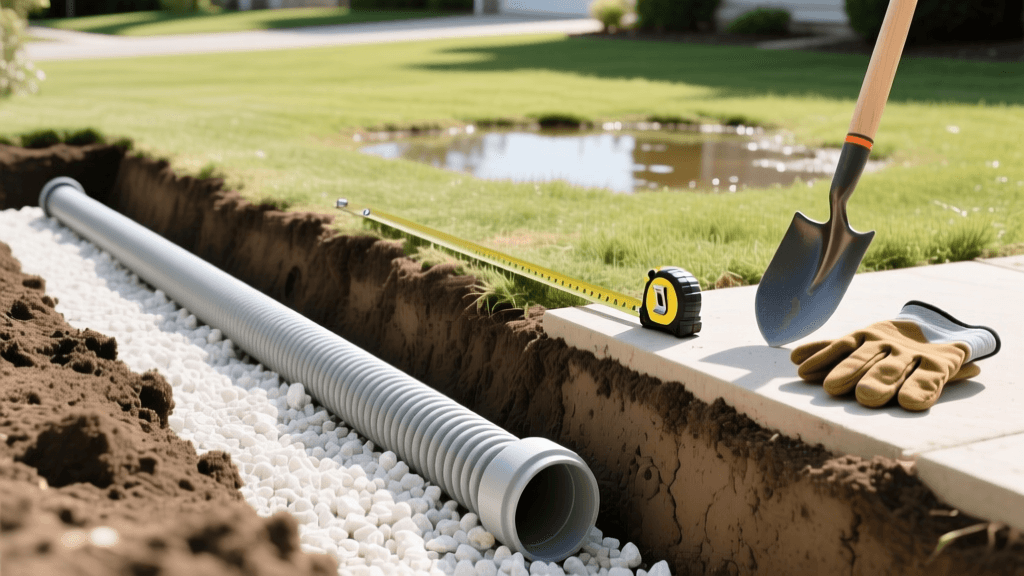
How to Install a DIY French Drain for Yard Drainage
Water pooling in your yard after a heavy rainstorm is more than just a nuisance; it can lead to foundation damage, ruined landscaping, soil erosion, and a prime breeding ground for mosquitoes. If your property suffers from poor drainage, installing a French drain is one of the most effective and permanent solutions available. Unlike surface drains that only catch water once it has already pooled, a French drain intercepts groundwater and surface runoff, channeling it safely away from your home and vulnerable landscape beds.
In this comprehensive, step-by-step guide, we will walk you through exactly how to plan, dig, and install a high-performance DIY French drain. Whether you are protecting your basement from seepage or drying out a perpetually soggy lawn, these practical instructions will ensure your drainage system works flawlessly for decades.
What is a French Drain and How Does it Work?
A French drain is a slightly sloped trench filled with gravel and a perforated pipe that redirects surface water and groundwater away from your home. According to water management experts at Penn State Extension, managing surface and subsurface water is critical for maintaining structural integrity and soil health. A French drain relies on a simple physical principle: water will always follow the path of least resistance. By providing a highly porous trench filled with washed gravel and a perforated pipe, you create an artificial underground riverbed. This system pulls water out of the saturated soil and redirects it to a safe discharge area, such as a municipal storm drain, a dry well, or a lower-lying daylight exit.
Tools and Materials Needed
Before breaking ground, gather the necessary tools and materials. For a standard 50-foot drain, expect to spend a weekend (1 to 2 days) on the project.
- Trenching Shovel and Spade: For digging the initial trench and removing sod.
- Mattock or Pickaxe: Essential for breaking up compacted clay soil or cutting through small roots.
- String Line and Line Level: Crucial for maintaining the correct slope over long distances.
- Landscape Fabric: Use a high-quality, non-woven geotextile fabric (e.g., Mirafi 500X or similar 4oz to 6oz fabric) to prevent soil from clogging the gravel.
- Perforated Drain Pipe: 4-inch diameter (corrugated or PVC).
- Washed Drain Gravel: #57 washed limestone or river rock. You will need approximately 1.5 tons per 50 linear feet. Do not use pea gravel, as the small stones can shift and clog the pipe.
- Wheelbarrow and Tarps: For moving soil and gravel efficiently.
Estimated Costs: A DIY French drain typically costs between $10 and $30 per linear foot, depending on material choices, soil conditions, and whether you rent a mini-excavator. Hiring a professional landscaping contractor will generally range from $50 to $100+ per linear foot.
Step-by-Step French Drain Installation
Step 1: Plan the Route and Check for Utilities
Before you dig, you must determine where the water is coming from and where it will go. The exit point (daylight) must be lower than the starting point to allow for gravity-fed drainage. If you cannot daylight the pipe, you will need to install a dry well at the end of the line. Most importantly, always call 811 (the national 'Call Before You Dig' hotline) a few days before your project to have local utility companies mark underground gas, water, and electrical lines. This is a free service and prevents catastrophic and dangerous accidents.
Step 2: Dig the Trench to the Proper Slope
A standard French drain trench should be 12 inches wide and 18 to 24 inches deep. The most critical factor in this step is the slope. You need a minimum grade of 1%, which equals a 1-inch drop for every 8 feet of length. Drive wooden stakes into the ground every 10 feet along your planned route. Tie a string line across the stakes and use a line level to ensure the string drops exactly 1.25 inches for every 10-foot section. Use this string as your depth guide while digging to ensure a consistent, gravity-driven flow.
Step 3: Line the Trench with Landscape Fabric
Once the trench is dug and the slope is verified, drape the non-woven landscape fabric into the trench. Do not cut the fabric to the exact width of the trench; instead, leave at least 12 to 18 inches of excess fabric hanging over both sides. This excess will be folded over the top of the gravel later, creating a 'burrito' effect that completely encapsulates the drain and prevents surrounding soil and clay from migrating into the gravel and clogging the system.
Step 4: Add Base Gravel and Install the Pipe
Shovel 2 to 3 inches of washed #57 gravel into the bottom of the fabric-lined trench and tamp it down lightly to create a stable base. Next, lay your perforated drain pipe on top of the gravel. Crucial Expert Tip: Many DIYers mistakenly install perforated pipe with the holes facing up, assuming water falls into it like a bucket. However, as highlighted by landscaping experts at This Old House, the perforated holes must face DOWN. As the water table rises in the gravel bed, it enters the bottom of the pipe directly. This keeps the pipe clear of sediment and allows the gravel to act as a primary filter, significantly extending the lifespan of your drain.
Step 5: Cover, Wrap, and Conceal
Once the pipe is laid, cover it with more washed gravel until the gravel level is about 2 to 3 inches below the surface grade. Fold the excess landscape fabric over the top of the gravel, overlapping the seams to create a sealed barrier. Finally, cover the wrapped drain with the native topsoil you removed during digging, and lay new sod or spread grass seed over the top to conceal the trench and restore your lawn.
Corrugated vs. PVC Pipe: Which Should You Choose?
When selecting your 4-inch perforated pipe, you will generally choose between flexible corrugated polyethylene and rigid PVC (often SDR 35 or Schedule 40). Below is a comparison to help you decide which is best for your specific landscape.
| Feature | Corrugated Pipe | PVC Pipe (SDR 35) |
|---|---|---|
| Cost | $0.75 - $1.50 per foot | $1.50 - $3.00 per foot |
| Durability | Moderate (can crush under heavy soil loads or vehicle traffic) | High (rigid, withstands heavy soil pressure and shallow burial) |
| Flow Rate | Lower (corrugated interior ridges create water friction) | Higher (smooth interior walls allow rapid water movement) |
| Installation | Easy (flexible, bends around curves without fittings) | Moderate (requires glue, couplings, and fittings for turns) |
| Maintenance | Harder to clean (drain snakes can catch on interior ridges) | Easy to flush, snake, and inspect with a camera |
Recommendation: Use corrugated pipe for long, winding runs with gentle curves where budget is a primary concern. Opt for rigid PVC if the drain will be buried shallowly, if it needs to support weight (like near a driveway), or if you want a system that is easy to flush and maintain over the next 50 years.
Discharge Options: Where Does the Water Go?
Collecting the water is only half the battle; you must discharge it responsibly. The Environmental Protection Agency (EPA) encourages sustainable water management practices. If your local codes permit, daylighting the pipe into a lower-lying wooded area or swale is the most cost-effective method. If you lack a lower elevation, installing a subterranean dry well filled with crushed stone allows the water to slowly percolate back into the water table without overwhelming the local storm sewer system. Alternatively, you can connect the end of the French drain to a pop-up emitter valve in a sunny area of your lawn, which remains hidden when dry but pops open to release water when the drain is flowing.
Maintenance Tips for Long-Lasting Drainage
A properly installed French drain requires very little maintenance, but a few proactive steps will ensure it lasts a lifetime. First, ensure the exit point (daylight or pop-up emitter) is kept clear of leaves, debris, and overgrown vegetation. Rodents and small animals sometimes nest in the open ends of corrugated pipes; installing a galvanized steel wire mesh cap over the exit point will prevent blockages. Finally, every two to three years, use a garden hose or a plumber's snake to flush out the pipe from the highest accessible cleanout point, clearing any fine silt that may have bypassed the landscape fabric.
By taking the time to calculate your slope correctly, choosing the right washed gravel, and wrapping the system in high-quality geotextile fabric, your DIY French drain will keep your landscape dry, your foundation safe, and your lawn pristine for decades to come.
