
2026 Guide: Documenting Fall Weatherstripping & Pipe Insulation
The Intersection of Garden Photography and Fall Winterization
As the vibrant hues of autumn give way to the stark, frosty realities of winter, the boundary between your indoor living space and the outdoor garden becomes a critical focal point for homeowners. For those who view their property through the lens of a camera, this seasonal transition offers a unique opportunity. Fall home winterization—specifically weatherstripping garden-facing doors and insulating outdoor irrigation pipes—is rarely considered a photogenic endeavor. However, in 2026, the practice of documenting your home's seasonal maintenance has evolved into a vital blend of property management, historical archiving, and macro photography.
By treating your fall winterization checklist as a structured photography project, you accomplish two things: you ensure your home is properly sealed against the cold, and you create a visual archive that tracks the wear-and-tear of your property's envelope over time. This guide will walk you through the technical steps of weatherstripping and pipe insulation, while simultaneously teaching you how to document the process using modern photographic techniques, macro lenses, and smartphone-integrated thermal imaging.
Weatherstripping the Garden Transition Zones
The transition zones between your garden and your home—such as patio French doors, sunroom entries, and greenhouse attachments—are the most vulnerable to heat loss. Over the summer, constant foot traffic, garden debris, and UV exposure degrade the seals on these doors. Before applying new materials, it is essential to document the current state of your weatherstripping.
Macro Photography of Worn Seals
Equip your camera with a dedicated macro lens (a 90mm or 100mm macro is ideal for 2026 mirrorless systems) or use your smartphone's macro mode. Photograph the compressed, cracked, or torn rubber gaskets along the bottom and sides of your garden-facing doors. These close-up images serve as a baseline for your home maintenance archive. Pay attention to the lighting; use a small LED panel light held at a 45-degree angle to cast micro-shadows that highlight the depth of the cracks and the compression of the old foam.
Selecting and Applying 2026 Weatherstripping Materials
Once documented, remove the old weatherstripping and clean the tracks with a degreaser. According to the U.S. Department of Energy, choosing the right material for the specific application is crucial for energy efficiency. For the bottom of heavy patio doors, a high-density silicone bulb seal or an interlocking metal threshold is recommended. For the sides and tops, V-seal (tension seal) or reinforced foam tape works best.
- Silicone Bulb Seals: Costing around $15 to $22 per roll in 2026, these offer superior longevity and flexibility in freezing temperatures.
- V-Seal Plastic Strips: Priced at roughly $8 per roll, these fold into a 'V' shape and spring open to bridge gaps up to 1/4 inch.
- Reinforced Foam Tape: Best for irregular gaps around older garden shed doors or greenhouse vents.
As you install the new weatherstripping, take 'after' macro photos. The contrast between the degraded rubber and the pristine, flexible silicone makes for a highly satisfying visual record and proves the efficacy of your labor.
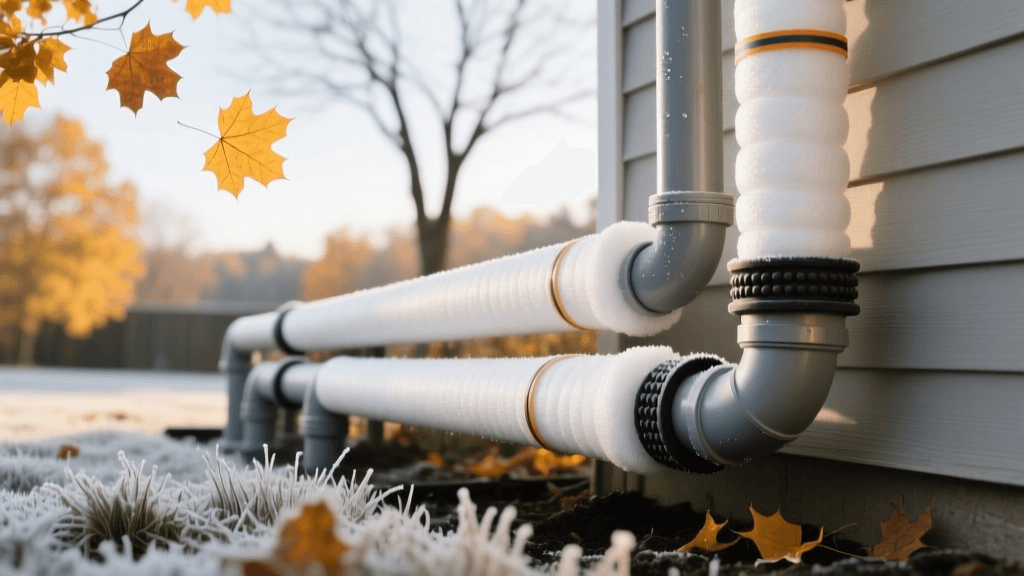
Insulating Outdoor Garden Pipes and Spigots
Your garden's hydration infrastructure is highly susceptible to freezing. Outdoor hose bibbs (spigots), drip irrigation backflow preventers, and exposed PVC or copper pipes must be insulated before the first hard freeze. Documenting this process is not just about aesthetics; it is about creating a 'winterization map' of your garden's plumbing.
Creating a Visual Plumbing Map
Before wrapping any pipes, take wide-angle and medium-shot photographs of your garden's plumbing layout. Capture the backflow preventer near the house foundation, the main shut-off valves, and any exposed piping running along retaining walls or raised beds. In 2026, many smart home systems integrate with outdoor irrigation, so be sure to photograph the locations of any smart freeze sensors or Wi-Fi water shut-off valves installed on your exterior lines.
Step-by-Step Insulation and Documentation
The FEMA Ready.gov guidelines emphasize that insulating exposed pipes is one of the most effective ways to prevent catastrophic water damage during winter storms. Here is how to insulate and document the process:
- Drain and Disconnect: Remove all garden hoses and drain the irrigation lines. Photograph the empty, dry spigots to confirm they are free of standing water.
- Apply Foam Covers: Slip insulated foam spigot covers (such as the Frost King 2026 Eco-Foam covers, priced around $6 each) over the hose bibbs. Secure them with the integrated velcro straps.
- Wrap Exposed Pipes: For longer runs of pipe, use self-sealing fiberglass or elastomeric foam pipe insulation. Cut the foam to length, snap it over the pipe, and seal the seams with foil tape.
- Protect Backflow Preventers: Wrap these complex valves in specialized insulated pouches or use a combination of foam and heavy-duty weatherproof tape.
As you complete each section, take a photograph. Use a bright, colored weatherproof tape or a small garden marker in the frame to indicate the direction of water flow. When you review these photos next autumn, you will know exactly where every valve and insulated joint is located, even if they are hidden beneath overgrown summer perennials.
Thermal Imaging: Seeing the Unseen Drafts
The most exciting advancement in winterization documentation is the accessibility of thermal imaging. Heat loss around garden-facing windows and poorly insulated patio doors is invisible to the naked eye but glaringly obvious through a thermal lens. By integrating thermal photography into your fall maintenance routine, you can pinpoint exactly where your weatherstripping is failing.
Top Thermal Camera Attachments for 2026
Smartphone-attached thermal cameras have become incredibly precise, allowing you to capture high-resolution thermal images that overlay perfectly with standard photographs. Below is a comparison of the top models available in 2026 for home winterization documentation:
| Brand & Model | Thermal Resolution | Best Use Case | 2026 Est. Price |
|---|---|---|---|
| FLIR One Gen 4 Pro | 160 x 120 | General draft detection around patio doors | $399 |
| Seek Thermal CompactXR | 320 x 240 | Long-range outdoor pipe and foundation scans | $449 |
| InfiRay P2 Pro | 256 x 192 | Macro thermal shots of window gaskets | $329 |
Interpreting Your Thermal Photos
To capture the best thermal documentation, wait until the evening when the outdoor temperature has dropped significantly, and your indoor heating is running. Turn off the interior lights to reduce glare and reflections on the glass. Scan the perimeter of your garden-facing French doors. On your thermal display, cold air infiltrating through broken weatherstripping will appear as dark blue or purple streaks against the warmer orange and red background of your interior walls.
Take a screenshot or save the thermal image directly to your phone's gallery. Most 2026 thermal apps allow you to create a 'fusion' image, which blends the thermal heat map with a standard digital photo at 50% opacity. These fusion images are the ultimate documentation tool, showing exactly where the draft is occurring in relation to the physical door frame.
Building Your 2026 Garden & Home Winter Archive
A collection of random photos in your camera roll is not a true archive. To make your winterization documentation useful for future years, you must organize it systematically. Create a dedicated digital folder or use a cloud-based photo management system with robust metadata tagging.
"A well-documented home is a resilient home. When you photograph your winterization efforts, you are not just taking pictures; you are writing a visual manual for your property's ongoing preservation." — 2026 National Home Preservation Journal
Tag your photos with specific keywords: #Winterization2026, #PatioDoorWeatherstrip, #NorthGardenSpigot, #ThermalDraft. Include the date, the specific product used (e.g., 'Silicone Bulb Seal Lot 44'), and the cost in the image description or caption. When autumn rolls around again, you can pull up your archive, review the thermal images from the previous year, and immediately identify which garden-facing doors need their weatherstripping replaced before the first frost hits.
Conclusion
Fall home winterization does not have to be a mundane, forgotten chore. By merging the meticulous nature of weatherstripping and pipe insulation with the creative discipline of garden photography, you transform seasonal maintenance into an engaging, highly rewarding project. The macro shots of fresh silicone seals, the wide-angle maps of insulated garden spigots, and the revealing thermal images of drafty patio doors all contribute to a comprehensive visual archive. As you secure your home against the winter chill, your camera ensures that the knowledge, effort, and upgrades of 2026 are preserved, making next year's transition into winter even smoother and more efficient.

