
2026 Guide: Photographing Self-Watering Window Box Installs
The Art of the Garden Install: Visual Storytelling in 2026
In the modern era of garden documentation, the final bloom is only half the story. Today’s garden enthusiasts, landscape designers, and botanical influencers know that the process of creation is just as captivating as the result. Installing a window box with a self-watering liner and an integrated drip tray is a fantastic weekend project, but when paired with deliberate garden photography and time-lapse documentation, it transforms into a compelling visual narrative. Whether you are building a portfolio, updating a landscaping blog, or simply preserving a digital garden diary, capturing the technical and aesthetic nuances of this installation requires a strategic approach.
As we move through 2026, the intersection of smart gardening and high-resolution visual media has never been more accessible. With the latest mirrorless cameras, weather-sealed smartphone lenses, and advanced intervalometers, you can document every screw turned and every seedling planted in stunning 4K or 8K resolution. This guide will walk you through the physical installation of a self-watering window box system while simultaneously directing your camera work to ensure every step is beautifully archived.
Essential Camera Gear for Garden Documentation
Before picking up a drill, you must set up your documentation station. For a comprehensive visual diary, you need a mix of wide-angle context shots, dynamic action shots, and extreme macro details. In 2026, a weather-sealed mirrorless camera paired with a 24-70mm f/2.8 lens is the gold standard for outdoor versatility. If you are relying on a smartphone, ensure it is equipped with a clip-on macro lens and a rugged, waterproof case to protect against soil and moisture.
Lighting is the most critical variable in outdoor photography. While the "golden hour" (shortly after sunrise or before sunset) provides warm, directional light for final reveal shots, the actual installation process is best documented during mid-morning overcast conditions. Cloud cover acts as a giant natural softbox, eliminating harsh shadows and glare from metallic tools, plastic liners, and wet soil. Bring along a 5-in-1 collapsible reflector to bounce fill light into the dark recesses of the window box as you work.
For time-lapse documentation, a heavy-duty tripod with a geared center column is non-negotiable. Wind is the enemy of time-lapse photography; even a mild breeze can cause micro-vibrations that ruin hours of footage. Weight down your tripod with a sandbag, and use your camera’s built-in intervalometer set to capture one frame every ten seconds. This will yield a smooth, accelerated view of the entire multi-hour installation process.
Phase 1: Staging the Flat Lay (Materials and Prep)
Every great DIY tutorial begins with a "knolling" or flat lay shot. This involves organizing all your materials at 90-degree angles and photographing them from directly above. Lay out a neutral-colored canvas drop cloth on your driveway or lawn to serve as a clean backdrop. Arrange your self-watering liner, the drip tray, mounting brackets, galvanized screws, a magnetic stud finder, and your preferred potting mix in a visually pleasing grid.
Shoot this flat lay with a 50mm or 85mm prime lens to avoid the barrel distortion common in wide-angle lenses. Set your aperture to f/8 to ensure everything from the top of the soil bag to the threads on the screws is in sharp focus. This overhead shot serves as the "table of contents" for your visual diary, giving your audience a clear understanding of the components involved before the physical labor begins.
Phase 2: Mounting the Brackets and Drip Tray
The most critical structural and protective element of this installation is the drip tray. According to experts at the University of Maryland Extension, managing water runoff is essential to prevent rot, mold, and structural damage to your home's exterior facade. The drip tray must sit snugly beneath the window box liner, sloping slightly away from the house to encourage proper drainage.
As you locate the exterior wall studs using a magnetic stud finder, switch your camera to video mode or burst-photo mode. Capture the close-up action of the drill bit biting into the siding or brick. Use a fast shutter speed (at least 1/500th of a second) to freeze the motion of the drill and the flying debris. When securing the heavy-duty steel brackets, ensure you are using 3-inch galvanized or stainless-steel lag screws for maximum load-bearing support, especially when the self-watering reservoir is full and the soil is saturated.
Once the brackets are leveled and the drip tray is slotted into place, take a series of detail shots focusing on the gap between the home’s exterior and the back of the drip tray. Documenting this specific clearance (ideally 1/4 inch to promote airflow and prevent moisture trapping) provides immense educational value to your audience and proves your adherence to best practices in exterior home maintenance.
Phase 3: Inserting the Self-Watering Liner
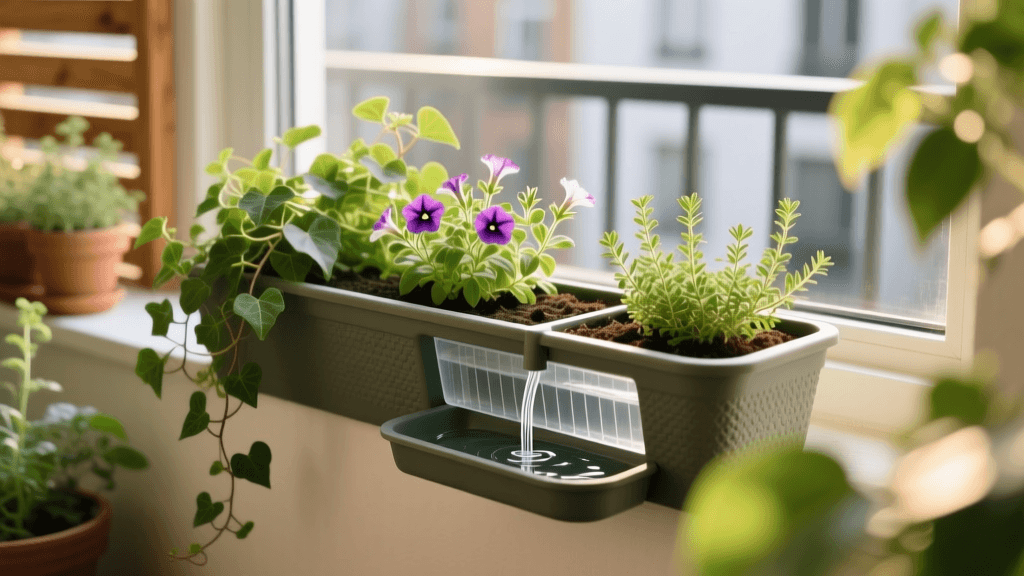
With the structural foundation secure, it is time to introduce the star of the show: the self-watering liner. Modern 2026 models utilize advanced capillary wicking mats and sub-irrigation reservoirs that drastically reduce water waste. Carefully lower the liner into the brackets, ensuring the water fill tube is positioned at the front corner for easy access and photographic visibility.
This is the perfect moment to utilize your macro lens. Capture the texture of the wicking mat and the engineering of the overflow drain. These macro shots elevate your documentation from a simple DIY guide to a technical review of gardening technology. As you add the base layer of drainage gravel and the top layer of high-quality potting mix, shoot from a low angle, placing the camera almost level with the window sill. This perspective exaggerates the depth of the box and makes the soil layering process look incredibly dynamic.
2026 Self-Watering Liner Comparison Chart
| Brand / Model (2026) | Reservoir Capacity | Drip Tray Integration | Photogenic Aesthetic |
|---|---|---|---|
| Lechuza Balconera Stone | 1.3 Gallons | Optional Slide-on Tray | High (Textured Slate Finish) |
| Gardener's Supply Self-Watering Liner | 1.0 Gallons | Universal Fit Drip Catcher | Medium (Classic Matte Black) |
| EarthBox Window System | 1.5 Gallons | Integrated Overflow Channel | Medium (Utilitarian Terracotta) |
Phase 4: Planting and the Final Reveal
Planting is where the visual storytelling truly comes to life. When selecting plants for a self-watering window box, you must balance horticultural needs with visual impact. The Royal Horticultural Society (RHS) recommends utilizing a mix of thrillers, fillers, and spillers to create depth and continuous color throughout the growing season. For 2026, trailing varieties like Dichondra argentea 'Silver Falls' provide a stunning, high-contrast backdrop for vibrant fillers like Calibrachoa 'Superbells'.
As you arrange the plants, step back and review your camera’s live view screen. Ensure the color palette is balanced and that the trailing foliage is deliberately draped over the front lip of the liner, partially obscuring the drip tray for a natural, overflowing look. Use a small hand blower to remove any stray soil or dust from the leaves and the exterior of the window box before taking your final still images.
For the final reveal, wait for the golden hour. Position your camera at a 45-degree angle from the corner of the house to capture both the depth of the window box and the architectural lines of the building. Use a wide aperture (f/2.8 or f/4) to blur the background slightly, drawing the viewer's eye directly to the vibrant blooms and the sleek profile of the self-watering liner.
Setting Up the Long-Term Time-Lapse
The installation is complete, but the documentation is just beginning. To capture the explosive growth enabled by the consistent moisture of the self-watering reservoir, set up a permanent or semi-permanent time-lapse rig. Mount a dedicated action camera or an older weather-sealed DSLR on a nearby fence post or tree bracket, angled directly at the window box.
Set the intervalometer to capture one image every 30 minutes during daylight hours. Over the next eight to twelve weeks, this will compile into a mesmerizing video showing the trailing plants cascading down over the drip tray and the blooms opening and closing with the sun. This long-term visual data not only serves as beautiful content for social media but also acts as empirical proof of the efficacy of your chosen self-watering system and plant varieties.
Conclusion
Documenting a window box installation with a self-watering liner and drip tray is a rewarding exercise in both horticulture and visual arts. By carefully planning your camera angles, mastering your lighting, and paying close attention to the technical details of water management, you create a lasting archive of your garden's evolution. In 2026, the tools to tell these stories are at our fingertips; it is up to us to frame the narrative, one beautifully captured frame at a time.

