
Landscaping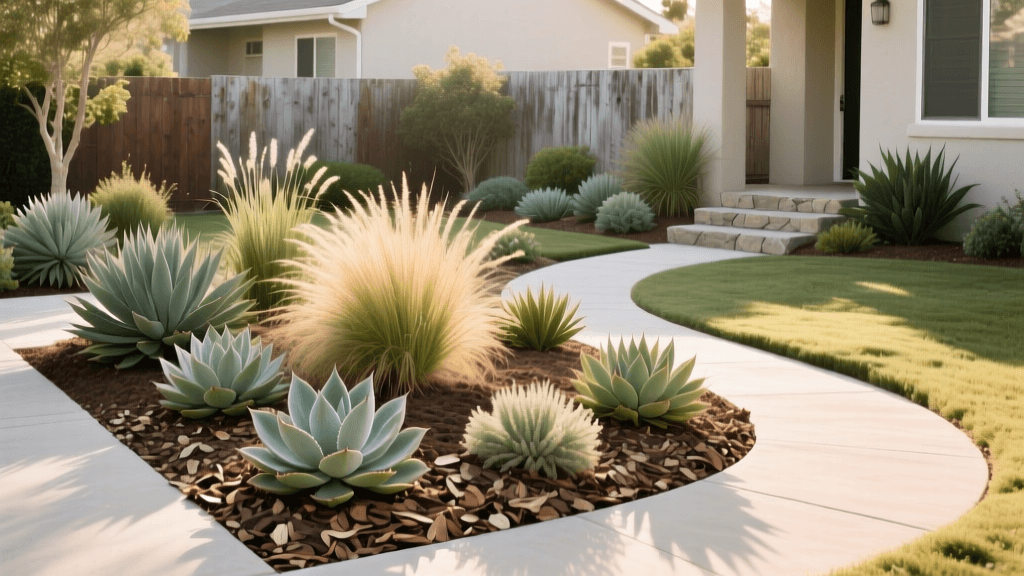
Beginner Guide to Drought-Tolerant Front Yard Landscaping
Transform Your Front Yard with Drought-Tolerant Landscaping
Designing a front yard that looks stunning year-round without demanding constant watering is one of the smartest investments a homeowner can make. Drought-tolerant landscaping, often referred to as xeriscaping, is not about creating a barren desert scape. Instead, it is about working with nature to build a vibrant, textured, and colorful garden that thrives on minimal supplemental water. According to the Environmental Protection Agency (EPA), landscape irrigation accounts for nearly one-third of all residential water use, totaling nearly 9 billion gallons per day nationwide. By transitioning to a water-wise front yard, you can drastically reduce your water bill, lower your maintenance time, and boost your home's curb appeal.
This beginner-friendly guide will walk you through the exact steps to plan, prepare, and plant a resilient drought-tolerant front yard, complete with plant recommendations, soil preparation techniques, and cost estimates.
Step 1: Assess Your Microclimate and Soil
Before buying a single plant, you must understand your yard's unique conditions. Drought-tolerant plants generally demand excellent drainage; they will quickly succumb to root rot if left sitting in heavy, waterlogged clay.
The Percolation Test
To test your soil drainage, dig a hole about 12 inches deep and 12 inches wide in your proposed garden bed. Fill it with water and let it drain completely. Then, fill it a second time and measure how long it takes for the water level to drop. Ideally, the water should drain at a rate of 1 to 2 inches per hour. If it drains slower than that, you have heavy clay soil that will require amendment or the use of raised berm planting.
Sun Mapping
Observe your front yard over a full day. Note which areas receive full sun (6+ hours of direct sunlight), part sun (3-6 hours), and full shade. Most classic drought-tolerant perennials, such as lavender and coneflowers, require full sun to produce robust blooms and maintain structural integrity.
Step 2: Choose the Right Drought-Tolerant Plants
When selecting plants, prioritize native species or adapted perennials with deep taproots, silver or fuzzy foliage (which reflects sunlight and reduces transpiration), and narrow leaves. The Colorado State University Extension emphasizes that proper plant selection based on hydro-zoning—grouping plants with similar water needs together—is a foundational principle of successful xeriscaping.
Below is a comparison chart of five beginner-friendly, highly resilient perennials that provide excellent curb appeal and seasonal interest.
| Common Name | Botanical Name | USDA Zones | Sun Exposure | Mature Size | Key Features |
|---|---|---|---|---|---|
| Purple Coneflower | Echinacea purpurea | 3-8 | Full Sun | 2-4 ft tall | Attracts pollinators, drought-resistant taproot |
| Munstead Lavender | Lavandula angustifolia | 5-8 | Full Sun | 1-2 ft tall | Fragrant silver foliage, loves poor soil |
| Autumn Joy Sedum | Hylotelephium 'Herbstfreude' | 3-9 | Full Sun | 1.5-2 ft tall | Succulent leaves, late-season pink blooms |
| Russian Sage | Perovskia atriplicifolia | 4-9 | Full Sun | 3-5 ft tall | Airy purple spikes, highly deer resistant |
| Yarrow | Achillea millefolium | 3-9 | Full Sun | 1-3 ft tall | Fern-like foliage, flat-topped flower clusters |
Tip: Use the Missouri Botanical Garden Plant Finder tool to filter specific cultivars by your exact zip code and soil moisture requirements.
Step 3: Amend the Soil and Prepare the Beds
Unlike traditional vegetable gardens or lush English cottage gardens, drought-tolerant landscapes do not require rich, heavily fertilized soil. In fact, too much nitrogen promotes rapid, weak, and thirsty top growth that cannot be sustained during a summer heatwave.
Instead of heavy fertilizers, focus on improving soil structure. If your soil failed the percolation test, incorporate 2 to 3 inches of coarse compost or expanded shale into the top 8 inches of the existing soil. This opens up the soil profile, allowing oxygen to reach the roots and preventing water from pooling. Expect to spend about $30 to $50 per cubic yard for high-quality landscape compost. For a standard 100-square-foot front yard bed, you will need approximately one cubic yard of amendment.
Step 4: Apply the Right Mulch
Mulch is the unsung hero of water-wise landscaping. It suppresses weeds, moderates soil temperature, and drastically reduces surface evaporation. However, the type of mulch matters immensely for drought-tolerant plants.
Organic vs. Inorganic Mulch
- Shredded Hardwood Bark: Excellent for perennials like coneflowers and yarrow. It retains some moisture and breaks down over time to feed soil microbes. Apply a 2 to 3-inch layer. Cost: ~$35 per cubic yard.
- Crushed Gravel or Decomposed Granite: Ideal for Mediterranean plants like lavender and Russian sage. Gravel reflects heat, keeps the plant crown dry (preventing fungal rot), and allows rain to percolate instantly. Apply a 2-inch layer over landscape fabric. Cost: ~$50 to $80 per cubic yard.
Crucial Rule: Never pile mulch against the stems or crowns of your plants (a practice known as "volcano mulching"). Leave a 2-inch gap around the base of every plant to prevent rot and pest infestations.
Step 5: Install Drip Irrigation for Establishment
A common misconception is that drought-tolerant plants never need water. While they are incredibly resilient once established, they require consistent, deep watering during their first growing season to develop those crucial deep taproots.
Ditch the overhead sprinklers, which waste water to wind and evaporation. Instead, invest in a beginner drip irrigation kit (available at most hardware stores for $50 to $100). Run the main poly tubing along the base of your garden bed and attach 1-gallon-per-hour (GPH) button emitters directly to the root zone of each new plant.
The First-Year Watering Schedule
- Weeks 1-4: Water deeply every 2 to 3 days to keep the root ball moist.
- Months 2-6: Transition to watering once a week, applying about 1 inch of water (roughly 30 minutes per emitter).
- Year 2 and Beyond: Reduce watering to only during periods of severe, prolonged drought. Natural rainfall should be sufficient for the rest of the year.
Hardscaping: Adding Structure and Reducing Turf
To maximize your water savings, replace water-thirsty turfgrass with functional hardscaping. Consider installing a permeable gravel pathway or a dry river bed using river rock to manage stormwater runoff while adding visual interest. A 4-foot-wide decomposed granite pathway spanning 20 feet (80 sq ft) will cost roughly $150 in materials and can be installed in a single weekend. Frame these hardscaped areas with drought-tolerant ornamental grasses like Blue Fescue or Mexican Feather Grass to soften the edges and create movement in the wind.
Maintenance Tips for Long-Term Success
Once your drought-tolerant front yard is planted and mulched, maintenance drops significantly compared to a traditional lawn. However, a few seasonal tasks will keep your landscape looking pristine:
- Spring Cleanup: Wait until early spring to cut back dead perennial foliage. Leaving seed heads (like those on the Purple Coneflower) over the winter provides vital food for local bird populations.
- Weed Control: Hand-pull weeds before they go to seed. Weeds are aggressive competitors for limited soil moisture.
- Avoid Over-Fertilizing: Resist the urge to feed your xeriscape plants. If growth appears stunted after three years, a light top-dressing of compost is all that is needed.
By following these steps, you will cultivate a front yard that not only conserves precious water resources but also stands as a beautiful, ecologically friendly testament to smart, modern landscaping. Your local pollinators—and your water bill—will thank you.
