
Landscaping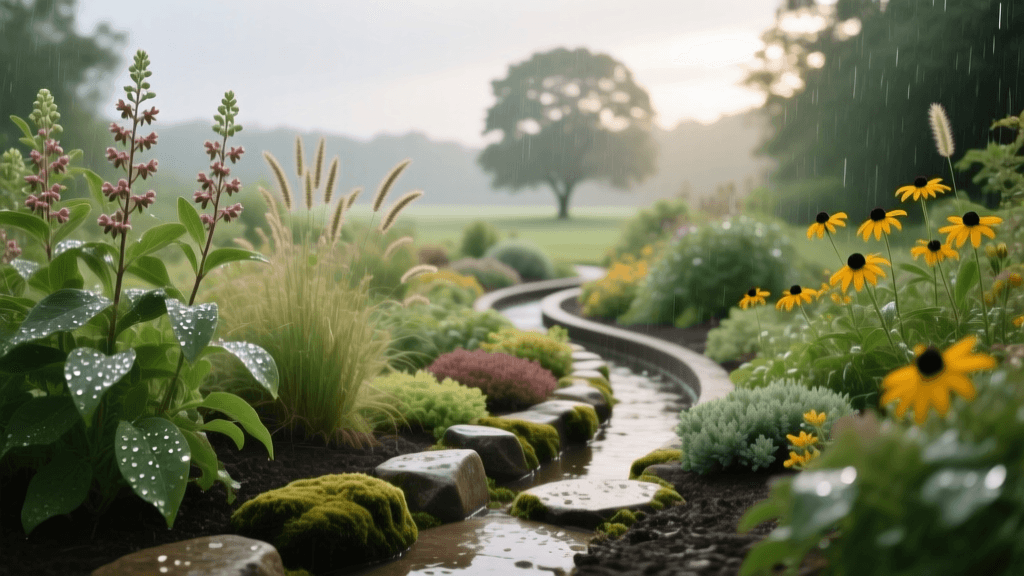
How to Build a Rain Garden for Sustainable Yard Drainage
What Is a Rain Garden and Why Do You Need One?
A rain garden is a shallow, landscaped depression designed to capture and absorb stormwater runoff from impervious surfaces like roofs, driveways, and patios. Unlike traditional drainage systems that quickly funnel water into municipal sewers—often carrying pollutants like motor oil, fertilizers, and heavy metals with it—a rain garden allows water to slowly infiltrate the native soil. This natural filtration process protects local waterways and recharges groundwater aquifers.
According to the Environmental Protection Agency (EPA), green infrastructure solutions like rain gardens are critical for reducing combined sewer overflows and mitigating urban flooding. By implementing sustainable drainage methods on your property, you not only solve pesky yard pooling issues but also create a thriving micro-habitat for local pollinators and beneficial insects.
Step 1: Site Selection and the Percolation Test
Before breaking ground, you must choose the right location. A rain garden should be situated at least 10 feet away from your home’s foundation to prevent basement seepage, and away from septic systems and large tree roots. Look for a naturally low-lying area where downspouts or surface runoff naturally flow.
How to Perform a Percolation Test
Not all soils drain well. Heavy clay soils can hold water for days, creating a mosquito breeding ground rather than a functional garden. To test your soil’s infiltration rate:
- Dig a test hole about 8 inches deep and 6 inches wide.
- Fill the hole with water and let it drain completely (this primes the soil).
- Refill the hole to the top and measure the water level.
- Wait 24 hours and measure the drop in water level.
The Rutgers Cooperative Extension Water Resources Program advises that your soil should drain at least 1 inch per hour. If your soil drains slower than this, you will need to amend the soil heavily or install an underdrain pipe connected to an overflow outlet.
Step 2: Sizing and Excavation
The size of your rain garden depends on the square footage of the impervious surface draining into it and your soil type. For sandy soils, a rain garden should be about 10% to 15% of the impervious surface area. For clay-heavy soils, aim for 20% to 30%.
When excavating, dig the basin to a depth of 6 to 8 inches. Ensure the bottom is perfectly level so water distributes evenly rather than pooling in one corner. Use the excavated soil to build a low berm (about 4 to 6 inches high) on the downhill side of the garden to contain the water during heavy storms. Create a 2-foot-wide level entry point (a swale) where the water will flow into the garden, and line it with river rock to prevent erosion.
Step 3: The Ideal Rain Garden Soil Mix
Native topsoil is rarely porous enough for a rain garden. To ensure rapid infiltration and provide nutrients for your plants, you must create a specialized bioretention soil mix. The industry-standard recipe is:
- 50% to 60% Coarse Washed Sand: Provides the necessary macropores for rapid drainage.
- 20% to 30% Topsoil: Adds structure and mineral content.
- 20% to 30% Organic Compost: Retains moisture during dry spells, provides nutrients, and binds pollutants.
Mix these components thoroughly before backfilling the excavated basin. Leave the soil mix about 2 inches below the surrounding lawn grade to allow for water storage capacity and a layer of mulch.
Step 4: Choosing Native Plants for Three Zones
A rain garden experiences extreme moisture fluctuations: it may be submerged for a few hours after a storm, then bone dry during a summer drought. Therefore, traditional turfgrass and ornamental exotics will fail. You must select deep-rooted native plants. The National Wildlife Federation emphasizes that native plants are essential for supporting local food webs and require significantly less maintenance and watering once established.
Divide your rain garden into three distinct planting zones based on moisture tolerance:
Zone 1: The Bottom (Wettest)
This area holds water the longest. Choose plants that can tolerate temporary inundation and wet roots. Excellent choices include Swamp Milkweed (Asclepias incarnata), Blue Flag Iris (Iris versicolor), and Joe-Pye Weed (Eutrochium purpureum).
Zone 2: The Slopes (Moderate)
The sides of the rain garden experience alternating wet and dry conditions. Plants here need to be highly adaptable. Consider Black-Eyed Susan (Rudbeckia hirta), New England Aster (Symphyotrichum novae-angliae), and Switchgrass (Panicum virgatum).
Zone 3: The Berm (Driest)
The top of the berm drains quickly and dries out fast. Plant drought-tolerant species like Purple Coneflower (Echinacea purpurea), Butterfly Weed (Asclepias tuberosa), and Little Bluestem (Schizachyrium scoparium).
Mulching and Overflow Management
Mulch is critical in a rain garden, but not all mulch is created equal. Because the basin will experience periodic flooding, lightweight mulches like pine straw or standard wood chips will simply float away, clogging your overflow outlet or washing into the street. Instead, use heavy, double-shredded hardwood mulch or large river rocks in the inlet zone. Apply a 2 to 3-inch layer to suppress weeds, retain moisture during dry periods, and provide an additional layer of filtration for incoming runoff.
Even the best-designed rain gardens can overflow during extreme, once-in-a-decade storm events. You must plan for this by creating a designated overflow outlet. This can be a simple notch in the berm lined with river rock, or a buried PVC pipe that safely directs excess water away from your home and into a secondary drainage area or dry well. Never allow the overflow to direct water toward neighboring properties or public sidewalks, as this can create liability issues and ice hazards in winter.
Rain Garden Cost and Maintenance Breakdown
Building a rain garden is a cost-effective, eco-friendly alternative to traditional hardscaping drainage solutions. Below is a comparison of sustainable and conventional drainage methods to help you budget your landscaping project.
| Drainage Solution | Average Cost (per sq. ft.) | Eco-Friendly Rating | Maintenance Requirements |
|---|---|---|---|
| Rain Garden (DIY) | $3 - $10 | High (Filters water, supports wildlife) | Weeding, annual mulching, pruning |
| Rain Garden (Pro) | $15 - $25 | High (Filters water, supports wildlife) | Minimal if established correctly |
| French Drain | $20 - $30 | Low (Moves water to storm sewers) | Flushing pipes, clearing gravel clogs |
| Dry Well | $10 - $20 | Medium (Recharges groundwater) | Inspecting for sediment buildup |
Ongoing Maintenance for a Thriving Rain Garden
During the first two years, your primary tasks will be watering during dry spells (about 1 inch per week) and aggressive weeding. Once the deep root systems of the native plants establish, they will naturally outcompete weeds and require no supplemental irrigation.
Apply 2 to 3 inches of double-shredded hardwood mulch annually. Inspect the inlet swale after major storms to remove any debris or sediment that could block water flow. With minimal care, your rain garden will serve as a beautiful, sustainable landscape feature that protects your local watershed for decades.
