
Landscaping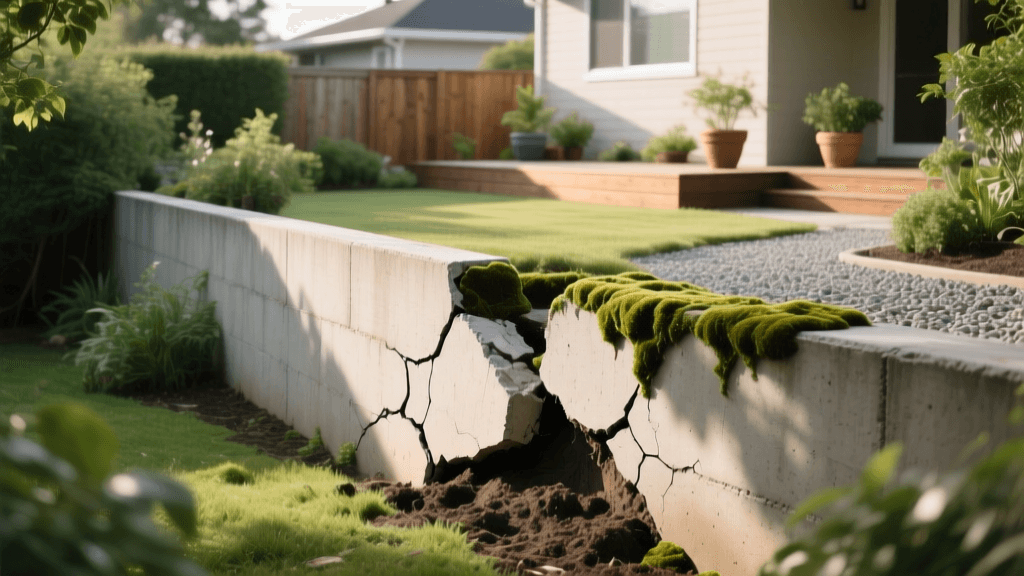
Diagnosing and Fixing a Leaning Landscape Retaining Wall
The Hidden Dangers of a Failing Retaining Wall
A retaining wall is a critical structural element in many landscape designs, tasked with holding back thousands of pounds of soil and managing complex drainage dynamics. When a retaining wall begins to lean, bulge, or crack, it is not merely a cosmetic issue; it is a severe structural failure waiting to happen. Ignoring the early warning signs of a failing hardscape can lead to catastrophic collapse, property damage, and costly emergency repairs. As a homeowner or landscaping professional, understanding the physics behind retaining wall failure and knowing how to troubleshoot the root cause is essential for long-term outdoor living space stability. This comprehensive guide will walk you through the exact diagnostic steps, engineering principles, and actionable repair solutions required to save a leaning landscape retaining wall.
Step 1: Diagnose the Root Cause of the Lean
Before picking up a shovel or ordering materials, you must identify why the wall is failing. Retaining walls rarely fail without a specific, identifiable trigger. The vast majority of leaning walls are victims of poor water management or inadequate foundational support.
Hydrostatic Pressure
The number one enemy of any retaining wall is hydrostatic pressure. When rainwater or irrigation runoff saturates the soil behind the wall, the soil expands and becomes significantly heavier. Water trapped in the soil exerts immense lateral force against the back of the wall blocks. If the wall was not designed with adequate drainage to relieve this pressure, the sheer weight of the waterlogged soil will push the wall outward, causing a noticeable lean or a pronounced bulge in the center of the structure.
Inadequate Base Preparation
According to engineering guidelines published by Allan Block, a proper base trench must be excavated to a depth equal to 10 percent of the total wall height, plus an additional 6 inches for a compacted gravel base. If the original installer skipped this step, placed the first course of blocks directly on soft topsoil, or failed to compact the base aggregate using a mechanical plate compactor, the wall will inevitably settle unevenly. This differential settlement manifests as a forward tilt or a localized dip in the wall's alignment.
Lack of Proper Backfill and Drainage
The National Concrete Masonry Association (NCMA) mandates the use of clear, angular drainage stone immediately behind the wall blocks. If the contractor backfilled the space behind the wall with the native clay soil they just excavated, they created a massive sponge that traps water. Furthermore, the absence of a perforated drain pipe at the base of the wall or missing weep holes in the bottom course of blocks will guarantee that water has nowhere to escape.
Step 2: Assess the Severity of the Damage
Once you understand the potential causes, you need to measure the physical toll on the wall. Grab a long, sturdy string, two stakes, and a tape measure to perform the String Line Test.
- Set the Stakes: Drive a stake into the ground at one end of the wall and another at the opposite end, ensuring the string runs parallel to the wall's face.
- Pull it Taut: Tie the string tightly between the stakes, positioning it exactly 1 inch away from the top course of the wall at both ends.
- Measure the Deviation: Walk the length of the wall and measure the distance between the string and the face of the blocks. If the wall is bowing outward by more than 1 inch per 4 feet of height, the structural integrity is severely compromised.
- Check for Cracks and Separation: Look for vertical cracks indicating shear failure, or blocks that have completely separated from their interlocking lips. If the blocks are sliding off their pins or lips, the wall is in the advanced stages of failure.
Step 3: Troubleshooting and Repair Solutions
The repair method you choose depends entirely on the severity of the lean and the type of wall you have (segmental concrete blocks, natural stone, or poured concrete). Below are the three primary troubleshooting solutions for a leaning retaining wall.
Solution A: Rebuilding the Base and Adding Drainage (For Minor Bulging)
If the wall is leaning slightly (less than 1 inch of deviation) and the blocks are intact, the issue is likely a saturated base or poor drainage. You can often save the wall without a complete tear-down.
- Excavate the Backfill: Carefully dig out the soil behind the wall down to the base course. Remove at least 12 to 18 inches of soil width.
- Install a French Drain: Lay a 4-inch Schedule 40 PVC pipe or a flexible corrugated drain pipe wrapped in non-woven geotextile fabric at the very bottom of the trench. Ensure the pipe has a minimum slope of 1/8 inch per foot to daylight or a dry well.
- Replace with Drainage Gravel: Backfill the excavated area with 3/4-inch clear, crushed angular gravel. Do not use pea gravel, as it rolls and does not lock together. The angular gravel creates voids that allow water to flow freely down to the drain pipe.
- Separate the Soil: Line the trench with a high-quality geotextile fabric like Mirafi 500X before adding the gravel. This prevents fine clay particles from migrating into the gravel and clogging the drainage system over time.
Solution B: Installing Helical Tiebacks (For Moderate Leaning)
For walls that are leaning significantly but where the blocks themselves are not cracked or shattered, helical tiebacks offer an engineered solution that avoids demolition. Helical anchors are steel shafts with helical bearing plates that are driven horizontally through the wall face and deep into the stable soil behind the failure plane.
- The Process: A specialized contractor drills a small hole through the face of the retaining wall block. The helical anchor is hydraulically torqued through the wall and into the earth until it reaches competent, load-bearing soil.
- Securing the Wall: A steel faceplate is attached to the front of the block, and a nut is tightened against the anchor shaft. This physically pulls the leaning wall back toward the soil and locks it in place.
- Cost and Timing: Helical anchors typically cost between $150 and $250 per anchor, installed every 4 to 6 feet. This repair can usually be completed in one to two days and provides immediate structural stabilization.
Solution C: Complete Tear-Down and Rebuild (For Severe Failure)
If the wall is leaning more than 2 inches, blocks are cracking, or the base has completely washed out, no patch job will suffice. The wall must be dismantled and rebuilt to modern engineering standards. The American Society of Landscape Architects (ASLA) frequently highlights that proper hardscape engineering must prioritize subsurface drainage over surface aesthetics. When rebuilding, ensure the first course of blocks is buried so that at least 10 percent of the wall's total height is below grade. Use a laser level to guarantee the base course is perfectly flat and compact the 3/4-inch gravel base in 2-inch lifts using a mechanical plate compactor.
Retaining Wall Repair Methods: Cost and Application Chart
Understanding the financial and logistical commitments of each repair strategy is vital for budgeting your landscape renovation. The table below outlines the primary repair methods, their ideal use cases, and estimated costs.
| Repair Method | Best Application | Estimated Cost | Time Required |
|---|---|---|---|
| Drainage Retrofit (French Drain) | Minor bulging caused by hydrostatic pressure; blocks are intact. | $20 - $35 per linear foot | 1 - 2 Days |
| Helical Tieback Anchors | Moderate leaning (1-3 inches); stable blocks; difficult access behind wall. | $150 - $250 per anchor | 1 - 2 Days |
| Base Underpinning | Settling or sinking due to a washed-out or poorly compacted base trench. | $50 - $80 per linear foot | 2 - 4 Days |
| Complete Tear-Down and Rebuild | Severe leaning, shattered blocks, total base failure, or walls over 4 feet. | $40 - $75 per square foot | 3 - 7 Days |
Best Practices for Long-Term Hardscape Stability
Once you have diagnosed and repaired your leaning retaining wall, implementing a strict maintenance routine will ensure the structure stands the test of time. First, inspect your weep holes and drainage outlets every spring and late fall. Use a garden hose to flush out the perforated drain pipe behind the wall, ensuring that no dirt, roots, or debris are blocking the water flow. Second, monitor the grading above the retaining wall. If the landscape above the wall slopes toward the structure, surface runoff will continuously saturate the backfill. Regrade the soil above the wall to divert surface water away from the edge, or install a shallow swale or channel drain at the top of the slope to intercept runoff before it reaches the hardscape. Finally, avoid adding excessive surcharge loads near the edge of the wall. Planting large, deep-rooted trees or parking heavy vehicles within 4 feet of the top of the wall introduces lateral forces that the wall was not engineered to withstand. By combining rigorous diagnostic troubleshooting with proper drainage engineering, you can protect your landscape investment and enjoy a safe, beautiful outdoor living space for decades to come.
