
Landscaping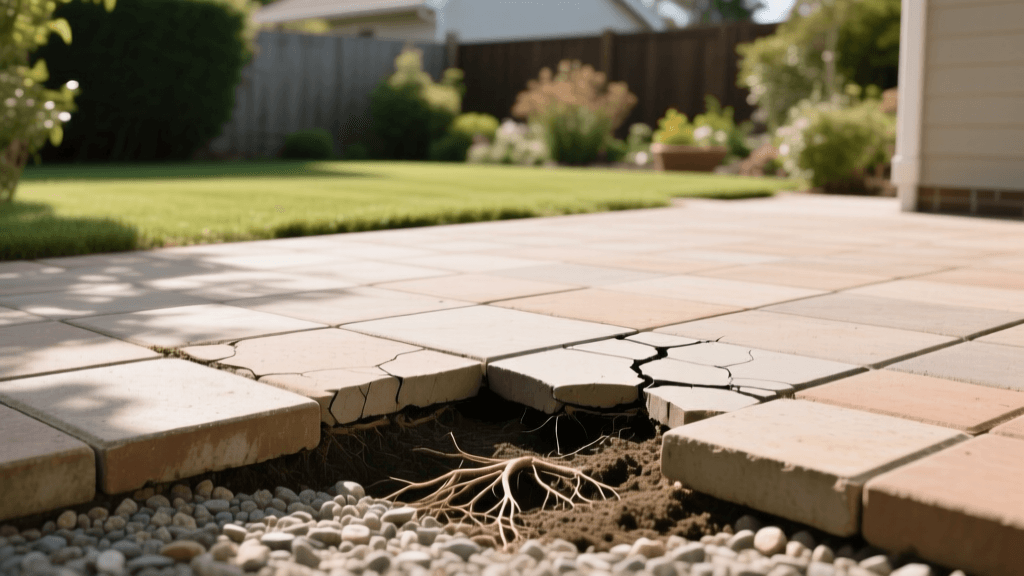
How to Fix a Sinking Paver Patio: Diagnosis and Repair
Why Is My Paver Patio Sinking?
A beautifully installed paver patio serves as the cornerstone of outdoor living spaces, offering durability, aesthetic appeal, and a functional area for entertainment. However, few landscaping issues are as frustrating as watching your once-level patio develop uneven dips, sunken corners, or tripping hazards. Sinking pavers are not just an eyesore; they can lead to water pooling against your home’s foundation and create severe safety hazards. To properly fix a sinking paver patio, you must first diagnose the underlying failure. Hardscape troubleshooting requires an understanding of soil mechanics, drainage principles, and base preparation standards. In this comprehensive guide, we will explore the root causes of paver settlement and provide a detailed, step-by-step repair protocol to restore your landscape to its original glory.
Common Causes of Paver Settling and Sinking
Before you begin pulling up stones, it is crucial to understand why the failure occurred. Treating the symptom without addressing the root cause will only result in the pavers sinking again after the next heavy rain or freeze-thaw cycle.
1. Inadequate Base Preparation
The most frequent cause of sinking pavers is an improperly constructed sub-base. According to the Interlocking Concrete Pavement Institute (ICPI), a properly installed flexible base requires a minimum of 4 to 6 inches of compacted crushed stone for pedestrian traffic, and up to 10 inches for vehicular loads. If the original installers used unwashed gravel, organic topsoil, or failed to compact the aggregate in 2-inch lifts using a mechanical plate compactor, the base will inevitably consolidate over time, causing the surface above it to sink.
2. Poor Drainage and Water Erosion
Water is the ultimate enemy of hardscaping. If your patio lacks the proper slope—a minimum gradient of 1/8 inch per foot away from structures—water will pool on the surface and seep into the joints. Over time, this hydrostatic pressure and continuous water flow will wash out the bedding sand and erode the crushed stone base. This is especially common near roof downspouts or adjacent to poorly graded garden beds. The University of Minnesota Extension emphasizes that managing surface runoff and ensuring proper yard grading are critical first steps in preventing landscape erosion and hardscape washouts.
3. Edge Restraint Failure
Paver patios are flexible systems that rely on interlocking friction and perimeter confinement. If the edge restraints (typically heavy-duty plastic, aluminum, or concrete curbs) crack, warp, or lose their anchoring spikes, the outer pavers will begin to creep outward. As the perimeter expands, the interlocking tension is lost, allowing individual pavers to drop into the bedding layer and creating a domino effect of sinking and separating stones across the patio.
Diagnosis Chart: Identifying Your Patio Problem
Use the troubleshooting table below to match your patio’s specific symptoms with the most likely underlying cause and the appropriate corrective action.
| Symptom | Likely Cause | Troubleshooting Action |
|---|---|---|
| Localized dips near downspouts | Water erosion and base washout | Extend downspouts, excavate washout area, rebuild compacted base |
| Perimeter pavers separating and dropping | Edge restraint failure or missing spikes | Remove failed restraint, install heavy-duty restraint with 10-inch spikes |
| Widespread unevenness or seasonal heaving | Frost heave, clay subgrade, or poor drainage | Improve site grading, install geotextile fabric, or rebuild entire base |
| Sinking directly under heavy furniture/pots | Insufficient bedding sand compaction | Remove affected pavers, re-screed bedding sand, and re-compact |
Step-by-Step Repair Guide for Sinking Pavers
Once you have diagnosed the issue, you can proceed with the physical repair. This process requires precision, the right materials, and proper compaction techniques.
Tools and Materials Required
- Paver puller or two flathead screwdrivers
- Plate compactor (minimum 5,000 lbs of centrifugal force)
- Hand tamper (for small, localized repairs)
- 3/4-inch minus crushed stone (ASTM No. 57 or similar angular aggregate)
- Coarse concrete sand (ASTM C33)
- Polymeric jointing sand
- Stiff bristle broom and garden hose
Step 1: Extract the Sunken Pavers
Carefully remove the pavers in and around the sunken area. Use a specialized paver puller tool, or insert two flathead screwdrivers into the joints on opposite sides of the stone and gently pry upward. Remove at least two rows of pavers beyond the visible dip to ensure you can properly feather the repair into the existing, stable surface. Clean the edges of the extracted pavers with a wire brush to remove old sand and debris, ensuring a tight fit upon reinstallation.
Step 2: Excavate and Rebuild the Sub-Base
Scoop out the existing wet or washed-out bedding sand to expose the crushed stone base. If the base is deeply rutted or consists of soft mud, you must excavate down to stable subgrade. For localized repairs, add your 3/4-inch minus crushed stone in 2-inch layers (lifts). Use a hand tamper or a small plate compactor to thoroughly compact each layer. The goal is to achieve a rock-solid foundation that mimics the density of the surrounding undisturbed base. Do not skip this step; a poorly tamped repair base will settle within a single season.
Step 3: Reapply Bedding Sand and Screed
Once the crushed stone base is level and compacted, spread a 1-inch layer of coarse ASTM C33 concrete sand over the area. Do not use fine masonry sand or play sand, as these retain moisture and are prone to washout. Use a straight 2x4 piece of wood or a metal screed rail to strike off the sand perfectly level with the surrounding existing bedding layer. Never tamp or compact the bedding sand before laying the pavers; the sand must remain loose so the pavers can seat themselves properly during the final compaction.
Step 4: Replace Pavers and Compact
Re-lay the cleaned pavers in their original pattern, starting from the fixed edge and working outward. Ensure the joints are tight and uniform. Once all pavers are in place, spread a generous amount of polymeric jointing sand over the surface and sweep it deeply into the crevices. Run your plate compactor over the repaired area in multiple directions to vibrate the pavers down into the bedding sand and lock the jointing sand into place. Finally, mist the patio with a garden hose to activate the polymers in the sand, creating a flexible, water-resistant seal that prevents future washout and insect infiltration.
Long-Term Prevention and Maintenance
Preventing future sinking requires proactive landscape management. Inspect your edge restraints annually, replacing any cracked plastic or rusted spikes immediately. Keep roof gutters clean and ensure downspout extensions discharge water at least 4 feet away from the patio edge. Furthermore, reapply polymeric sand every 3 to 5 years as UV exposure and weathering slowly degrade the joint binders.
If your property suffers from chronic drainage issues, high water tables, or expansive clay soils that constantly undermine your hardscaping, consider a more permanent solution for future landscape renovations. The Environmental Protection Agency (EPA) recommends permeable interlocking concrete pavements (PICP) as a sustainable green infrastructure alternative. Permeable pavers utilize an open-graded aggregate base that acts as a subterranean reservoir, allowing stormwater to infiltrate directly through the surface and dissipate safely into the soil, virtually eliminating the hydrostatic pressure and washout issues that plague traditional impermeable patios.
By accurately diagnosing the root cause of your patio’s settlement and adhering to strict base preparation and compaction standards, you can restore the safety, beauty, and structural integrity of your outdoor living space for decades to come.
