
Landscaping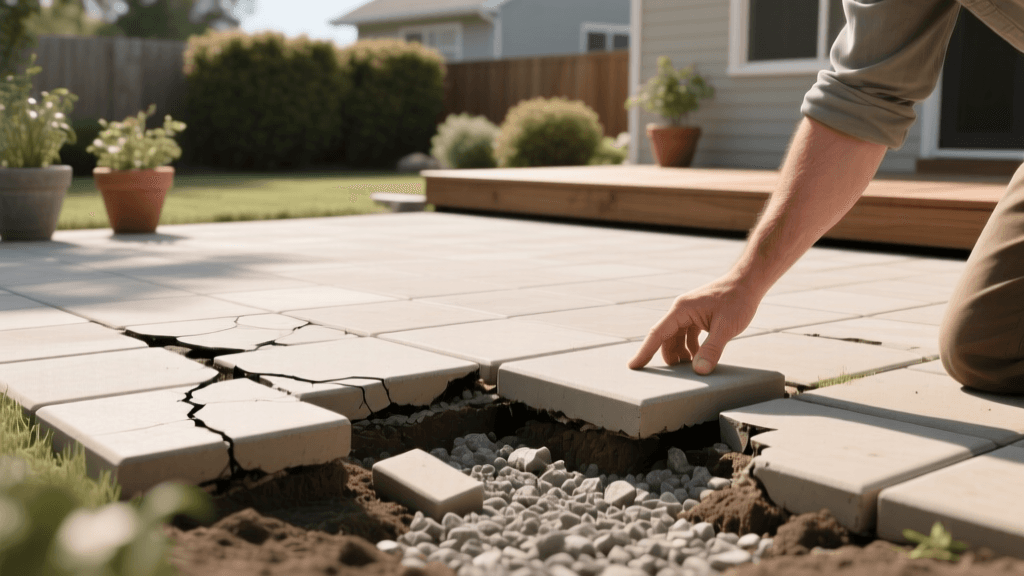
How to Fix a Sinking Paver Patio: Diagnosis and Repair
A beautifully installed paver patio serves as the cornerstone of outdoor living, providing a durable and elegant space for relaxation and entertainment. However, discovering that your patio is sinking, shifting, or developing dangerous trip hazards can be incredibly frustrating. Sinking pavers not only ruin the aesthetic appeal of your landscape but also create pooling water issues and structural vulnerabilities. Diagnosing the root cause of the settlement is the critical first step before attempting any repairs. In this comprehensive troubleshooting guide, we will explore the primary reasons behind hardscape failure and provide actionable, step-by-step instructions to restore your patio to its original, level glory.
Common Causes of Sinking Paver Patios
Before grabbing a shovel, it is essential to understand why the ground beneath your hardscape is failing. Paver systems are flexible pavements, meaning they rely entirely on the structural integrity of the layers beneath them. When one layer fails, the surface follows suit.
1. Inadequate Base Preparation
The most frequent culprit behind sinking pavers is a poorly constructed sub-base. According to the Interlocking Concrete Pavement Institute (ICPI), a proper flexible pavement base requires 4 to 6 inches of compacted, crushed angular gravel for pedestrian traffic, and up to 8 inches for vehicular traffic. If the original installer used rounded pea gravel, insufficient depth, or failed to compact the base in 2-inch lifts (layers), the aggregate will naturally shift and settle under the weight of the pavers and environmental stress.
2. Poor Drainage and Erosion
Water is the ultimate enemy of hardscaping. If your patio was not graded with a minimum 1% slope (a drop of 1/8 inch per foot) away from your home's foundation or retaining walls, water will pool on the surface and seep into the joints. Over time, this trapped water washes away the bedding sand and erodes the sub-base, creating voids that the pavers eventually collapse into. As noted by Penn State Extension, managing water runoff and ensuring proper subsurface drainage is critical to preventing soil erosion and landscape failure.
3. Edge Restraint Failure
Pavers rely on lateral pressure to stay interlocked. If the perimeter edge restraints—whether plastic, aluminum, or poured concrete—have cracked, pulled up, or degraded, the outer pavers will spread outward. This outward spreading removes the friction holding the inner pavers together, leading to widespread shifting, sinking, and joint separation.
Diagnosing the Problem: Troubleshooting Chart
Use the following diagnostic chart to identify the specific symptoms your patio is exhibiting and determine the underlying cause.
| Symptom | Probable Cause | Actionable Solution |
|---|---|---|
| Localized sinking near downspouts | Erosion from concentrated water flow | Redirect downspouts; rebuild base with geotextile fabric |
| Widespread unevenness and settling | Insufficient or improperly compacted sub-base | Complete removal and re-excavation of the base layer |
| Pavers spreading apart at the edges | Broken or missing edge restraints | Install new heavy-duty aluminum or concrete restraints |
| Heaving or lifting in isolated spots | Tree root intrusion or frost heave | Remove roots; add frost-resistant granular base material |
Step-by-Step Repair Guide for Sunken Pavers
Once you have diagnosed the issue, you can begin the repair process. For localized sinking (affecting less than 20% of the patio), a targeted repair is sufficient. If the entire patio is failing, a full tear-out and rebuild is recommended.
Step 1: Extract and Clean the Pavers
Begin by removing the affected pavers. Use a flat spud bar or a specialized paver extractor tool to pry them up without chipping the edges. If the joints are filled with old polymeric sand or mortar, use a masonry chisel and a rubber mallet to carefully break the seal. Stack the pavers nearby and use a stiff-bristled broom to clean off any old bedding sand from their undersides.
Step 2: Rebuild the Sub-Base
Excavate the sunken area until you reach stable, undisturbed soil. If water erosion was the cause, consider laying a layer of non-woven geotextile landscape fabric to separate the soil from the gravel and prevent future migration. Add 3/4-inch crushed angular gravel (often called crushed stone #57 or #411) in 2-inch layers. Rent a vibratory plate compactor (such as a Wacker Neuson WP1550 or a comparable model from a local hardware rental center) to compact each layer thoroughly. The final gravel base should sit exactly 1.5 inches below your desired finished height to allow for the bedding sand and paver thickness.
Step 3: Re-Lay and Compact
Screed a 1-inch layer of coarse, sharp bedding sand (ASTM C33 standard, such as Sakrete Paver Bedding Sand) over the compacted gravel. Do not use play sand or mason sand, as the rounded particles will roll and fail to lock the pavers in place. Use two 1-inch PVC pipes as guides and a straight 2x4 board to screed the sand perfectly level, maintaining your 1% drainage slope. Carefully place the pavers back into their original pattern, dropping them straight down to avoid pushing the sand out of alignment. Finally, run the plate compactor over the repaired area with a protective urethane mat attached to the base plate to vibrate the pavers into the sand without cracking them.
Step 4: Seal the Joints
Sweep a high-quality polymeric sand (such as Techniseal DG-10 or Alliance Gator Dust) into the joints until they are filled to within 1/8 inch of the surface. Use a leaf blower on a low setting to remove all excess dust from the surface of the pavers. Lightly mist the area with a garden hose using a fine spray nozzle to activate the polymers. Allow 24 to 48 hours for the sand to cure before allowing foot traffic.
Cost Breakdown: DIY vs. Professional Repair
Understanding the financial commitment of hardscape repair helps you decide whether to tackle the project yourself or hire an expert. Below is an estimated cost comparison for repairing a 100-square-foot sunken section of a paver patio.
| Expense Category | DIY Estimated Cost | Professional Estimated Cost |
|---|---|---|
| Materials (Gravel, Sand, Polymeric Sand) | $80 - $150 | $150 - $250 (Wholesale markup) |
| Tool Rentals (Plate Compactor, Extractor) | $75 - $120 / day | Included in labor |
| Labor (Tear out, prep, lay, compact) | $0 (Your time) | $600 - $1,200 |
| Edge Restraints & Spikes (If needed) | $40 - $80 | $100 - $150 |
| Total Estimated Cost | $195 - $350 | $850 - $1,600 |
If the damage is extensive, involves complex grading near your home's foundation, or requires heavy machinery to move soil, it is highly advisable to consult a certified expert. You can find vetted, qualified hardscape contractors through the National Association of Landscape Professionals (NALP) directory to ensure the job is done to industry standards.
Preventative Maintenance Tips
Once your patio is repaired, implementing a routine maintenance schedule will drastically extend its lifespan and prevent future sinking.
- Annual Joint Inspection: Check the polymeric sand joints every spring. If you notice sand washing out, reapply joint sand immediately to prevent water from infiltrating the base.
- Manage Vegetation: Keep tree roots and aggressive shrubbery at least 5 to 10 feet away from the patio edge. Roots seeking moisture will easily heave and crack the sub-base.
- Clean Gutters and Downspouts: Ensure that roof runoff is directed at least 4 feet away from the patio using downspout extensions or French drains to prevent localized soil erosion.
- Avoid De-icing Salts: In winter, avoid using harsh chemical de-icers like calcium chloride, which can degrade the paver surface and break down the polymeric sand bonds. Use sand or paver-safe ice melters instead.
Conclusion
A sinking paver patio is a clear symptom of underlying structural or drainage failures, but it is rarely a permanent loss. By accurately diagnosing the root cause—whether it is base erosion, poor drainage, or restraint failure—you can execute targeted repairs that restore both the safety and beauty of your outdoor space. Armed with the right materials, proper compaction techniques, and a commitment to preventative maintenance, your hardscape will remain a stable, level, and inviting focal point of your landscape for decades to come.
