
2026 Winter Prep: Freeze-Proof Sillcock Install & Pruning Timing
The Intersection of Pruning Timing and Plumbing Winterization
As we navigate the unpredictable polar vortex shifts and erratic late-autumn temperature swings of the 2026 winter season, mastering the seasonal calendar is more critical than ever for homeowners. Bridging the gap between horticulture and hardscape maintenance requires a deep understanding of timing. Just as improper pruning timing can fatally damage a shrub's vascular system by exposing fresh cuts to frost, failing to time your outdoor plumbing winterization correctly can destroy your home's water lines. Late fall is the pivotal window where garden biology meets home infrastructure. Before you put your pruning shears away and seal up the garden beds, you must address the primary water source that fuels your landscape: the outdoor faucet. In this comprehensive 2026 guide, we will explore the precise timing and methods for dormant-season pruning, and provide a meticulous, step-by-step tutorial on installing and winterizing a freeze-proof sillcock to protect your property from catastrophic water damage.
Pruning Methods & Timing: Preparing Shrubs for the 2026 Freeze
The timing of your pruning dictates the health and structural integrity of your landscape. According to horticultural experts at the University of Minnesota Extension, pruning is not a one-size-fits-all task; it requires aligning your cuts with the specific biological cycles of your plants. As 2026 brings more frequent early-spring false thaws followed by hard freezes, understanding when to cut is vital.
Thinning Cuts vs. Heading Cuts
When preparing your garden for winter, the method of pruning is just as important as the timing. Thinning cuts involve removing a branch back to its point of origin or a lateral branch that is at least one-third the diameter of the removed branch. This method maintains the natural shape of the shrub and reduces wind resistance during harsh 2026 winter storms. Heading cuts, on the other hand, involve cutting a branch back to a bud or a stub. While heading cuts are useful for encouraging dense, bushy growth in hedges, they should generally be avoided in late fall. Making heading cuts too close to the first frost stimulates localized cellular activity, leaving the plant vulnerable to dieback.
The Danger of Late-Fall Pruning
For most deciduous trees and spring-flowering shrubs (like lilacs and forsythia), late fall is the wrong time to prune. Pruning these species in October or November removes the flower buds that have already set for the following spring and leaves open wounds that cannot compartmentalize before the deep freeze sets in. The optimal timing for structural pruning is late winter or very early spring, just before the sap begins to flow but while the plant's framework is still visible and fully dormant. However, late fall is the perfect time for sanitation pruning—removing dead, diseased, or crossing branches that could harbor pests or snap under the weight of 2026 ice storms.
Before you store your bypass pruners and loppers for the winter, it is essential to clean and oil them. This is where your outdoor faucet comes into play. Use your garden hose to thoroughly wash sap and debris from your tools, dry them immediately, and apply a light coat of camellia or mineral oil. Once this final autumn cleanup is complete, it is time to shut down and winterize the water source itself.
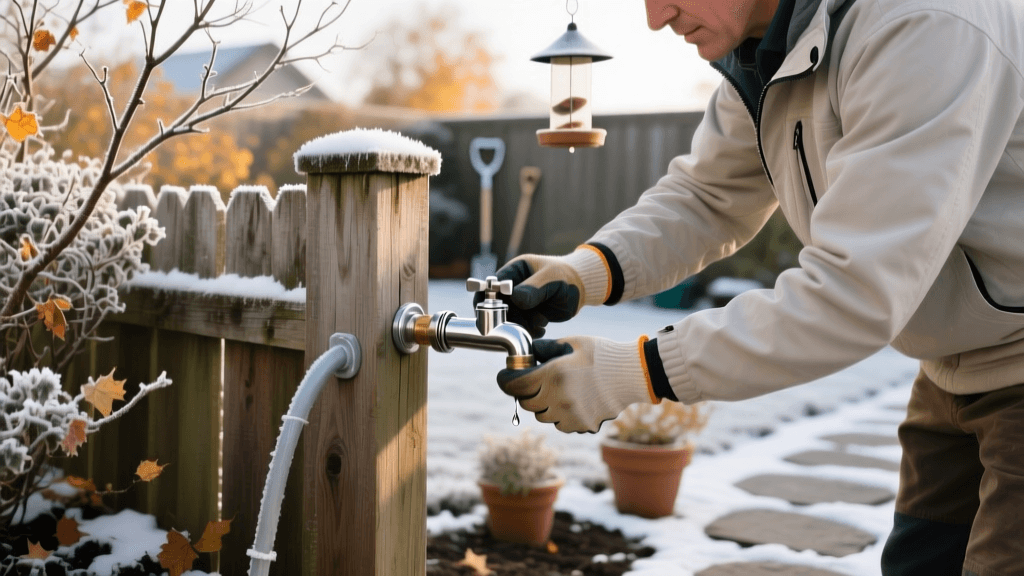
The Anatomy of a Freeze-Proof Sillcock
Standard hose bibs (outdoor faucets) are a major liability in freezing climates. In a standard setup, the valve that stops the water flow is located just behind the exterior handle. When winter hits, the water trapped inside the exterior pipe freezes, expands, and cracks the brass or copper, leading to flooded basements and crawlspaces when the ice thaws.
A freeze-proof sillcock (also known as a frost-free hose bib) solves this through brilliant mechanical engineering. The actual shut-off valve is located at the very end of a long metal stem—typically 12, 18, or 24 inches long—that extends deep into the heated interior of your home's rim joist. When you turn off the handle outside, the water stops flowing inside the warm zone of your house. The exterior pipe is then pitched slightly downward, allowing gravity to drain the remaining water out of a small 'weep hole' located near the valve seat, leaving the exterior pipe completely dry and immune to freezing.
Step-by-Step: Installing a Freeze-Proof Sillcock in 2026
Modern plumbing innovations have made DIY sillcock replacement highly accessible. In 2026, push-to-connect fittings (like SharkBite) allow homeowners to install frost-free bibs without needing a blowtorch or soldering skills, though traditional sweat-soldering remains the gold standard for permanent, leak-proof connections.
Tools and Materials Required
- Freeze-proof sillcock (Woodford Model 17 or B&K Mueller are top 2026 picks)
- Push-to-connect fittings or soldering kit (torch, flux, lead-free solder)
- Pipe cutter or reciprocating saw with a metal blade
- Adjustable wrenches and tubing cutters
- Exterior-grade silicone caulk
- Drill and masonry/wood bits (depending on your siding)
Installation Steps
1. Locate the Interior Shutoff and Drain: Find the dedicated interior shut-off valve for your outdoor faucet. Turn it off, then go outside and open the hose bib to drain all remaining water and relieve pressure.
2. Remove the Old Faucet: Unscrew the mounting flange from the exterior siding. Use a pipe wrench to disconnect the old sillcock from the interior copper or PEX supply line. If the old pipe is soldered, you may need to cut it back a few inches using a tubing cutter to ensure a clean edge for the new connection.
3. Measure Your Wall Thickness: This is the most critical step. Measure from the exterior siding to the interior supply line connection point. Sillcocks are sold in specific stem lengths (e.g., 12-inch for standard 2x6 construction with brick veneer, 18-inch for thicker walls). The valve seat must sit inside the heated envelope of your home.
4. Prep and Connect the New Sillcock: Slide the mounting flange onto the new sillcock. If using push-to-connect fittings, ensure the copper pipe is deburred and marked to the proper insertion depth. Push the fitting firmly until it clicks. If soldering, clean the pipe, apply flux, and sweat the joint using lead-free solder.
5. Secure and Pitch the Flange: The sillcock must be installed with a very slight downward pitch (about 1/4 inch per foot) toward the exterior. This ensures the weep hole can drain the pipe. Secure the flange to the siding using exterior-grade screws.
6. Caulk and Seal: Apply a generous bead of exterior-grade silicone caulk around the top and sides of the flange to prevent water intrusion behind your siding. Leave the bottom uncaulked to allow any incidental moisture to escape.
Winterizing Your Outdoor Faucets and Garden Beds
Even with a freeze-proof sillcock, improper homeowner behavior can render the system useless. The most common mistake is leaving a garden hose attached to the faucet during the winter. A hose traps water inside the sillcock barrel, preventing the weep hole from draining the pipe. When this trapped water freezes, it will burst the sillcock just like a standard hose bib.
If you are renting a home or cannot replace a standard faucet, you must winterize it manually. Shut off the interior valve, open the exterior handle, and drain the line. Install a foam insulated faucet cover over the exterior bib. According to the Insurance Information Institute, frozen and burst pipes are one of the most common and costly winter home insurance claims, often resulting in thousands of dollars in structural and landscape damage. Taking proactive measures in late autumn is a financial necessity.
Furthermore, integrate your outdoor plumbing with 2026 smart-home technology. Devices like the Moen Flo or Phyn smart water shutoff valves can be configured to monitor micro-leaks in your outdoor zones, automatically shutting off your main water supply if a hose bib fails during a sudden January thaw-and-freeze cycle.
Comparison Chart: Frost-Free Sillcocks vs. Standard Hose Bibs
| Feature | Standard Hose Bib | Freeze-Proof Sillcock |
|---|---|---|
| Valve Location | Exterior (behind the handle) | Interior (end of the long stem) |
| Freeze Resistance | None (requires manual winterizing) | High (self-draining if pitched correctly) |
| Installation Complexity | Low (short reach) | Moderate (requires wall penetration) |
| Hose Attachment Rule | Can leave on (if winterized) | MUST be removed in winter to allow draining |
| Anti-Siphon Protection | Often requires add-on vacuum breaker | Built-in integral backflow prevention |
| Typical 2026 Cost | $15 - $25 | $45 - $85 (depending on stem length) |
Final Thoughts on Seasonal Timing
Mastering the transition from autumn to winter is about respecting the biological and mechanical limits of your property. By timing your pruning methods to align with plant dormancy, you protect your landscape's long-term vitality. By simultaneously upgrading and winterizing your outdoor water sources with a properly pitched freeze-proof sillcock, you safeguard your home's infrastructure against the brutal realities of the 2026 winter climate. Take the time this late fall to execute both tasks with precision, and your garden—and your home—will emerge unscathed and ready to thrive when spring finally returns.

