
Good Ideas 50-Gallon Rain Barrel Setup Guide 2026
Introduction to Xeriscaping and Rainwater Harvesting in 2026
Xeriscaping is no longer just a niche gardening trend reserved for arid deserts; in 2026, it has become a fundamental, mainstream approach to sustainable home landscaping worldwide. With municipal water restrictions tightening and seasonal droughts becoming more unpredictable, homeowners are actively seeking ways to cultivate lush, resilient outdoor spaces without draining local aquifers or inflating their utility bills. At the very heart of any successful low-water landscape is an efficient rainwater harvesting system. Enter the Good Ideas 50-gallon rain barrel with spigot—a staple in the xeriscaping community that perfectly balances aesthetic appeal, durability, and functional water conservation.
In this comprehensive 2026 guide, we will walk you through the exact process of installing the Good Ideas 50-gallon rain barrel, optimizing it for gravity-fed drip irrigation, and integrating it seamlessly into your drought-tolerant garden design.
Why the Good Ideas 50-Gallon Rain Barrel is a Xeriscaping Staple
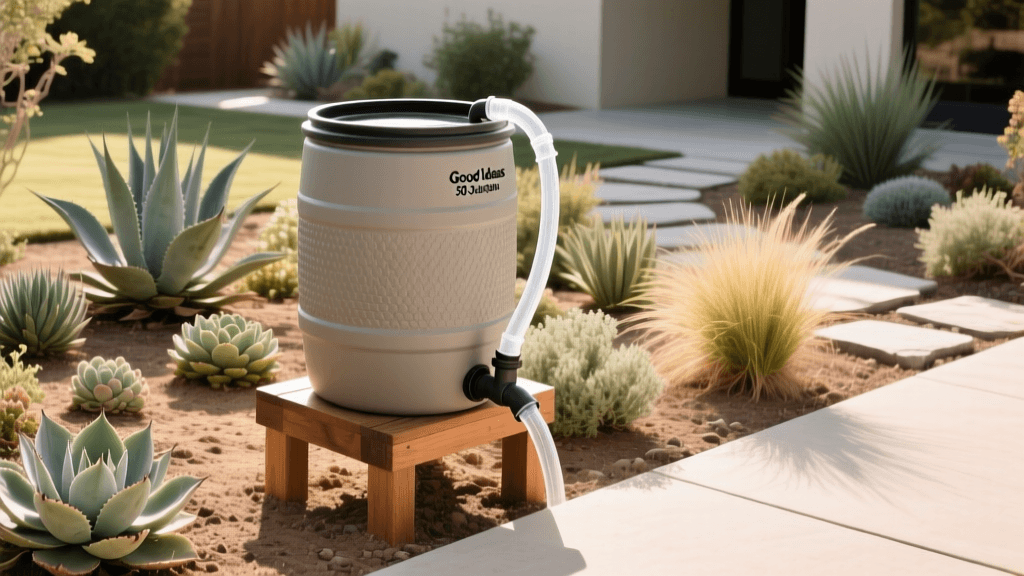
The Good Ideas 50-gallon rain barrel (frequently recognized under the popular Rain Wizard series) is engineered specifically for the modern, eco-conscious homeowner. Unlike makeshift barrels that can degrade under harsh UV rays or leak at poorly fitted spigots, this unit is rotationally molded from UV-resistant polyethylene. It features a flat back, allowing it to sit flush against your home's exterior, which is crucial for maximizing space in tightly designed urban xeriscapes.
Furthermore, the integrated brass spigot is positioned perfectly to accommodate a watering can or a low-pressure soaker hose, while the built-in overflow valve ensures that excess water is safely routed away from your home's foundation during heavy 2026 spring downpours.
| Feature | Specification | Xeriscaping Benefit |
|---|---|---|
| Capacity | 50 Gallons | Provides a substantial reserve for deep-watering drought-tolerant root zones during extended dry spells. |
| Material | UV-Resistant Polyethylene | Withstands extreme sun exposure without degrading, cracking, or leaching chemicals into your garden soil. |
| Spigot | Brass Threaded Spigot | Allows direct, leak-free attachment of soaker hoses for low-volume, targeted xeriscape irrigation. |
| Design | Flat Back & Oak Grain | Sits flush against exterior walls and mimics natural wood, blending beautifully with native plantings. |
Calculating Your Roof Catchment Potential
Before you install your barrel, it is vital to understand how much water you can actually harvest. According to the EPA WaterSense program, a standard roof can capture an astonishing amount of water during a single storm. The general rule of thumb for rainwater harvesting is that one inch of rain falling on a 1,000-square-foot catchment area yields approximately 600 gallons of water. Since the Good Ideas barrel holds 50 gallons, a mere fraction of an inch of rain on a standard-sized garage or house roof will fill it to the brim. This mathematical reality is what makes rain barrels so incredibly effective for xeriscaping; you do not need a massive cistern to sustain a low-water garden, just a strategic collection point.
Tools and Materials Required
To ensure a smooth installation process, gather the following tools and materials before heading out to the garden:
- Good Ideas 50-gallon rain barrel with spigot
- Universal downspout diverter kit (includes hole saw and flexible hose)
- Concrete cinder blocks or a specialized rain barrel stand
- Standard bubble level
- Power drill with hole saw attachment (if not included in the diverter kit)
- Hacksaw or heavy-duty tin snips (for cutting aluminum downspouts)
- Teflon tape (plumber's tape) for the spigot threads
- Work gloves and safety goggles
Step-by-Step Installation Guide
Step 1: Site Selection and Base Preparation
Gravity is the engine of your xeriscape irrigation system. The Good Ideas barrel must be placed on a raised, perfectly level base to generate enough water pressure for a drip line or soaker hose. Stack concrete cinder blocks to elevate the barrel at least 12 to 18 inches off the ground. Use your bubble level to ensure the base is entirely flat. An uneven base can cause the 50-gallon barrel—which weighs over 400 pounds when full—to tip or warp over time. Place the barrel's flat back directly against the wall, right next to the target downspout.
Step 2: Modifying the Downspout
Instead of cutting the downspout entirely (which can cause winter ice damming issues), use a universal downspout diverter kit. Mark a spot on the downspout that aligns with the top third of the rain barrel. Don your safety goggles and use the hole saw to drill a clean, circular hole into the aluminum or vinyl downspout. Insert the diverter coupling and secure it tightly according to the manufacturer's instructions.
Step 3: Connecting the Diverter Hose
Attach the flexible diverter hose from the downspout coupling to the inlet port on the top or side of the Good Ideas rain barrel. Ensure the hose has a slight downward slope from the downspout to the barrel to encourage smooth water flow. The beauty of a diverter kit is that once the barrel reaches its 50-gallon capacity, the water naturally backs up and continues down the standard downspout, preventing dangerous overflow near your foundation.
Step 4: Testing the Spigot and Overflow
Wrap the threads of the brass spigot with Teflon tape and screw it into the pre-drilled lower port of the barrel. Hand-tighten, then use an adjustable wrench for a final quarter-turn to ensure a watertight seal. Run a garden hose from your municipal supply into the barrel's top opening to simulate a rainstorm. Check the spigot for leaks and observe the overflow valve to ensure excess water routes correctly away from your home.
Integrating the Barrel into Your Low-Water Landscape
Installing the barrel is only half the battle; integrating it into your xeriscape design is where the magic happens. The Colorado State University Extension emphasizes that xeriscaping relies heavily on hydro-zoning—grouping plants with similar water needs together. Your rain barrel should be positioned to serve your moderate water hydro-zones, such as native flowering perennials, culinary herb gardens, or newly established drought-tolerant shrubs that require deep, infrequent watering to develop robust taproots.
For irrigation, attach a low-pressure soaker hose directly to the brass spigot. Because the Good Ideas barrel relies on gravity, the pressure will be relatively low (around 1 to 2 PSI depending on the elevation of your base). This low pressure is absolutely ideal for soaker hoses, which weep water slowly directly into the soil, eliminating the evaporation losses associated with overhead sprinklers. Surround the base of your rain barrel with river rock and deep-rooted native plants like Yarrow, Coneflower, or Russian Sage to manage any minor splashing and create a cohesive, natural aesthetic.
Seasonal Maintenance and Winterization
To keep your system functioning flawlessly through 2026 and beyond, routine maintenance is required. In the spring, flush the barrel with a mild vinegar solution to eliminate any algae buildup or stagnant odors. Ensure your roof gutters are fitted with fine mesh screens to prevent pine needles, shingle grit, and organic debris from entering the barrel and clogging the brass spigot.
Winterization is critical if you live in a climate with freezing temperatures. Water expands when it freezes, which will easily crack even the most durable UV-resistant polyethylene. According to Penn State Extension, proper winterization and routine cleaning are the most critical factors in extending the lifespan of polyethylene rain barrels. Before the first hard frost, open the spigot and drain the barrel completely. Disconnect the diverter hose, plug the downspout coupling with the provided winter cap, and store the flexible hoses in your shed until spring.
Conclusion
The Good Ideas 50-gallon rain barrel with spigot is more than just a decorative garden accessory; it is a vital piece of infrastructure for any serious xeriscaper. By capturing free, unchlorinated rainwater and delivering it precisely where your landscape needs it most, you actively reduce your reliance on municipal water systems while fostering a deeper connection to your local ecosystem. Whether you are cultivating a sprawling native prairie garden or a compact urban courtyard, mastering rain barrel installation is a definitive step toward a resilient, water-wise future.

