
Landscaping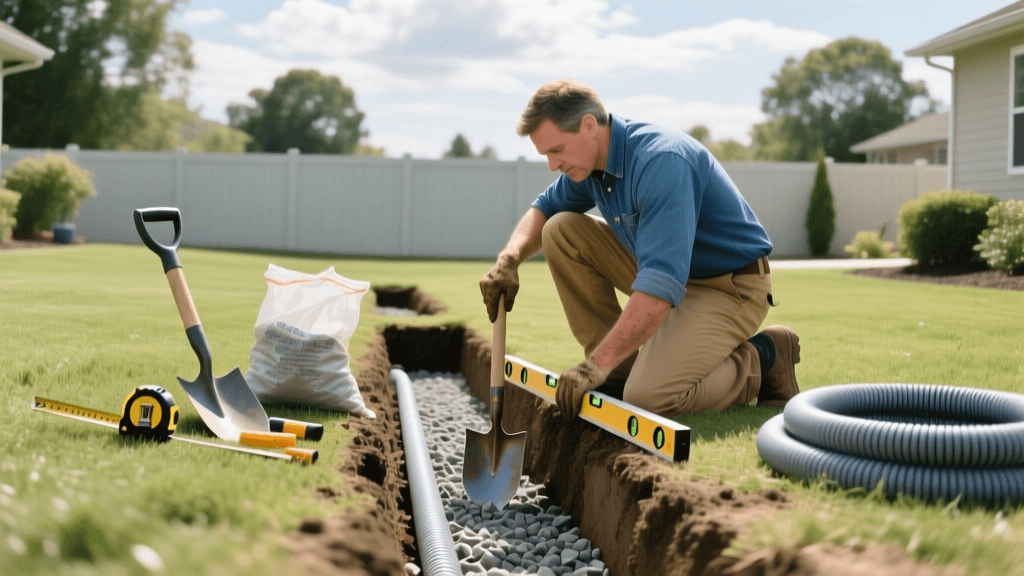
Step-by-Step Guide to Installing a Yard French Drain
Why Your Yard Needs a French Drain
Water pooling in your yard after a heavy rainstorm is more than just a landscaping nuisance; it is a direct threat to your home's foundation, your lawn's root system, and your property's overall structural integrity. When surface water has nowhere to go, it saturates the soil, creating muddy dead zones in your grass and potentially seeping into your basement or crawlspace. A French drain is one of the most effective, time-tested subsurface drainage solutions available to homeowners.
At its core, a French drain is a gravel-filled trench containing a perforated pipe that redirects surface water and groundwater away from your property. According to the University of Florida IFAS Extension, proper grading and subsurface drainage are critical to preventing structural damage, soil erosion, and the proliferation of water-borne lawn diseases. This practical, step-by-step guide will walk you through the exact process of planning, digging, and installing a professional-grade French drain in your yard.
Tools and Materials Required
Before breaking ground, gather the necessary tools and materials. Investing in high-quality drainage components will ensure your system lasts for decades without clogging.
Essential Tools
- Trenching Shovel and Spade: A sharp, flat spade for cutting sod and a trenching shovel for clearing out soil.
- Wheelbarrow and Tarps: For moving excavated soil and storing topsoil for later backfilling.
- Hand Tamper: To compact the base of the trench.
- String Line and Line Level: Crucial for maintaining a consistent downward slope.
- Tape Measure and Marking Paint: For outlining the trench path.
Core Materials
- Landscape Fabric: Heavy-duty woven geotextile fabric (e.g., Mirafi 500X). Avoid cheap, non-woven weed barriers, as they tear easily and clog with silt.
- Perforated Drain Pipe: 4-inch diameter. You can choose between rigid PVC (Schedule 20 or 40) or flexible corrugated HDPE pipe.
- Drainage Gravel: Washed, crushed stone (3/4-inch to 1-inch size). Never use pea gravel, as the smooth, round stones compact too tightly and restrict water flow.
Step 1: Planning, Permits, and Utility Marking
The most critical step in any landscaping excavation project happens before you ever pick up a shovel. You must determine the water's entry point, the trench path, and the discharge location. The discharge area should be a lower elevation on your property, a municipal storm drain (if local codes permit), or a dry well.
Furthermore, you must calculate the slope. A French drain requires a minimum slope of 1%, which equates to a 1-inch drop for every 8 feet of trench length. Use wooden stakes, a string line, and a line level to map this gradient from the problem area to the discharge point.
CRITICAL SAFETY WARNING: Before digging any trench deeper than 12 inches, you must have underground utilities marked. In the United States and Canada, simply Call 811 or submit an online request a few days before your project. Utility companies will come to your property and mark buried gas, water, and electrical lines for free.
Step 2: Digging the Trench
Once your string line is set and utilities are marked, use marking paint to outline the trench. For a standard residential yard drain, the trench should be 12 inches wide and 18 to 24 inches deep. If you are dealing with heavy clay soil, you may need to widen the trench to 18 inches to provide a larger gravel reservoir for water to percolate into the pipe.
Cut the sod cleanly with a flat spade and set it aside on a tarp; you can reuse this sod to patch up your yard at the end of the project. Dig down to the required depth, constantly checking your measurements against the string line to ensure you are maintaining your 1% slope. Remove any large rocks or thick tree roots that could obstruct the pipe or damage it over time.
Step 3: Lining the Trench and Adding Base Gravel
Line the entire trench with your heavy-duty woven landscape fabric. The fabric acts as a filter, allowing water to pass through while blocking soil, silt, and root intrusion. Ensure the fabric is wide enough to drape over the edges of the trench and extend at least 12 inches up both sides. You will need this excess fabric later to wrap over the top of the gravel.
Once the fabric is laid, pour in a 2-inch to 3-inch base layer of washed drainage gravel. Use a hand tamper to lightly compact this base layer, creating a stable, sloped bed for your pipe to rest on. This prevents the pipe from sagging or shifting as the ground settles over the years.
Step 4: Laying the Perforated Pipe
Lay your 4-inch perforated pipe on top of the gravel base. If you are using corrugated flexible pipe, ensure it is pulled taut so it doesn't snake back and forth, which can create low spots where water pools and stagnates.
Pro Tip: Holes Facing Down. There is a persistent myth in DIY circles that the holes in a perforated pipe should face up to 'catch' water. Landscape drainage experts and civil engineers overwhelmingly recommend placing the pipe with the holes facing down. As water fills the gravel bed, it rises from the bottom up. Water enters the pipe through the bottom holes, while the solid top of the pipe prevents soil and debris from falling directly into the conduit. This significantly extends the lifespan of your drain.
Step 5: Backfilling and Finishing the System
Once the pipe is laid and connected to your discharge point, cover it with more washed drainage gravel. Fill the trench with gravel until it is about 3 to 4 inches below the surface grade. Shake the shovel as you pour to ensure the gravel settles evenly around and beneath the pipe, eliminating air pockets.
Fold the excess landscape fabric over the top of the gravel bed, overlapping the edges like a burrito. This creates a complete fabric envelope around the gravel, ensuring that topsoil cannot wash down into the stone and clog the system. Finally, cover the wrapped gravel with 2 to 3 inches of reserved topsoil and lay your saved sod back on top. Water the sod heavily to help it knit back into the surrounding lawn.
Choosing the Right Pipe Material
When shopping for drainage pipe, you will generally encounter two main options. Here is a comparison to help you choose the right material for your specific yard conditions.
| Feature | Corrugated HDPE Pipe | Rigid PVC Pipe (Schedule 20/40) |
|---|---|---|
| Flexibility | Highly flexible; bends around curves easily. | Rigid; requires elbow fittings for turns. |
| Durability | Prone to crushing under heavy soil loads or vehicle traffic. | Extremely strong; withstands heavy loads and root pressure. |
| Flow Rate | Ridged interior creates friction, slowing water flow. | Smooth interior allows for rapid, unrestricted water flow. |
| Cost | Budget-friendly and widely available at big-box stores. | More expensive and requires PVC cement for joints. |
| Best Use Case | Shallow trenches, curved paths, and low-traffic lawn areas. | Deep trenches, under driveways, and straight long runs. |
Estimated Cost Breakdown
The cost of installing a French drain varies wildly based on soil conditions, trench length, and whether you hire a professional or tackle it as a DIY weekend project. Below is an estimated cost breakdown for a standard 50-foot trench.
| Expense Category | DIY Installation (50 ft) | Professional Installation (50 ft) |
|---|---|---|
| Materials (Pipe, Gravel, Fabric) | $250 - $400 | $400 - $600 (Wholesale) |
| Tool Rental (Trencher, Tamper) | $150 - $250 | Included in Labor |
| Labor | $0 (Your Sweat Equity) | $1,500 - $3,500 |
| Discharge Solutions (Dry Well) | $100 - $300 | $300 - $800 |
| Total Estimated Cost | $500 - $950 | $2,200 - $4,900 |
Common Mistakes to Avoid
Even with the best intentions, DIY landscapers often make a few critical errors that render their French drains useless within a single season. Avoid these pitfalls to ensure long-term success:
- Skipping the Landscape Fabric: Without a fabric envelope, surrounding soil will inevitably wash into the gravel and pipe during heavy rains, turning your drain into a solid, muddy plug.
- Using the Wrong Gravel: Pea gravel or limestone screenings contain fine dust that turns to sludge when wet. Always insist on washed, angular crushed stone.
- Ignoring the Discharge Point: A French drain is not a magical black hole for water; it is a transportation system. If you do not provide a clear, lower-elevation exit point for the water, it will simply back up into the trench.
- Failing to Check Local Codes: Penn State Extension and other environmental agencies strongly recommend integrating drainage systems with sustainable landscaping practices. Many municipalities strictly prohibit discharging subsurface water directly into sanitary sewer systems or onto neighboring properties. Always check local stormwater management regulations before finalizing your discharge plan.
Long-Term Maintenance
French drains are largely passive and require minimal maintenance, but a little proactive care goes a long way. Once a year, preferably in early spring before the heavy rainy season, inspect your discharge point. Clear away any leaves, debris, or animal nests that may have blocked the pipe exit. If you notice water pooling over the trench line, it may indicate that the gravel has become compacted or clogged with silt. In severe cases, you may need to expose the pipe and flush it out with a high-pressure garden hose or a plumbing snake to restore optimal flow.
By following this comprehensive guide, you can transform a soggy, unusable yard into a dry, healthy landscape that protects your home and enhances your outdoor living space for decades to come.
