
Landscaping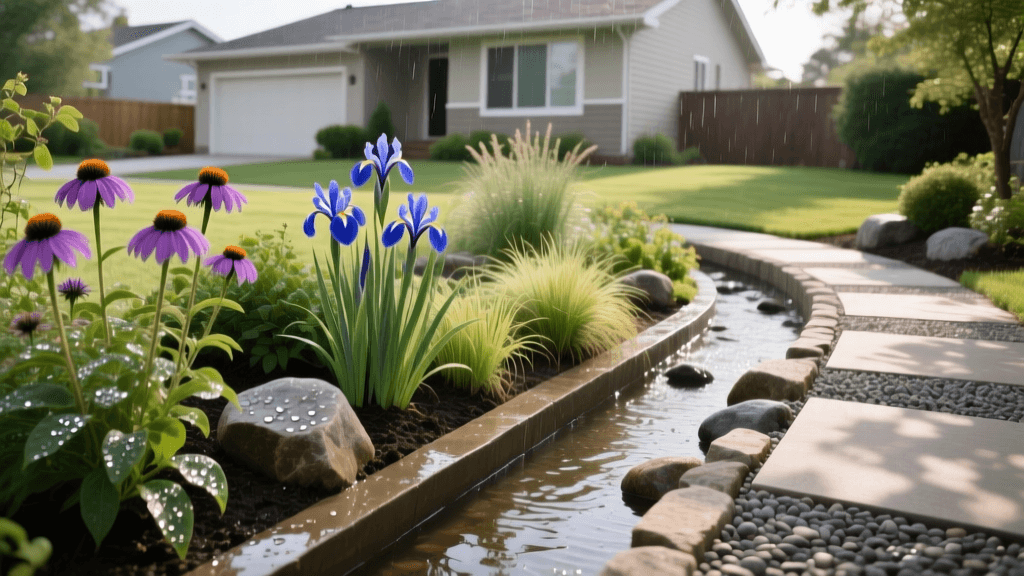
How to Plan and Design a Rain Garden for Better Drainage
Transforming Yard Drainage Issues Into Landscape Features
Water pooling in your yard after a heavy rainstorm is more than just a nuisance; it is a significant threat to your home’s foundation, your lawn’s root system, and your overall curb appeal. When traditional grading, surface swales, and French drains fail to manage heavy stormwater runoff, landscape design offers a beautiful, ecologically sound solution: the rain garden. A well-planned rain garden acts as a natural sponge, capturing and filtering runoff from impervious surfaces like roofs, driveways, and patios. In this comprehensive design and planning guide, we will walk you through the exact steps to plan, size, and plant a rain garden that solves your drainage woes while elevating your outdoor living space.
What Exactly is a Rain Garden?
A rain garden is a shallow, planted depression designed to capture, hold, and filter stormwater runoff before it can overwhelm municipal sewer systems or pollute local waterways. According to the Environmental Protection Agency (EPA), green infrastructure solutions like rain gardens are critical for reducing the burden on aging stormwater systems and mitigating localized flooding in residential areas. Unlike a pond or a water garden, a rain garden is not meant to hold water permanently. Ideally, the captured water should infiltrate the underlying soil within 24 to 48 hours. This rapid drainage prevents the breeding of mosquitoes and ensures that the deep-rooted native plants used in the design do not suffer from prolonged root rot. By integrating a rain garden into your landscape design, you are not only solving a practical drainage problem but also creating a vibrant micro-habitat for local pollinators, birds, and beneficial insects.
Step 1: Site Selection and the Percolation Test
Proper placement is the most critical factor in rain garden planning. You want to capture runoff naturally, but you must also protect your home's structural integrity. Always locate your rain garden at least 10 feet away from your home’s foundation to prevent water seepage into your basement. Avoid placing the garden directly over a septic system, underground utility lines, or in areas with a steep slope greater than 12%, as this can lead to erosion and berm failure.
Before you start digging, you must conduct a simple soil percolation test to ensure your native soil can absorb water adequately. According to guidelines published by the Rutgers University Cooperative Extension, a basic perc test involves digging a hole about 8 inches deep and 8 inches wide in your proposed location. Fill the hole with water and let it drain completely to saturate the soil. Then, refill it to the top and measure how long it takes for the water level to drop. If the water drains at a rate of at least one inch per hour, your site is excellent for a rain garden. If it takes longer than 48 hours to drain completely, you will need to heavily amend the soil or consider an alternative drainage solution like a dry creek bed or a French drain.
Step 2: Sizing, Excavation, and Cost Breakdown
A general rule of thumb for sizing a rain garden is that it should be roughly 20% to 30% of the total impervious surface area draining into it. For example, if a 500-square-foot section of your roof drains via a downspout into the garden area, your rain garden should be approximately 100 to 150 square feet. The ideal depth for the flat bottom of the garden (the ponding area) is between 4 and 8 inches. This depth provides enough volume to hold a typical rain event while allowing for rapid infiltration.
When it comes to costs, a DIY rain garden excavation and planting project typically ranges from $500 to $1,500, depending on the size and soil conditions. This includes renting a mini-excavator or hiring manual labor, purchasing soil amendments, and buying plants. If you prefer to hire a professional landscaping contractor to handle the design, earthmoving, and planting, expect to pay between $3,000 and $5,000 for a standard residential installation. The primary cost drivers are the removal of heavy clay soil, the delivery of engineered bioretention soil, and the maturity of the native plants you select.
Step 3: Engineering the Perfect Rain Garden Soil Mix
One of the most common mistakes homeowners make is simply digging a hole in their native clay soil and planting directly into it. Clay holds water too tightly, creating a bathtub effect that drowns plants and breeds mosquitoes. To ensure proper drainage and plant health, you must replace the native soil with a specialized bioretention mix. The University of Minnesota Extension recommends a specific engineered soil blend for optimal rain garden performance. The ideal mix consists of:
- 50% to 60% Coarse Builder’s Sand: Provides essential drainage and structural stability, preventing the soil from compacting over time.
- 20% to 30% Topsoil: Offers a baseline mineral content and helps retain just enough moisture for plant survival during dry spells.
- 20% Organic Compost: Leaf compost or well-aged pine bark fines provide nutrients, encourage beneficial microbial activity, and help filter pollutants like heavy metals and excess nitrogen from the runoff.
Mix these components thoroughly before backfilling your excavated depression. Leave a 2-inch gap between the top of the soil mix and the top of the garden's berm to allow for water ponding and a layer of mulch.
Step 4: Plant Selection by Rain Garden Zones
A rain garden is not a monolith; it features distinct microclimates based on elevation and moisture retention. The center (bottom) stays wet the longest, the slopes experience alternating wet and dry conditions, and the edges (berms) remain relatively dry. Choosing the right native plants for each zone is vital for long-term survival and curb appeal. Below is a structured planning chart to guide your nursery purchases:
| Rain Garden Zone | Moisture Level | Recommended Plant Species | Spacing & Size |
|---|---|---|---|
| Zone 1: Bottom (Center) | Wet to Saturated | Blue Flag Iris, Swamp Milkweed, Joe-Pye Weed | 18-24 inches apart |
| Zone 2: Slopes (Sides) | Alternating Wet/Dry | New England Aster, Switchgrass, Cardinal Flower | 15-18 inches apart |
| Zone 3: Edges (Berm) | Mostly Dry | Black-Eyed Susan, Little Bluestem, Purple Coneflower | 12-15 inches apart |
When purchasing plants, opt for native species rather than exotic ornamentals. Native plants have evolved deep, extensive root systems—often reaching 4 to 8 feet underground—which act as natural pipes, driving water deep into the soil profile and breaking up compacted subsoil. Purchase plants in 1-gallon pots or deep 'plugs' to ensure rapid establishment. Expect to spend between $15 and $35 per native plant, depending on the species and local nursery availability.
Step 5: Mulching and Long-Term Maintenance
Once your plants are in the ground, applying the correct mulch is non-negotiable. Avoid lightweight mulches like pine straw or standard shredded bark, as they will float away during the first heavy rainstorm and wash into the street. Instead, use double-shredded hardwood mulch or large pine bark nuggets. Apply a 2- to 3-inch layer over the entire soil surface, keeping the mulch a few inches away from the direct crowns of your plants to prevent stem rot. The heavy mulch will anchor the soil, suppress weeds, and retain moisture during the critical establishment phase.
Maintenance during the first year is primarily focused on watering. Even though a rain garden is designed to handle excess water, the young plants need consistent moisture to develop those crucial deep roots. Water the garden deeply twice a week during dry spells for the first 12 months. After the first year, your rain garden should be entirely self-sustaining, relying solely on natural rainfall and stormwater runoff. Annual maintenance involves cutting back dead perennial foliage in early spring, removing invasive weeds, and occasionally topping off the mulch layer to maintain that vital 2-inch depth. With proper planning and execution, your rain garden will serve as a stunning, low-maintenance landscape feature that protects your property and the local watershed for decades to come.
