
Landscaping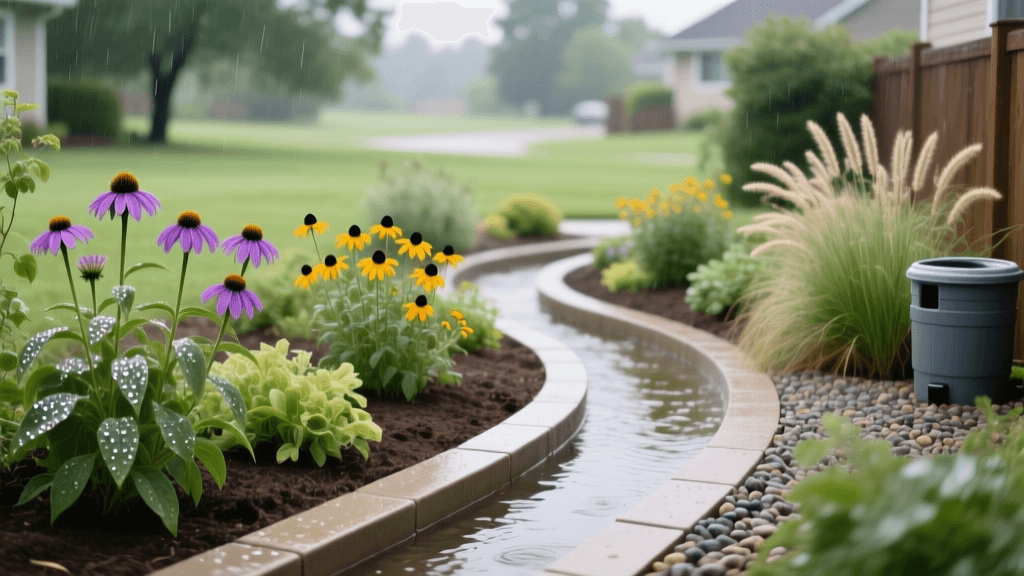
How to Design a Rain Garden: Layouts and Plant Lists
Introduction to Residential Rain Gardens
A rain garden is a strategically designed, shallow depression in your landscape that captures, holds, and filters stormwater runoff from impervious surfaces like roofs, driveways, and patios. Beyond solving common yard drainage issues and eliminating standing water, these landscape features serve a vital ecological function. By allowing water to percolate slowly into the ground, rain gardens filter out pollutants such as fertilizers, oils, and heavy metals before they can reach local waterways. According to the Environmental Protection Agency (EPA), implementing bioretention features like rain gardens is one of the most effective ways homeowners can reduce nonpoint source pollution and manage stormwater at the residential level.
Designing a rain garden requires careful planning, precise measurements, and an understanding of your native soil composition. This comprehensive guide will walk you through the essential steps of site selection, soil amendment, the three-zone planting strategy, and cost estimation to help you build a functional and beautiful landscape feature.
Step 1: Site Selection and Safety Protocols
Before breaking ground, you must identify the optimal location for your rain garden. The ideal site naturally collects water or is situated near a downspout, but it must also adhere to strict safety and structural guidelines.
- Foundation Setbacks: Always position your rain garden at least 10 feet away from your home’s foundation to prevent water from seeping into your basement or compromising the structural integrity of your house.
- Utility Lines: Always call 811 (the national 'Call Before You Dig' hotline) at least 48 hours before excavation to have underground utility lines marked.
- Slope Considerations: Avoid placing rain gardens on slopes greater than 12%. Steeper slopes require complex terracing and retaining walls, which drastically increase costs and engineering requirements.
- Septic Systems: Never locate a rain garden over or immediately adjacent to a septic system or drain field, as the added water volume can overwhelm the system.
Step 2: The Percolation Test
Not all soils drain equally. Clay-heavy soils retain water, while sandy soils drain rapidly. To determine if your soil can support a rain garden, perform a simple percolation test.
- Dig a test hole approximately 8 inches deep and 8 inches wide in your proposed location.
- Fill the hole with water and let it drain completely to saturate the surrounding soil.
- Refill the hole and measure the water level drop every hour.
- A healthy rain garden site should drain at a rate of at least 1 inch per hour. If the water remains after 24 hours, you have heavy clay soil and will need to heavily amend the soil or install an underdrain system connected to a daylight outlet.
Step 3: Sizing and Excavation
A common rule of thumb for sizing a rain garden is that it should cover roughly 20% to 30% of the impervious surface area that drains into it. For example, if a 1,000-square-foot section of your roof drains into the garden, the depression should be between 200 and 300 square feet.
Excavate the area to a depth of 6 to 8 inches. Use the excavated soil to build a berm (a raised mound) on the downhill side of the garden. This berm acts as a dam, temporarily holding 4 to 6 inches of water during heavy rain events. Compact the berm thoroughly and cover it with topsoil and sod or creeping groundcover to prevent erosion.
Step 4: Soil Amendment and Hardscaping
Experts at Penn State Extension recommend replacing or heavily amending the native soil with a specialized bioretention mix to ensure rapid drainage and healthy plant growth. The ideal rain garden soil mix consists of:
- 50% Coarse Builder’s Sand: Provides structural drainage and prevents compaction.
- 25% Topsoil: Offers a stable base and essential minerals.
- 25% Organic Compost: Retains moisture, feeds microbial life, and filters pollutants.
For the inflow point (where water enters the garden), install a 2-foot by 3-foot apron of 3-inch to 5-inch river cobbles. This hardscaping element dissipates the kinetic energy of rushing water from downspouts, preventing the water from carving erosive trenches into your fresh soil.
The 3-Zone Planting Strategy
A successful rain garden mimics a natural wetland ecosystem by utilizing a three-zone planting strategy. Because water depth and moisture levels vary drastically from the center of the depression to the top of the berm, you must select plants based on their specific hydrological tolerances.
| Garden Zone | Moisture Level | Recommended Native Plants |
|---|---|---|
| Zone 1: Bottom | Wet / Standing Water | Blue Flag Iris, Swamp Milkweed, Joe-Pye Weed, Cardinal Flower |
| Zone 2: Slopes | Moderate / Fluctuating | Black-Eyed Susan, New England Aster, Switchgrass, Wild Bergamot |
| Zone 3: Berm | Dry / Well-Drained | Purple Coneflower, Butterfly Weed, Little Bluestem, Yarrow |
When purchasing plants, opt for deep-rooted native species. Native plants like Switchgrass (Panicum virgatum) can develop root systems extending 6 to 10 feet deep, which naturally aerates the soil and creates macro-pores for water infiltration.
Cost Breakdown and Material Estimates
The cost of installing a residential rain garden varies based on whether you hire a professional landscaping crew or tackle it as a DIY weekend project. Below is an estimated cost breakdown for a standard 150-square-foot rain garden.
- Excavation and Soil Mix (DIY): $150 - $300 (Purchasing bulk sand, topsoil, and compost by the cubic yard).
- Excavation and Soil Mix (Pro): $800 - $1,500 (Includes heavy machinery, labor, and material delivery).
- Native Plants (Plugs and 1-Gallon Pots): $200 - $450 (Assuming 1 plant per square foot).
- Mulch and River Rock: $100 - $250 (Double-shredded hardwood mulch for the beds, river cobbles for the inflow apron).
- Total DIY Cost: $450 - $1,000 ($3 to $7 per square foot).
- Total Professional Cost: $2,250 - $4,500 ($15 to $30+ per square foot).
Many local municipalities and watershed organizations offer rebates or grants to homeowners who install rain gardens, as they reduce the burden on municipal storm sewer systems. Check with your local county extension office or water management district for potential financial incentives.
Mulching and Maintenance Timing
After planting, apply a 2-inch to 3-inch layer of double-shredded hardwood mulch. Avoid using lightweight pine bark or wood chips, as they will float away during the first heavy rainstorm. Double-shredded hardwood interlocks, forming a mat that stays in place while allowing water to penetrate.
The best time to design and plant a rain garden is in early spring or early fall. These seasons provide moderate temperatures and consistent rainfall, allowing native plants to establish their deep root systems before the stress of summer heat or winter freezes. During the first growing season, you will need to water the garden deeply once a week during dry spells. By the second year, a properly designed rain garden planted with native species should be entirely self-sustaining, requiring only annual weeding, occasional mulch replenishment, and the removal of sediment buildup at the inflow point.
Conclusion
Designing a rain garden is a highly rewarding landscaping project that merges aesthetic beauty with environmental stewardship. By carefully selecting your site, engineering a well-draining bioretention soil mix, and utilizing the three-zone native planting strategy, you can transform a problematic, waterlogged area of your yard into a thriving, sustainable ecosystem that protects local watersheds and boosts your property's curb appeal.
