
Landscaping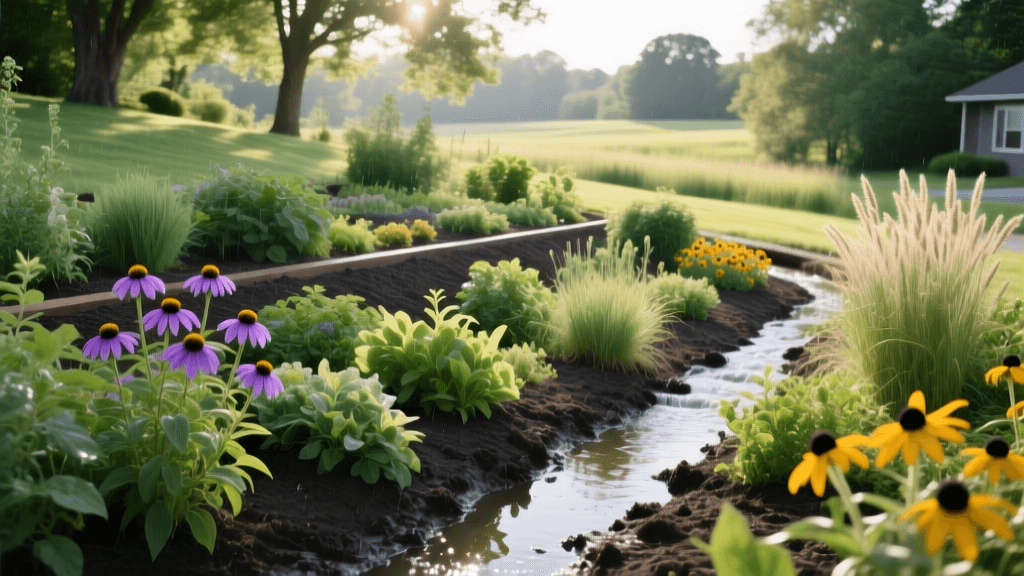
How to Build a Native Rain Garden for Sustainable Landscaping
The Environmental Power of Native Rain Gardens
As urbanization and suburban development continue to expand, the amount of impervious surfaces in our neighborhoods has skyrocketed. Roofs, concrete driveways, asphalt roads, and compacted lawns prevent rainwater from naturally absorbing into the earth. This creates a massive volume of stormwater runoff that picks up oil, heavy metals, synthetic fertilizers, and pet waste, carrying these pollutants directly into municipal sewer systems and local waterways. For homeowners looking to adopt eco-friendly and sustainable landscaping methods, the native rain garden is one of the most impactful, beautiful, and functional solutions available. A rain garden is a shallow, vegetated depression designed to capture, filter, and slowly infiltrate stormwater runoff back into the groundwater table.
According to the Environmental Protection Agency (EPA), green infrastructure solutions like rain gardens are critical for reducing the burden on aging municipal stormwater systems. By capturing the first flush of rainfall—where the highest concentration of pollutants is found—rain gardens act as natural biofilters. The deep root systems of native plants break down toxins, while the specially engineered soil trap sediments. Beyond water management, these sustainable landscape features create vital micro-habitats for local pollinators, birds, and beneficial insects, effectively replacing sterile turfgrass with thriving ecosystems.
Step 1: Site Selection and the Percolation Test
The success of a sustainable rain garden relies heavily on proper placement. You want to capture runoff from a downspout, driveway, or patio, but you must protect your home's structural integrity. Always locate your rain garden at least 10 feet away from your home’s foundation to prevent water seepage into your basement. Avoid placing the garden over septic systems, underground utilities, or in areas with a high water table. Furthermore, choose a spot that receives full sun to partial shade, as most native water-tolerant plants require at least six hours of direct sunlight to thrive and transpire water efficiently.
Before breaking ground, you must perform a percolation (perc) test to ensure your native soil can drain adequately. Dig a test hole about 12 inches deep and 6 inches wide. Fill it with water and let it drain completely to saturate the surrounding soil. Refill the hole to the top and measure the water level drop over a one-hour period. For a rain garden to function properly without becoming a stagnant mosquito breeding ground, the water should drop at least 1 inch per hour. If your soil is heavy clay and drains slower than this, you will need to excavate deeper and amend the soil heavily, or consider installing an under-drain pipe leading to a safe daylight exit.
Step 2: Sizing, Shaping, and Excavation
A standard residential rain garden typically ranges from 100 to 300 square feet, depending on the size of the catchment area and the permeability of your soil. A general rule of thumb for sustainable sizing is to design the garden to capture runoff from 20% to 30% of the impervious roof area that drains into it.
When excavating, aim for a shallow, saucer-like depression with a flat bottom. The ideal depth for the basin is between 4 and 8 inches. This shallow depth ensures that water will pool temporarily but infiltrate within 24 to 48 hours, which is crucial for preventing mosquito larvae from maturing. Use the excavated soil to build a berm on the downhill side of the garden. The berm acts as a dam, holding the water in the basin so it has time to percolate into the ground. Cap the berm with native sod or heavy mulch to prevent erosion during heavy rain events.
Step 3: Engineering the Sustainable Soil Mix
Native rain gardens require a delicate balance between moisture retention and rapid drainage. If you simply plant in unamended native clay, the garden will flood and drown your plants. If you use pure sand, it will drain too fast and fail to support plant life during dry spells. The ideal sustainable rain garden soil mix consists of three components, blended thoroughly before backfilling the excavated basin:
- 50% Coarse Builder’s Sand: Provides the necessary macro-pores for rapid water infiltration and drainage.
- 30% Loamy Topsoil: Offers structural support and essential mineral content for plant root development.
- 20% Organic Compost: Retains moisture during dry periods, provides slow-release nutrients, and feeds the soil microbiome essential for breaking down stormwater pollutants. Avoid using peat moss, as its harvesting is not environmentally sustainable. Instead, rely on locally sourced, leaf-based organic compost.
Step 4: Zoning and Native Plant Selection
A well-designed rain garden features three distinct hydrological zones, each requiring specific native plant adaptations. The upland zone (the berm and outer edges) experiences dry conditions similar to a standard garden bed. The mid-zone (the slopes) experiences alternating periods of flooding and drying. The wet zone (the deepest part of the basin) remains saturated the longest after a storm. According to landscaping guidelines published by Penn State Extension, utilizing a diverse mix of deep-rooted native perennials, grasses, and shrubs is the key to long-term resilience and pollutant filtration.
| Hydrological Zone | Moisture Profile | Recommended Native Plants | Ecological Benefit |
|---|---|---|---|
| Upland (Berm & Edges) | Dry to Moderate | Purple Coneflower, Black-Eyed Susan, Little Bluestem | Provides late-season nectar for bees and seeds for overwintering birds. |
| Mid-Zone (Slopes) | Alternating Wet & Dry | Swamp Milkweed, Blue Flag Iris, New England Aster | Deep roots stabilize soil against erosion; Milkweed supports Monarch butterflies. |
| Wet Zone (Center Basin) | Saturated to Flooded | Joe Pye Weed, Cardinal Flower, Swamp Rose Mallow | Thrives in standing water; attracts hummingbirds and specialized native bees. |
When planting, space your plugs or gallon-sized plants closely together (about 12 to 18 inches apart) to quickly establish a dense canopy that shades out invasive weeds and reduces soil surface evaporation.
Cost Breakdown: DIY vs. Professional Installation
One of the most attractive aspects of sustainable landscaping is the potential for cost savings, especially when utilizing eco-friendly methods that reduce the need for synthetic inputs and municipal water. Below is an estimated cost comparison for a standard 150-square-foot DIY rain garden versus hiring a professional landscape contractor.
| Project Component | DIY Eco-Friendly Cost | Professional Installation Cost |
|---|---|---|
| Site Prep & Excavation | $0 (Sweat Equity) | $800 - $1,500 |
| Soil Amendments (Sand, Compost) | $150 - $250 | $300 - $500 |
| Native Plants & Plugs | $200 - $400 | $600 - $1,200 |
| Hardwood Mulch (2-3 inches) | $50 - $100 | $150 - $250 |
| Labor & Design Fees | $0 | $1,500 - $3,000 |
| Total Estimated Cost | $400 - $750 | $3,350 - $6,450 |
Furthermore, many local municipalities and watershed conservation districts offer rebates or grant programs for homeowners who install certified rain gardens, which can significantly offset your initial material costs.
Long-Term Eco-Friendly Maintenance
The goal of a sustainable rain garden is to create a self-sustaining ecosystem that requires minimal human intervention. However, the first two years are critical for establishment. During this period, you must water the garden deeply during dry spells to help the native root systems penetrate the engineered soil mix. Weeding is also essential early on, as invasive species like Japanese Stiltgrass or Bindweed can quickly outcompete young native plugs.
Once established, maintenance shifts to seasonal observation and minimal intervention. Apply a 2-inch layer of triple-shredded hardwood mulch annually to suppress weeds and retain moisture. Never use synthetic fertilizers in or around your rain garden; the goal is to filter nutrients out of the runoff, not add to them. Excess nitrogen and phosphorus will cause aggressive weeds to choke out your carefully selected native perennials and will ultimately wash out into the waterways you are trying to protect. According to the National Audubon Society, leaving the dried seed heads and stalks of native plants standing through the winter provides crucial overwintering habitat for native bees and a vital food source for backyard birds, making your rain garden a year-round ecological asset.
By integrating a native rain garden into your landscape design, you are taking a proactive stand for environmental conservation. You transform a problematic runoff issue into a stunning, low-maintenance focal point that supports local biodiversity, protects water quality, and embodies the true spirit of sustainable landscaping.
