
Landscaping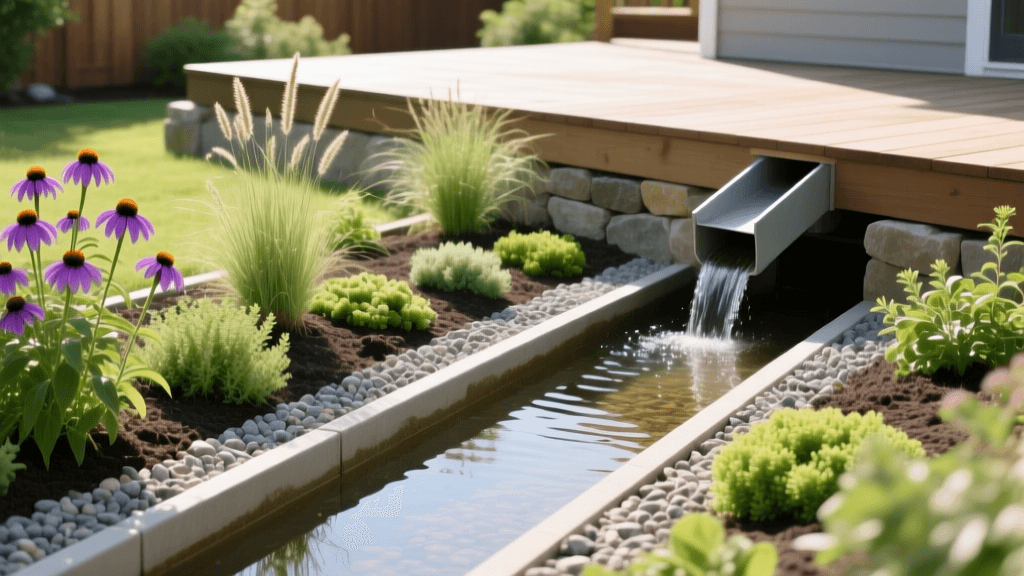
Designing a Rain Garden for Sustainable Yard Drainage
Transforming Yard Runoff into an Eco-Friendly Oasis
When heavy rains hit, the water that washes over your roof, driveway, and lawn picks up a toxic cocktail of fertilizers, pesticides, motor oil, and sediment. This stormwater runoff is one of the leading causes of non-point source water pollution in the United States, ultimately draining into local streams, rivers, and lakes. As homeowners and landscapers seek sustainable landscaping practices to combat this issue, the rain garden has emerged as a premier eco-friendly drainage solution. By mimicking natural hydrological processes, rain gardens capture, filter, and slowly release stormwater back into the earth.
According to the Environmental Protection Agency (EPA), green infrastructure solutions like rain gardens are critical for managing stormwater at its source. They reduce the burden on municipal sewer systems, mitigate localized flooding, and recharge depleted groundwater aquifers. If you are struggling with soggy yard spots, eroding slopes, or simply want to reduce your environmental footprint, designing a rain garden is a highly effective, aesthetically pleasing, and ecologically responsible landscaping project.
What Exactly is a Rain Garden?
A rain garden is not a pond or a wetland. It is a shallow, strategically placed depression in your landscape that is planted with deep-rooted, native vegetation. Its primary purpose is to capture the 'first flush' of stormwater runoff—the initial, most polluted wave of water from a rain event. The garden holds this water temporarily, allowing it to percolate slowly through a specialized soil matrix. As the water filters downward, the soil and plant roots trap and break down pollutants, leaving the groundwater cleaner than when it arrived. A properly designed rain garden will hold water for no more than 24 to 48 hours, which is crucial for preventing mosquito breeding.
The Environmental and Practical Benefits
Integrating a rain garden into your landscape design offers a multitude of benefits that extend far beyond simple drainage:
- Pollution Filtration: Rain gardens can remove up to 90% of nutrients and chemicals, and up to 80% of sediments from stormwater runoff.
- Groundwater Recharge: By allowing water to infiltrate the soil locally, you help maintain the water table and support local stream flows during dry periods.
- Erosion Control: Capturing runoff reduces the velocity and volume of water moving across your property, protecting topsoil and preventing landscape erosion.
- Wildlife Habitat: Native plants used in rain gardens provide essential nectar, seeds, and shelter for local pollinators, birds, and beneficial insects.
- Reduced Maintenance: Once established, native rain garden plants require significantly less watering, fertilizing, and mowing compared to traditional turfgrass.
Step-by-Step Guide to Designing Your Rain Garden
Step 1: Site Selection and Soil Testing
Location is the most critical factor in rain garden design. You want to intercept runoff naturally, so look for areas where water already flows, such as the base of a downspout or a natural swale in your yard. However, for safety and structural integrity, your rain garden must be located at least 10 feet away from your home's foundation, 50 feet from septic systems, and away from large tree root zones. Avoid placing it over underground utilities or in areas with a high water table.
Before you dig, you must perform a percolation (perc) test to ensure your soil can absorb water fast enough. Dig a test hole about 12 inches deep and 8 inches wide. Fill it with water and let it drain completely to saturate the soil. Then, fill it again and measure how much the water level drops in one hour. Ideally, the water should drop at least 1 inch per hour. If your soil is heavy clay and drains slower than 0.5 inches per hour, you will need to significantly amend the soil or install an underdrain system.
Step 2: Sizing and Excavation
The size of your rain garden depends on the square footage of the impervious surface (like your roof or driveway) draining into it, as well as your soil type. For a standard residential downspout draining into sandy loam soil, a garden that is 20% to 30% the size of the roof's footprint is usually sufficient. For heavier clay soils, you may need a garden that is 40% to 60% of the roof's footprint.
When excavating, aim for a flat bottom with gently sloping sides. The depth of the bowl should typically be between 4 to 8 inches. Deeper gardens can hold more water but may pose a tripping hazard or drown certain plant species. Use the excavated native soil to build a berm on the downhill side of the garden to help contain the water during heavy downpours.
Step 3: The Perfect Sustainable Soil Mix
Unless you are blessed with naturally sandy, well-draining soil, you will likely need to replace the native soil in the excavation area with a specialized bioretention mix. The University of Minnesota Extension recommends a specific soil blend that balances drainage capacity with nutrient retention. A standard, highly effective rain garden soil mix consists of:
- 50% to 60% Coarse Washed Sand: Provides excellent drainage and prevents soil compaction.
- 20% to 30% Compost: Adds organic matter, retains moisture, and provides a slow release of nutrients while supporting beneficial soil microbes that break down pollutants.
- 20% to 30% Topsoil: Helps bind the mix together and provides a familiar medium for plant roots.
Mix these components thoroughly before backfilling your excavated area. Do not compact the soil; it needs to remain loose to maximize water infiltration.
Step 4: Zoning and Plant Selection
A rain garden is not a monolith; it features distinct microclimates based on moisture levels. To ensure plant survival and ecological success, you must divide your garden into three distinct zones and select native plants accordingly. The 'Bowl' is the lowest point and stays the wettest. The 'Slope' is the transitional area that experiences fluctuating moisture. The 'Berm' is the highest, driest edge of the garden.
| Garden Zone | Moisture Level | Recommended Native Plants | Root Depth & Function |
|---|---|---|---|
| The Bowl (Center) | Wet to Saturated | Blue Flag Iris, Swamp Milkweed, Joe-Pye Weed | Deep, fibrous roots that tolerate prolonged inundation and break up compacted subsoil. |
| The Slope (Sides) | Moist to Occasionally Wet | Black-Eyed Susan, New England Aster, Wild Bergamot | Medium-depth roots adapted to fluctuating water levels and high pollutant filtration. |
| The Berm (Edges) | Well-Drained to Dry | Purple Coneflower, Prairie Dropseed, Little Bluestem | Drought-tolerant, deep taproots that stabilize the berm and prevent erosion. |
Mulching and Final Touches
Mulch is essential for retaining moisture, suppressing weeds, and protecting plant roots while they establish. However, not all mulch is suitable for a rain garden. Avoid pine bark or lightweight wood chips, as these will float away during the first heavy rain and clog your overflow exit. Instead, use a heavy, double-shredded hardwood mulch or aged leaf mold. Apply a 2 to 3-inch layer of mulch across the entire garden, ensuring it is slightly thinner near the crowns of your plants to prevent rot. You may also want to incorporate river rock or pea gravel at the inflow point (where the downspout enters the garden) to dissipate the energy of the rushing water and prevent soil scouring.
Maintenance and Long-Term Care
While rain gardens are designed to be low-maintenance, they are not no-maintenance, especially during the first two years. During the establishment phase, you will need to water the plants deeply during dry spells, as their root systems have not yet reached deep groundwater. Weeding is also critical early on, as aggressive weeds can outcompete your young native plants.
After each major storm, inspect the garden for sediment buildup at the inflow point. If sediment accumulates, it can form an impermeable crust that blocks water from entering the soil. Simply use a hand trowel or a stiff rake to break up and remove the sediment layer. Every few years, you may need to top off the mulch layer and divide overcrowded perennials to maintain vigorous growth and optimal water filtration.
Cost Breakdown and Return on Investment
Building a rain garden is an investment in your property's infrastructure and the local environment. The costs can vary widely based on whether you choose a DIY approach or hire a professional landscaping contractor. Below is a general cost breakdown for a standard 150-square-foot residential rain garden.
| Expense Category | DIY Estimated Cost | Professional Estimated Cost | Notes |
|---|---|---|---|
| Excavation & Labor | $0 (Your sweat equity) | $800 - $1,500 | Heavy clay soils or rocky terrain will increase professional excavation costs. |
| Soil Amendments (Sand/Compost) | $150 - $250 | $250 - $400 | Buying in bulk from a local landscape supply yard is much cheaper than bagged products. |
| Native Plants & Plugs | $200 - $400 | $400 - $800 | Using smaller 'plugs' instead of 1-gallon pots saves money and establishes faster. |
| Mulch & River Rock | $50 - $100 | $150 - $250 | Hardwood mulch and decorative cobble for the inflow zone. |
| Total Estimated Cost | $400 - $750 | $1,600 - $2,950 | Many local municipalities offer rebates for rain garden installation. |
Beyond the immediate aesthetic upgrade, the return on investment includes potential savings on municipal water bills (if you are on a tiered stormwater utility fee system), reduced costs associated with repairing foundation water damage, and increased property value due to enhanced curb appeal and sustainable landscaping features.
Conclusion
Designing and installing a rain garden is one of the most impactful eco-friendly landscaping projects a homeowner can undertake. By transforming problematic yard runoff into a thriving, sustainable ecosystem, you protect local waterways, support vital pollinator populations, and create a beautiful, dynamic focal point in your landscape. With careful planning, proper soil preparation, and the right selection of native plants, your rain garden will serve as a functional, sustainable drainage solution for decades to come.
