
Install & Winterize Freeze-Proof Sillcocks: Fall 2026 Guide
Why Fall Lawn Care Must Include Exterior Plumbing
When homeowners think of fall lawn care, their minds immediately jump to core aeration, overseeding, leaf mulching, and preparing the soil for the upcoming winter dormancy. However, a truly comprehensive autumn landscape transition must also address the infrastructure that keeps your garden alive during the spring and summer months. As temperatures begin to dip in late 2026, protecting your home's exterior water supply is just as critical as putting your irrigation system to bed. The cornerstone of this exterior plumbing defense is the outdoor faucet, specifically the freeze-proof sillcock (often called a frost-free hose bibb).
Failing to properly install, maintain, or winterize your outdoor faucets can lead to catastrophic pipe bursts inside your home's walls. According to Ready.gov, freezing water expands, putting immense pressure on metal and plastic pipes, which can cause thousands of dollars in interior water damage. By upgrading to a modern freeze-proof sillcock and following strict winterizing protocols, you safeguard your home while wrapping up your fall yard work.
Understanding the Freeze-Proof Sillcock
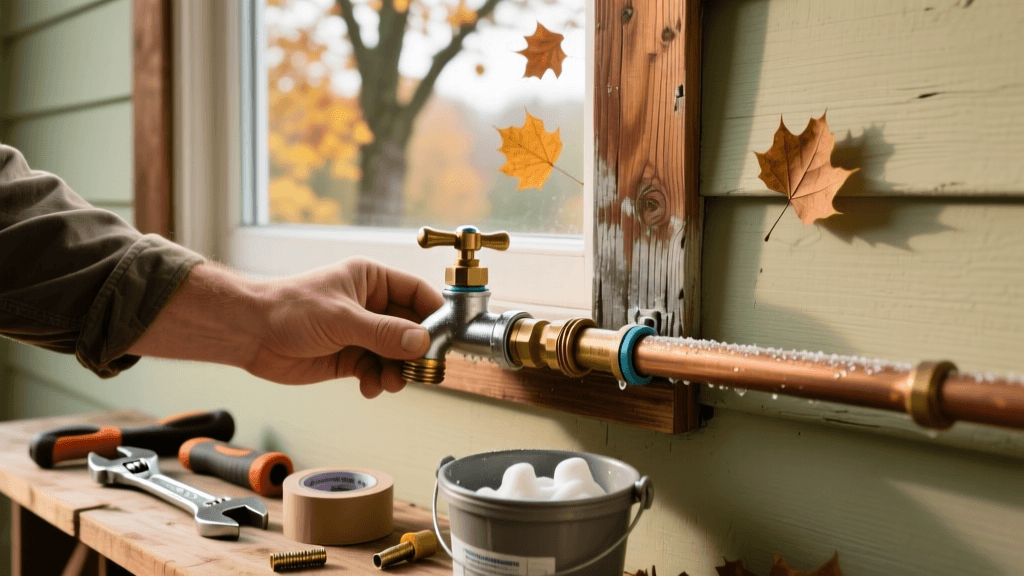
Unlike a standard hose bibb, where the shut-off valve is located right behind the handle on the exterior of the house, a freeze-proof sillcock features a long metal stem. This stem extends through the exterior wall and into the heated envelope of your home. When you turn off the faucet, the actual water shut-off occurs deep inside your warm basement or crawlspace. The exterior portion of the pipe is designed to drain completely dry, provided it is installed correctly and no hoses are left attached.
For 2026, the industry gold standard remains the Woodford Model 17 or the Mansfield 500 series. These models feature built-in anti-siphon valves to prevent contaminated garden water from being pulled back into your home's drinking supply, alongside robust brass construction that withstands extreme temperature fluctuations.
2026 Sillcock Comparison Chart
Not all outdoor faucets are created equal. Below is a comparison of the most common exterior faucet types you will encounter or consider installing this fall.
| Feature | Standard Hose Bibb | Woodford Model 17 (Frost-Free) | Smart-Integrated Frost-Free Setup |
|---|---|---|---|
| Valve Location | Exterior wall | Interior heated space (4" to 12" stem) | Interior heated space + smart shutoff |
| Freeze Resistance | None (Requires manual drain) | High (Self-draining if pitched correctly) | Maximum (Auto-shutoff on leak detection) |
| Average Cost (2026) | $15 - $30 | $45 - $85 | $500+ (Includes smart valve like Moen Flo) |
| Anti-Siphon | Rarely built-in | Standard | Standard |
Tools and Materials for Installation
If you are replacing an old, leaking, or standard faucet this autumn, gather the following tools before beginning your weekend project:
- Woodford Model 17 Freeze-Proof Sillcock (Measure your wall thickness to choose between 4", 6", 8", 10", or 12" stem lengths. A 6" or 8" stem is most common for modern 2x6 framed homes with siding).
- Pipe Wrenches (Two) or adjustable channel-lock pliers.
- Teflon Tape and Pipe Dope (Thread Sealant).
- Reciprocating Saw or Hole Saw (for cutting through siding and rim joists).
- Exterior Silicone Caulk (color-matched to your siding).
- Foam Pipe Insulation (for interior sealing).
Step-by-Step Installation Guide
Step 1: Shut Off and Drain the Water Supply
Locate the interior shut-off valve that supplies water to the outdoor faucet. Turn it off, then go outside and open the old faucet to drain any residual pressure and water. If your interior valve has a bleeder cap, place a small bucket underneath it and loosen the cap to let air into the line, ensuring a complete drain.
Step 2: Remove the Old Faucet
Using your pipe wrench, unscrew the old sillcock from the interior pipe fitting. If it is soldered (sweat fitting), you will need to cut the pipe using a tubing cutter or reciprocating saw and install a push-to-connect fitting (like SharkBite) or solder a new threaded adapter, depending on your plumbing skills.
Step 3: Prepare the New Sillcock
Wrap the interior threads of the new Woodford sillcock with 3-4 layers of Teflon tape in a clockwise direction, then apply a thin layer of pipe dope over the tape. This dual-seal method guarantees a watertight connection that will not degrade over the coming decades.
Step 4: Insert and Pitch the Sillcock (Crucial Step)
Insert the stem through the exterior wall. Here is the most critical rule of frost-free installation: The sillcock must be pitched slightly downward toward the exterior. Plumbing codes dictate a slope of at least 1/4 inch per foot. This downward angle allows gravity to pull the remaining water out of the long stem and through the weep hole when the faucet is turned off. If it is level or pitched upward, water will pool inside the stem, freeze, and split the brass pipe.
Step 5: Secure and Seal
Tighten the sillcock into the interior fitting using two wrenches (one to hold the interior pipe steady, one to turn the sillcock) to prevent twisting the pipes inside your wall. Secure the exterior flange to the siding with stainless steel screws. Finally, apply a generous bead of exterior silicone caulk around the top and sides of the flange to prevent autumn rain and winter snowmelt from entering your wall cavity. Leave the bottom uncaulked to allow any incidental moisture to escape.
Winterizing: The Critical Final Steps for Fall
Installing a freeze-proof sillcock is only half the battle. As you wrap up your fall lawn care and put away your garden hoses, you must follow proper winterizing protocols.
The "Hose Left On" Phenomenon
The number one reason frost-free sillcocks fail and cause interior flooding is that homeowners leave a garden hose attached during the winter. When a hose is attached and the nozzle is closed, it creates a vacuum seal. Even if you turn the faucet off, the water inside the long brass stem cannot drain out of the weep hole because the trapped hose blocks the airflow. When that trapped water freezes, it expands and ruptures the pipe. Always disconnect, drain, and store all garden hoses indoors before the first hard frost.
Irrigation System Blowouts
Your sillcock is often connected to secondary landscaping systems. If you use an above-ground drip irrigation system or a manual sprinkler setup connected to your hose bibb, it must be completely drained. For underground automated sprinkler systems, autumn is the time to schedule a professional compressor blowout. The EPA WaterSense program highly recommends annual winterization of irrigation systems to prevent cracked PVC pipes and damaged valve manifolds caused by expanding ice.
Smart Home Integration for 2026
As homes become smarter, integrating your exterior water supply with your home's automated monitoring system is a top trend for 2026. Consider installing a smart water shutoff valve, such as the Moen Flo or Phyn Plus, on your main water line. These devices monitor water pressure and flow rates 24/7. If a freeze-proof sillcock fails and begins leaking inside your wall while you are away for the holidays, the smart valve will detect the micro-leak and automatically shut off your home's main water supply, sending an alert to your smartphone. This bridges the gap between exterior landscaping maintenance and interior home protection.
Expert Tip: "Even with a perfectly installed frost-free sillcock, you must close the interior shut-off valve and open the exterior bleeder cap every late November. This creates a redundant fail-safe that guarantees no pressurized water is sitting near your exterior walls during deep winter freezes."
Common Mistakes to Avoid This Autumn
- Using expanding foam on the exterior: Never use spray foam to seal the exterior gap between the sillcock and the siding. It traps moisture and rots wood. Use a backer rod and high-quality silicone caulk.
- Skipping the interior shut-off valve: If your home's builder did not install an interior shut-off valve dedicated to the outdoor faucet, hire a plumber to add one this fall. It is an essential code requirement and a vital emergency tool.
- Storing hoses in the shed full of water: Drain your hoses completely before coiling them. Water left inside hoses stored in unheated sheds will freeze, expand, and compromise the hose's internal rubber lining, leading to leaks next spring.
Conclusion
Fall lawn care extends far beyond the grass. By taking a Saturday afternoon to install a high-quality Woodford freeze-proof sillcock, ensuring it has the correct downward pitch, and rigorously disconnecting all hoses and irrigation lines, you protect your home's structural integrity. Combine these physical winterizing steps with modern 2026 smart leak detection technology, and you can rest easy knowing your home and landscape are fully prepared to weather the harshest winter storms.

