
Freeze-Proof Sillcock Installation & Winterizing Guide 2026
The Intersection of Pest Control and Exterior Plumbing
As a specialist who spends the spring and summer months managing fall webworms (Hyphantria cunea) and eastern tent caterpillars, my late autumn schedule is dominated by garden prep and pest disruption. While most of my clients ask me about pruning out webworm nests before winter—a crucial step detailed by Penn State Extension to reduce next year's larval populations—the most critical exterior home maintenance task they often overlook is winterizing their outdoor plumbing. You might wonder what tree web worm control has to do with outdoor faucet freeze-proof sillcock installation. The answer lies in the microclimate.
A leaking, non-freeze-proof sillcock does not just burst your pipes; it creates a constant trickle of moisture against your home's siding, rim joists, and foundation. This damp, sheltered environment is exactly what overwintering pests, from carpenter ants to termites and even wood-decaying fungal pathogens, seek out when temperatures drop. By securing your exterior plumbing and upgrading to a frost-free system, you are actively fortifying your home's pest-defense perimeter while protecting your interior from catastrophic water damage.
Why Upgrade to a Freeze-Proof Sillcock in 2026?
In 2026, extreme winter weather events and deep freezes are becoming increasingly unpredictable, even in traditionally mild climate zones. A standard sillcock keeps its water shutoff valve right at the exterior wall, meaning water sits inside the pipe in the freezing zone. When that water freezes, it expands, cracking the brass housing and flooding your basement or crawlspace the moment you turn the hose on in the spring.
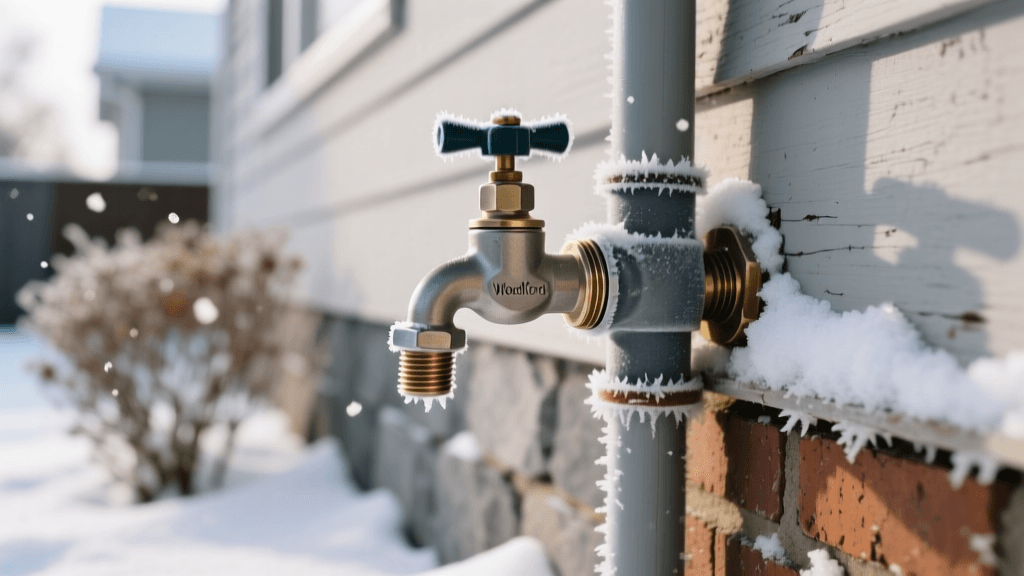
A freeze-proof (or frost-free) sillcock solves this by utilizing an extended stem. The actual shutoff valve is located deep inside the warm envelope of your home, typically 4 to 12 inches inside the wall. When you turn the faucet off, the water stops at the interior valve, and the remaining water in the exterior stem drains out—provided it is installed correctly.
2026 Sillcock Technology Comparison
Modern exterior faucets now integrate with smart home leak detection systems. Below is a comparison of the options available to homeowners this year.
| Sillcock Type | Valve Location | Freeze Protection | Smart Integration | Average 2026 Cost |
|---|---|---|---|---|
| Standard Brass Sillcock | Exterior Wall | None (Requires winterizing) | No | $15 - $25 |
| Woodford Frost-Free (Traditional) | Interior Warm Zone | High (If pitched correctly) | No | $45 - $75 |
| Smart Frost-Free with Auto-Shutoff | Interior Warm Zone | Maximum | Yes (Wi-Fi/Z-Wave) | $120 - $180 |
Step-by-Step: Installing a Woodford Frost-Free Sillcock
Upgrading your exterior faucets is a highly manageable DIY project for those with basic plumbing skills. For this guide, we are using a Woodford Model 17 or 19, which remains the industry gold standard for residential frost-free hydrants in 2026 due to its durable brass construction and anti-siphon protection.
Step 1: Shut Off and Drain the Water Supply
Locate the interior shutoff valve for your outdoor faucet. Turn it off, then go outside and open the sillcock to drain any remaining water. If your home lacks individual interior shutoff valves for exterior faucets, you will need to shut off the main water supply to the house and open the lowest interior faucet to relieve system pressure.
Step 2: Remove the Old Faucet
Using a pipe wrench, unscrew the old sillcock from the exterior. If you have copper piping, you may need to use a reciprocating saw or tubing cutter to remove the old pipe from the inside. Be careful not to damage the exterior siding or the interior drywall.
Step 3: Measure and Select the Correct Stem Length
Frost-free sillcocks come in various lengths (4-inch, 6-inch, 8-inch, 10-inch, and 12-inch). Measure from the exterior siding to the interior joist space where the pipe will connect. The stem must be long enough to reach the warm interior space but should not protrude so far that it becomes a tripping hazard or interferes with basement shelving.
Step 4: Install with the Crucial Downward Pitch
This is where most DIYers fail. For a frost-free sillcock to drain properly, it must be installed with a slight downward pitch toward the exterior (approximately 1/4 inch per foot). If the faucet is level or pitched upward, water will pool inside the stem, freeze, and split the pipe, entirely defeating the purpose of the frost-free design. Wrap the threads with high-quality PTFE tape and pipe dope, thread the new Woodford sillcock into the fitting, and tighten securely while maintaining that downward slope.
Step 5: Seal the Exterior Penetration
Pests and drafts exploit gaps around plumbing penetrations. The U.S. Department of Energy strongly recommends sealing all exterior penetrations to improve home energy efficiency and block pest entryways. Apply a generous bead of high-grade, paintable exterior silicone or polyurethane caulk around the flange of the sillcock where it meets the siding. This prevents carpenter ants and moisture from infiltrating the rim joist.
The Golden Rule: Never Leave a Hose Attached
The most common reason frost-free sillcocks fail and cause interior flooding is homeowner error. If you leave a garden hose attached to the faucet during the winter, the water cannot drain out of the extended stem. The trapped water will freeze inside the wall cavity, cracking the brass tube. When you turn the water on in the spring, the water will dump directly into your basement or wall cavity. Always disconnect, drain, and store your garden hoses before the first hard freeze.
Winterizing Standard Faucets and Irrigation Systems
If you are renting, or if your home has specialized hose bibbs that cannot be easily replaced with a frost-free model, you must winterize them manually.
- Interior Shutoff: Close the interior valve dedicated to the outdoor faucet.
- Drain the Line: Open the exterior faucet and leave it open all winter. This allows any residual water to expand outward rather than cracking the pipe.
- Insulated Covers: Purchase a rigid, foam-insulated faucet cover (often called a 'freeze cap'). These strap tightly against the siding and trap ambient heat from the home to protect the brass housing.
- Irrigation Blowouts: If you have an in-ground sprinkler system, hire a professional in late autumn to perform a compressed-air blowout. Leaving water in the lateral lines guarantees cracked PVC and shattered sprinkler heads by spring.
Tying It Back to the Garden: A Holistic Winter Prep
As you walk the perimeter of your home to check your sillcocks and caulk your exterior penetrations, take the opportunity to inspect your trees and shrubs. Late autumn is the ideal time to spot the silken, greyish tents of fall webworms at the tips of your deciduous trees. While the larvae have already dropped to the soil to pupate for the winter, pruning out the empty, unsightly webs and destroying them reduces the aesthetic damage and slightly lowers the localized egg mass count for the following spring.
Furthermore, ensure that your downspouts and grading are directing water away from the foundation. Just as a leaking sillcock creates a damp haven for wood-destroying organisms, poor drainage saturates the soil against your home, inviting subterranean termites and root-rot pathogens into your garden beds. True exterior home maintenance requires looking at the house and the landscape as a single, interconnected ecosystem.
Conclusion
Upgrading to a Woodford frost-free sillcock and properly winterizing your outdoor plumbing is a small investment of time and money that yields massive dividends. In 2026, with the rising costs of home repairs and the increasing unpredictability of winter storms, taking proactive control of your exterior water sources is non-negotiable. By eliminating damp, rotting wood around your foundation, you not only protect your pipes from bursting but also dismantle the ideal overwintering habitats for destructive pests. Grab your pipe wrench, caulk gun, and pruning shears, and secure your home's perimeter before the first snow flies.

