
Freeze-Proof Sillcock Install & Garden Documentation 2026
The Intersection of Garden Infrastructure and Visual Documentation
As landscape photographers and meticulous garden documentarians, we often focus our lenses on the vibrant blooms of late spring or the golden, textural hues of autumn. However, true garden stewardship—and comprehensive visual journaling—requires capturing the "bones" of the landscape. In 2026, the trend of documenting garden infrastructure has become a cornerstone for serious horticulturists and landscape architects. A garden is not just its plants; it is the irrigation networks, the hardscaping, and the vital plumbing that keeps the ecosystem thriving.
One of the most critical, yet frequently overlooked, aspects of seasonal garden transition is outdoor faucet winterization. Upgrading to a freeze-proof sillcock (often called a frost-free hose bib) protects your home’s interior from catastrophic water damage while preserving the aesthetic integrity of your garden's exterior walls. In this guide, we will walk through the precise installation of a freeze-proof sillcock for the 2026 winter season, while simultaneously exploring how to document this essential maintenance for your garden master journal and photography portfolio.
Why Upgrade to a Freeze-Proof Sillcock in 2026?
With shifting climate patterns bringing unpredictable polar vortexes further south in recent years, relying on standard outdoor faucets is a risk no garden owner should take. A standard sillcock keeps its shut-off valve just behind the exterior handle, leaving residual water vulnerable to freezing and expanding. A freeze-proof sillcock, conversely, features an extended stem that pushes the actual shut-off valve deep inside the heated envelope of your home or insulated garden shed.
According to the EPA WaterSense program, outdoor water leaks and burst pipes contribute to massive water waste and property damage annually. By upgrading to a modern, anti-siphon freeze-proof model like the Woodford Model 19 or the Mansfield 500, you ensure that when you turn off the faucet, the water drains outward via gravity, leaving the interior pipe completely dry. For the garden photographer, this means no ugly, split-brass eyesores ruining your spring hardscape photos, and no emergency plumbing repairs disrupting your carefully planned seasonal shoots.
Step-by-Step Freeze-Proof Sillcock Installation
Before you begin, gather your tools: a pipe wrench, adjustable pliers, Teflon tape, a cordless drill, exterior-grade silicone caulk, and your camera or smartphone for documentation. As noted by experts at Penn State Extension, proper winterization of exterior plumbing is essential for maintaining the structural integrity of your property.
Step 1: Shut Off the Water and Drain the Line
Locate the interior shut-off valve for your outdoor faucet. Turn it off, then go outside and open the existing sillcock to drain any remaining water. Photo Tip: Take a wide-angle shot of the interior shut-off valve. In your garden journal, log its exact location, as these valves are often hidden behind basement shelving or utility sinks.
Step 2: Remove the Old Faucet
Use your pipe wrench to unscrew the old sillcock from the exterior pipe. If it is soldered copper, you may need to use a tubing cutter and install a push-to-connect fitting (like a SharkBite) to transition to threaded pipe. Document the condition of the old fitting—corrosion or mineral buildup makes for excellent macro photography that tells the story of your garden's water quality.
Step 3: Measure Wall Thickness for Stem Length
This is the most critical measurement. Freeze-proof sillcocks come in various stem lengths (typically 4", 6", 8", 10", and 12"). Measure from the exterior siding to the interior joist space. If you have a brick veneer or thick stone garden wall, you will likely need a 10" or 12" stem. Documentation Tip: Photograph your tape measure extended through the wall cavity. This visual reference is invaluable if you ever need to replace the unit or share your hardscape specs with a contractor.
Step 4: Prep and Install the New Sillcock
Wrap the male threads of the new sillcock with 3-4 layers of PTFE (Teflon) tape in a clockwise direction. Thread the sillcock into the fitting, tightening it with a wrench until the handle is perfectly vertical and the flange sits flush against the siding. Apply a bead of exterior-grade silicone caulk around the top and sides of the flange to prevent moisture intrusion, leaving the bottom uncaulked to allow for condensation weeping.
Documenting the Installation for Your Garden Master Journal
In 2026, the modern garden journal is a hybrid of physical scrapbooking and digital databases. When documenting your sillcock installation, consider the following photographic and data-logging techniques:
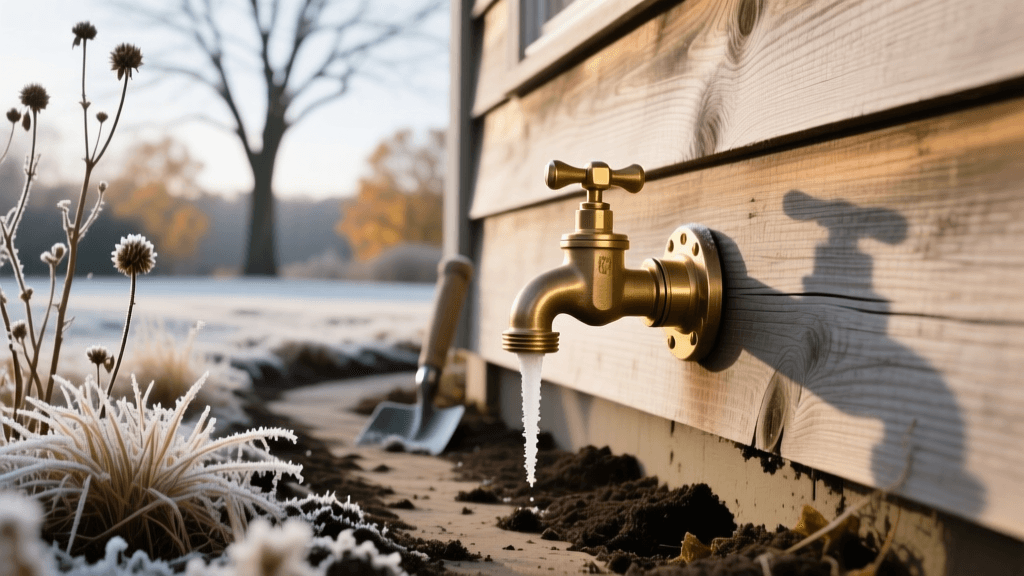
- Macro Detail Shots: Use a 90mm or 100mm macro lens (or the macro mode on your latest smartphone) to capture the threading of the brass fittings and the anti-siphon cap. The metallic textures contrast beautifully with the organic materials of your garden shed or home exterior.
- GPS Tagging: Use your camera’s GPS or a app to drop a pin at the exact location of the exterior faucet and its corresponding interior shut-off valve. Upload these coordinates to your digital garden map.
- Before and After Hardscape Context: Take a photo from a fixed tripod position before removal and after installation. This highlights the clean, upgraded look of the new brass or powder-coated finish against your siding or stonework.
- Material Logging: Record the brand, model number, stem length, and installation date in your journal. This data is crucial for future maintenance, especially when sourcing replacement rubber gaskets or stem assemblies a decade down the line.
Winterizing Existing Faucets and Hardscapes
If you are renting or cannot perform a full sillcock replacement before the first hard freeze, you must winterize your existing standard faucets. Disconnect all garden hoses, smart hose timers, and splitters. Even a "freeze-proof" faucet will burst if a hose is left attached, as the hose traps water inside the stem, preventing it from draining.
Install a heavy-duty foam insulation cover over the faucet. While these covers are not the most photogenic elements in a winter garden, they are necessary. To maintain your garden's visual appeal, consider wrapping the foam cover in a piece of decorative, weather-resistant burlap or canvas that matches your outdoor decor. Photograph the winterized hardscape in the soft, diffused light of a winter overcast day to emphasize the structural, dormant beauty of the garden.
2026 Top Freeze-Proof Sillcocks for Garden Hardscapes
When selecting a sillcock, consider both the plumbing requirements and the aesthetic impact on your garden's exterior. The following table outlines the top models for 2026, balancing durability, price, and hardscape compatibility.
| Brand & Model | 2026 Avg. Price | Key Features | Best Hardscape Application |
|---|---|---|---|
| Woodford Model 19 | $65 - $85 | Anti-Siphon, EPDM seals, 4"-12" stems | Thick brick veneer and historic stone garden walls |
| Mansfield 500 Series | $45 - $60 | Standard freeze-proof, lightweight brass | Vinyl siding and modern wood-paneled garden sheds |
| Simmons Proguard | $75 - $95 | Heavy-duty forged brass, integrated vacuum breaker | High-traffic commercial gardens and estate landscapes |
| Arrowhead Brass AG-250 | $55 - $70 | Anti-siphon, sleek polished finish | Visible hardscapes where aesthetic finish matters |
Capturing the Frost: Photography Tips for the Winter Garden
Once your plumbing is securely winterized and documented, you are free to focus on the artistic side of the dormant season. Winter offers a unique palette of cool blues, stark whites, and deep evergreen shadows. For the best macro photography of frost and ice crystals forming on your garden's ornamental grasses and hardscape elements, shoot early in the morning just after sunrise. The low angle of the winter sun creates long, dramatic shadows and backlights the ice, making it glow.
Use a tripod to keep your ISO low and your images crisp. If you are photographing the new brass sillcock against a backdrop of fresh snow, use a circular polarizing filter to cut the glare off the snow and enhance the rich, warm tones of the brass fitting. For more advanced techniques on capturing low-light winter textures, resources from B&H Photo Explora offer excellent guides on macro photography and exposure compensation in high-contrast snowy environments.
Conclusion: Stewardship Through the Lens
Installing and winterizing a freeze-proof sillcock is a quintessential act of garden stewardship. By upgrading your infrastructure in 2026, you protect your home from water damage and ensure your irrigation system is ready to support a lush landscape when spring returns. By pairing this practical maintenance with meticulous visual documentation and photography, you elevate your garden journal from a simple logbook into a comprehensive, multi-seasonal portfolio. Grab your camera, your pipe wrench, and embrace the quiet, structural beauty of the winter garden.

