Landscaping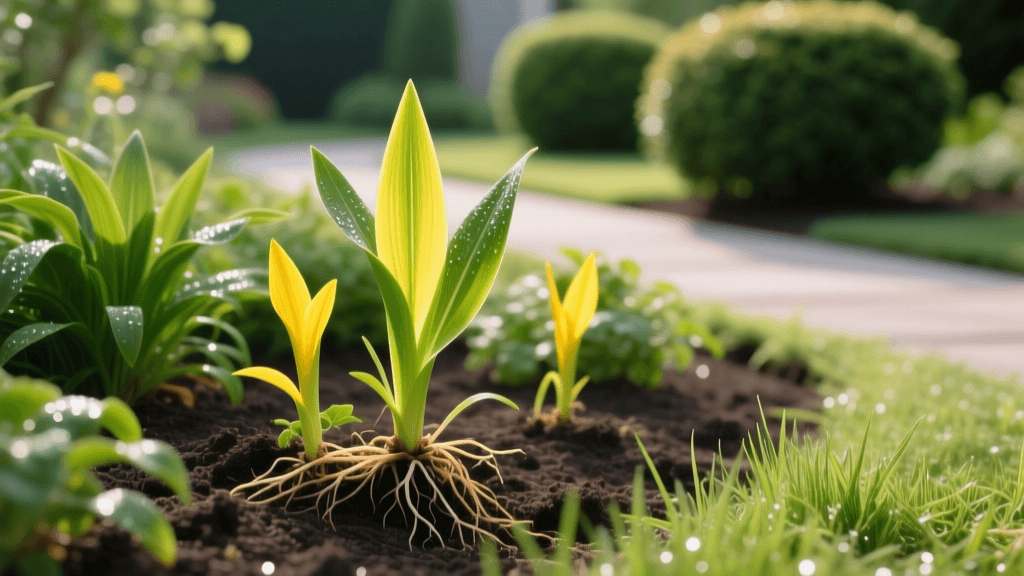
How to Identify and Remove Yellow Nutsedge in Landscaped Beds
The Menace of Yellow Nutsedge in Landscaping
Every seasoned landscaper and avid gardener knows the sinking feeling of spotting a light green, fast-growing intruder among carefully curated ornamental plants. Yellow nutsedge (Cyperus esculentus), often mistakenly called nutgrass, is one of the most formidable weeds you can encounter in landscaped garden beds. Despite its grass-like appearance, nutsedge is actually a sedge. It thrives in the exact conditions that many ornamental plants love: moist, nutrient-rich soil. Left unchecked, a single nutsedge plant can rapidly colonize an entire garden bed, choking out expensive perennials and shrubs while ruining the aesthetic of your hardscaping and mulch layouts.
In the landscaping world, there is a common mnemonic used to differentiate this pest from standard turfgrass: Sedges have edges, rushes are round, grasses have nodes from their tips to the ground. However, identifying it is only the first step. Eradicating yellow nutsedge requires a deep understanding of its unique biology, precise timing, and a multi-faceted approach combining manual extraction, chemical control, and cultural prevention.
Weed ID: How to Identify Yellow Nutsedge
Before you can eliminate the weed, you must correctly identify it. Misidentifying nutsedge as a standard grass weed will lead to the application of the wrong herbicides, wasting time and money while the nutsedge continues to spread. According to Penn State Extension, yellow nutsedge possesses several distinct morphological features that separate it from typical grassy weeds.
Visual Characteristics
- Stems: The most defining feature is the stem. If you roll the base of the stem between your thumb and index finger, you will feel a distinct triangular shape. The stems are solid, not hollow, and lack the nodes found on true grasses.
- Leaves: The leaves are typically arranged in sets of three at the base of the plant. They are thick, waxy, and feature a prominent midrib. Yellow nutsedge leaves are noticeably lighter in color (a bright yellow-green) compared to the darker green of most desirable landscape plants and turfgrasses.
- Growth Habit: Nutsedge grows significantly faster than surrounding ornamental plants. During the peak of summer, you may notice it towering above your mulch line just days after a fresh weeding session.
- Seedheads: If allowed to mature, the plant produces a distinctive, umbrella-like inflorescence (cluster of seedheads) at the top of the stem, featuring golden-brown spikelets.
Comparison Chart: Nutsedge vs. Standard Grass Weeds
| Feature | Yellow Nutsedge | Purple Nutsedge | Standard Grass Weeds (e.g., Crabgrass) |
|---|---|---|---|
| Stem Shape | Triangular (Solid) | Triangular (Solid) | Round or Flat (Often Hollow) |
| Leaf Color | Dark Green | Varies (Usually Medium Green) | |
| Root System | Rhizomes & Tubers (Nutlets) | Rhizomes & Tubers (Nutlets) | Fibrous Roots (No Tubers) |
| Seedhead | Golden-Brown Umbrella | Reddish-Purple Umbrella | Varies (Often Finger-like spikes) |
The Hidden Threat: The Tuber (Nutlet) Lifecycle
The true danger of yellow nutsedge lies beneath the soil surface. The plant reproduces primarily through underground tubers, commonly called nutlets. The University of Minnesota Extension notes that a single yellow nutsedge plant can produce hundreds of tubers in a single growing season. These tubers can survive in the soil for up to three years, dormant and waiting for the right conditions to sprout.
When you casually pull a mature nutsedge plant from your garden bed, the brittle rhizomes snap, leaving the majority of the tubers safely buried in the soil. Each left-behind tuber can generate a new plant, meaning your well-intentioned weeding session has effectively planted the next generation of weeds. Furthermore, tubers can form as deep as 8 to 14 inches below the soil surface, making deep mechanical tilling a terrible idea, as it simply chops the tubers into pieces and spreads them throughout your pristine landscape beds.
Step-by-Step Removal Guide for Landscaped Beds
Successfully removing yellow nutsedge from garden beds requires patience and a strategic combination of methods. Because garden beds contain desirable ornamental plants, broad-spectrum chemical applications must be handled with extreme care.
Phase 1: Manual Extraction (The 5-Leaf Rule)
If you choose to hand-pull nutsedge, timing is everything. Landscaping professionals adhere to the "5-Leaf Rule." Nutsedge plants do not begin forming their first tubers until they have developed five to six leaves. If you pull the weed when it is young (under the 5-leaf stage), you have a high chance of removing the entire root system before the tuber network has formed.
Actionable Advice: Inspect your garden beds weekly in early summer. Grip the base of the plant as close to the soil line as possible and pull slowly and steadily to extract the fragile rhizomes. If the plant has more than five leaves, do not pull it; you will leave tubers behind. Instead, cut it off at the soil line with a weeding knife to prevent it from photosynthesizing and feeding the underground tubers.
Phase 2: Chemical Control Strategies
For severe infestations in landscape beds, manual removal is rarely enough. You must target the tubers systemically. However, you must protect your ornamental shrubs and perennials from herbicide damage.
- Halosulfuron-methyl (e.g., SedgeHammer): This is the gold standard for post-emergent nutsedge control. It is highly effective at halting the growth of the tubers. A small box containing multiple water-soluble packets costs around $20 to $30. While primarily labeled for turfgrass, it can be used as a carefully directed spray in certain ornamental beds. Always add a non-ionic surfactant to the mixture to help the chemical adhere to the waxy nutsedge leaves.
- Glyphosate (e.g., Roundup): For isolated nutsedge plants growing far away from the foliage of your desirable plants, a careful spot-treatment with a 2% glyphosate solution is highly effective. Use a shielded sprayer or a paintbrush to apply the chemical directly to the nutsedge leaves. Warning: Glyphosate is non-selective; any drift onto your ornamental plants will kill them.
- Imazaquin (e.g., Image for Nutgrass): Another systemic option that travels down to the tubers. It works slower than halosulfuron-methyl but is highly effective over a 3-to-4-week period.
Phase 3: Pre-Emergent Barriers
To stop dormant tubers from sprouting the following spring, apply a pre-emergent herbicide specifically labeled for nutsedge suppression. Products containing Dimethylamine (such as Gallery) or Echostate can be applied to landscape beds in early spring before soil temperatures consistently reach 60°F. These chemicals create a barrier in the top inch of soil that prevents the nutsedge shoots from developing.
Cultural and Preventative Landscaping Practices
Chemical and manual controls are only temporary fixes if the underlying environmental conditions favor nutsedge. The Clemson University Home & Garden Information Center emphasizes that nutsedge is an indicator weed, meaning its presence tells you something about your soil's health and drainage.
Fixing Drainage Issues
Yellow nutsedge thrives in poorly drained, compacted, and chronically wet soils. If your garden beds are constantly soggy, you are inviting an invasion. Amend heavy clay soils with organic compost to improve percolation. For low-lying beds near downspouts or hardscaping runoff zones, consider installing a French drain or a dry creek bed to divert excess water away from your planting areas.
The Right Way to Mulch
Many homeowners believe that laying down black plastic landscape fabric will stop nutsedge. This is a myth. Nutsedge shoots are incredibly sharp and rigid; they will easily pierce through standard woven landscape fabrics and thin layers of mulch. To effectively smother emerging nutsedge, you must use a coarse, heavy mulch, such as arborist wood chips, applied at a depth of at least 3 to 4 inches. The physical weight and light-blocking properties of a thick, coarse mulch layer will exhaust the energy reserves of sprouting tubers before they can reach the sunlight.
Conclusion
Yellow nutsedge is a relentless adversary in the landscape, but it is not invincible. By correctly identifying the triangular stems and waxy leaves, respecting the 5-leaf rule for manual extraction, and utilizing targeted systemic herbicides like halosulfuron-methyl, you can reclaim your garden beds. Combine these eradication tactics with long-term landscaping improvements—specifically enhancing soil drainage and applying thick, coarse mulch—and you will starve the hidden tuber network, ensuring your ornamental plants remain the focal point of your outdoor living spaces.