
Gardening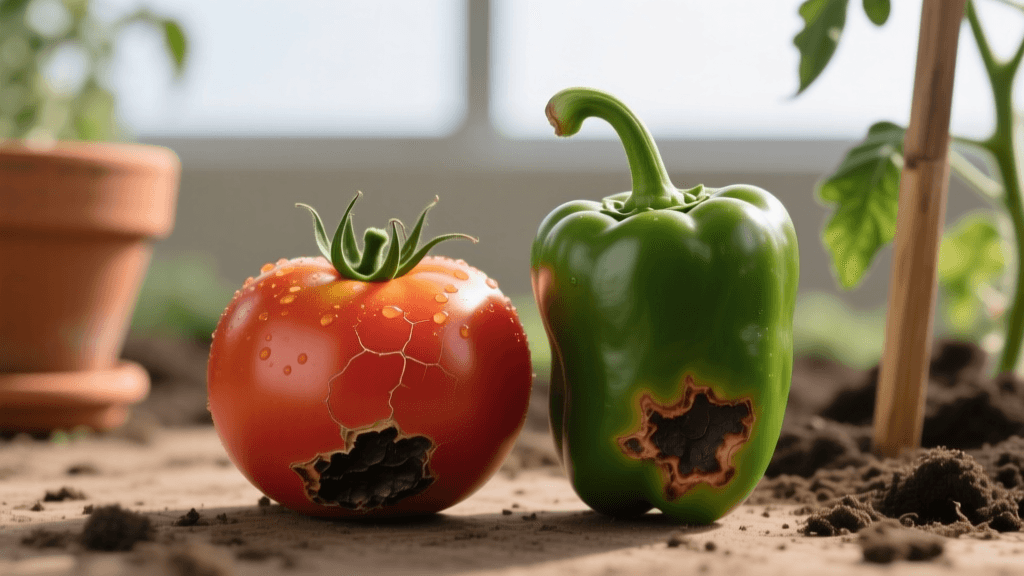
Blossom End Rot in Tomatoes: Diagnosis and Fast Fixes
Introduction to Blossom End Rot
Gardening brings immense joy, but few sights are as heartbreaking to a home grower as walking out to the vegetable patch and discovering the bottom of your prized tomatoes turning black and sunken. This condition, known as blossom end rot, is one of the most common and frustrating problems in vegetable gardening. While it frequently targets tomatoes, it also heavily impacts peppers, eggplants, and squash. Many gardeners immediately assume their soil lacks calcium and rush to the garden center for quick-fix sprays. However, the true culprit is rarely a simple nutrient deficiency. Understanding the physiological mechanics behind this disorder is the first step toward saving your current harvest and preventing future outbreaks. In this comprehensive diagnostic guide, we will explore the exact causes of blossom end rot, separate gardening myths from scientific facts, and provide a step-by-step solution protocol to restore your garden to peak health.
Diagnosing Blossom End Rot: What to Look For
Before applying any treatments, you must accurately diagnose the problem. Blossom end rot is not caused by a fungus, bacteria, or pest; it is a physiological disorder. The symptoms almost always begin when the fruit is about one-third to one-half of its full size.
- Initial Stage: A small, water-soaked, light-tan spot appears on the blossom end of the fruit (the side opposite the stem).
- Progressive Stage: As the fruit grows, the spot enlarges, turning dark brown or black. The tissue becomes sunken, dry, and leathery.
- Secondary Infections: The damaged, necrotic tissue often invites secondary fungal pathogens or pests, which may cause white, gray, or black mold to form over the original lesion.
It is crucial to distinguish this from sunscald, which typically appears on the side of the fruit facing the sun and looks papery and white, or from late blight, which causes greasy-looking dark spots on both leaves and fruit accompanied by white fungal growth in humid conditions. If the damage is strictly on the blossom end and the leaves look healthy, you are almost certainly dealing with blossom end rot.
The Real Cause: Moisture Fluctuations and Calcium Mobility
The prevailing myth in gardening circles is that blossom end rot means your soil is completely depleted of calcium. According to extensive soil testing data, most garden soils actually contain more than enough calcium to support a healthy tomato crop. The issue is not the presence of calcium in the soil, but the plant's ability to transport it to the developing fruit.
Calcium moves through the plant's vascular system via the transpiration stream, essentially riding along with water as it travels from the roots up through the leaves. When soil moisture fluctuates wildly, such as periods of drought followed by heavy watering or heavy rain, the transpiration stream is disrupted. The plant prioritizes sending water and calcium to the rapidly growing leaves rather than the fruit, which has a much lower transpiration rate. Consequently, the fruit suffers a localized calcium deficiency, leading to cell wall collapse at the blossom end.
Other contributing factors include:
- Root Damage: Cultivating too closely to the plant base severs fine root hairs, reducing water and nutrient uptake.
- Excessive Nitrogen: High levels of ammonia-based nitrogen fertilizers promote rapid, lush foliage growth. This forces the plant to compete with the fruit for available calcium, and the ammonium ions can actively inhibit calcium absorption by the roots.
- Cold Soil Temperatures: Planting too early in the spring when soils are below 60 degrees Fahrenheit stunts root development, limiting the plant's overall uptake capacity.
- High Soil Salinity: Excess salts from over-fertilization can create an osmotic imbalance, making it harder for roots to pull water from the soil.
Immediate Solutions: How to Save Your Current Crop
Once a fruit is affected by blossom end rot, the damaged tissue will not heal. However, you can absolutely save the rest of the plant and ensure the next flush of fruit develops normally. Follow this immediate action plan:
- Remove Affected Fruit: Pick off any tomatoes or peppers showing signs of rot. This redirects the plant's energy toward producing new, healthy fruit rather than trying to salvage damaged tissue. If only the bottom is affected, you can cut off the black portion and eat the rest, as it is perfectly safe for human consumption.
- Stabilize Soil Moisture: This is the most critical step. Tomatoes require 1 to 1.5 inches of water per week. Use a rain gauge to track natural precipitation and supplement with deep, slow drip irrigation. Avoid overhead watering, which wets the foliage and promotes fungal diseases. Water deeply at the base of the plant two to three times a week rather than giving a light sprinkle every day.
- Apply a Thick Mulch Layer: Apply 2 to 3 inches of organic mulch, such as straw, shredded leaves, or untreated grass clippings, around the base of the plants. Keep the mulch about 2 inches away from the main stem to prevent rot. Mulch acts as an insulator, keeping the soil cool and drastically reducing moisture evaporation.
- Halt High-Nitrogen Fertilizers: Stop applying synthetic, quick-release nitrogen fertilizers immediately. Switch to a balanced, slow-release organic fertilizer or a liquid kelp extract, which provides trace minerals and helps plants manage environmental stress without forcing excessive leafy growth.
Long-Term Prevention: Soil Preparation and Amendments
To prevent blossom end rot in future seasons, or when preparing new raised beds, you must focus on long-term soil structure and balanced nutrition. The ideal soil pH for tomatoes is between 6.2 and 6.8. At this slightly acidic range, calcium is highly available to plant roots. Before adding any calcium amendments, always conduct a professional soil test through your local university extension office.
If your soil test indicates a true calcium deficiency or an improper pH, you will need to select the correct amendment. Below is a comparison chart of common calcium sources used in vegetable gardening:
| Amendment | Calcium Content | pH Impact | Application Rate | Best Used When |
|---|---|---|---|---|
| Gypsum (Calcium Sulfate) | 23% | Neutral | 1 to 2 lbs per 100 sq ft | Soil pH is already optimal (6.2-6.8) but calcium is low. |
| Garden Lime (Calcium Carbonate) | 33% | Raises pH | 5 lbs per 100 sq ft | Soil is too acidic (below 6.0) and needs a pH increase. |
| Bone Meal | 18% | Slightly Raises | 2 lbs per 100 sq ft | You also need a slow-release phosphorus boost for root and bloom development. |
| Wood Ash | 20% | Strongly Raises | 15 lbs per 1000 sq ft | Soil is highly acidic and needs potassium; use sparingly to avoid alkaline spikes. |
Note on costs and timing: A standard 40-pound bag of pelletized gypsum typically costs around 15 to 20 dollars and is widely available at garden centers. Lime and gypsum should be incorporated into the soil in the fall or at least four to six weeks before spring planting, as they take time to break down and become bioavailable. For container gardening, use a high-quality potting mix formulated for vegetables, and supplement with a water-soluble calcium-magnesium (Cal-Mag) fertilizer if you are growing in coco coir or heavily fertilized peat mixes.
Choosing Resistant Tomato Varieties
While no tomato is entirely immune to blossom end rot under severe environmental stress, certain varieties are bred to be more resilient and efficient at calcium uptake. If you struggle with this issue annually, consider swapping out highly susceptible heirloom paste tomatoes (like San Marzano or Roma) for more resilient hybrids and slicers.
- Celebrity: A highly reliable, disease-resistant hybrid slicer that rarely suffers from severe blossom end rot.
- Mountain Pride: Bred specifically for the humid Southeast, this variety handles moisture fluctuations exceptionally well.
- Early Girl: Because it matures quickly, it often sets and ripens fruit before the peak heat and drought stress of mid-to-late summer.
- Jet Star: An indeterminate hybrid known for its vigorous root system, which helps maintain steady water and nutrient uptake.
Expert Insights and Busted Myths
The internet is full of home remedies for blossom end rot, but many are scientifically flawed. Adding crushed eggshells directly to the planting hole is a popular myth; eggshells take years to decompose and will not provide immediate calcium to a struggling plant. Similarly, spraying foliage with Epsom salts (magnesium sulfate) can actually worsen the problem, as magnesium and calcium compete for the same absorption pathways in the roots.
According to the Cornell University College of Agriculture and Life Sciences, blossom end rot is strictly a physiological disorder caused by localized calcium deficiency in the fruit, heavily exacerbated by uneven soil moisture. They emphasize that foliar calcium sprays are largely ineffective because calcium does not easily translocate from the leaves into the fruit tissue.
By trusting university-backed horticultural science over gardening folklore, you can save time, money, and your harvest. Focus on building rich, compost-amended soil that retains moisture evenly, maintain a strict and deep watering schedule, and use the right amendments based on verified soil tests. With these diagnostic and preventative strategies in place, your tomato and pepper plants will produce blemish-free, delicious fruit all season long.

