
Build a Budget DIY Drip Irrigation for Raised Garden Beds
Transform Your Garden with Budget-Friendly Drip Irrigation
When it comes to maintaining a thriving vegetable garden or a lush floral oasis in your backyard, water management is arguably the most critical factor. Hand watering is time-consuming and often leads to uneven soil moisture, while traditional overhead sprinklers waste massive amounts of water through wind drift and evaporation. For home gardeners looking to bridge the gap between efficient outdoor landscaping and smart home convenience, a DIY drip irrigation system is the ultimate solution.
Drip irrigation delivers water slowly and directly to the root zone of your plants. According to the EPA WaterSense program, drip irrigation systems can be up to 90% efficient, compared to just 50% to 70% for traditional sprinkler systems. This massive leap in efficiency not only conserves a vital natural resource but also significantly lowers your monthly utility bills. Furthermore, by keeping the soil surface between plants dry, drip systems drastically reduce weed germination and fungal diseases, a benefit heavily emphasized by Penn State Extension in their home gardening guidelines.
While professional irrigation installation can cost upwards of $2,500 for a residential landscape, you can build a highly effective, custom-tailored drip system for a standard 4x8-foot raised garden bed for under $75. This guide will walk you through the exact materials, measurements, and steps to create a budget-friendly DIY drip irrigation system that rivals professional setups.
Materials and Cost Breakdown
To keep costs low without sacrificing quality, we will use standard 1/2-inch poly tubing for the mainline and 1/4-inch micro-tubing for the lateral lines. Below is the exact shopping list and estimated cost breakdown for a single 4x8-foot raised bed. Prices are based on average retail costs from major home improvement stores and specialized irrigation suppliers like DripWorks or DIG Corporation.
| Component | Specification / Details | Estimated Cost |
|---|---|---|
| Head Assembly Kit | 3/4' hose thread to 1/2' tubing adapter, 200-mesh filter, 25 PSI pressure regulator | $18.00 |
| Mainline Tubing | 1/2-inch blank poly tubing (50-foot roll) | $12.00 |
| Micro-Tubing | 1/4-inch blank vinyl tubing (50-foot roll) | $9.00 |
| Fittings & Connectors | 1/2-inch barbed tees, elbows, and 1/4-inch barbed connectors (pack of 20) | $11.00 |
| End Caps | 1/2-inch figure-8 end clamps (pack of 5) | $4.00 |
| Installation Tools | Drip hole punch tool and 10 landscape staple pins | $12.00 |
| Smart Timer (Optional) | Bluetooth/Wi-Fi smart hose faucet timer (e.g., Orbit B-hyve) | $50.00 |
| Total (Base) | Without Smart Timer | $66.00 |
Step-by-Step Installation Guide
Step 1: Plan Your Layout
Before cutting any tubing, map out your raised bed. For a 4x8-foot bed, the most efficient layout is a grid system using 1/4-inch micro-tubing spaced 12 inches apart. This spacing ensures that water spreads evenly through capillary action in the soil, covering the entire bed whether you are planting dense crops like carrots and lettuce or larger plants like tomatoes and peppers. You will run the 1/2-inch mainline down one of the 8-foot long edges, and branch the 1/4-inch laterals across the 4-foot width.
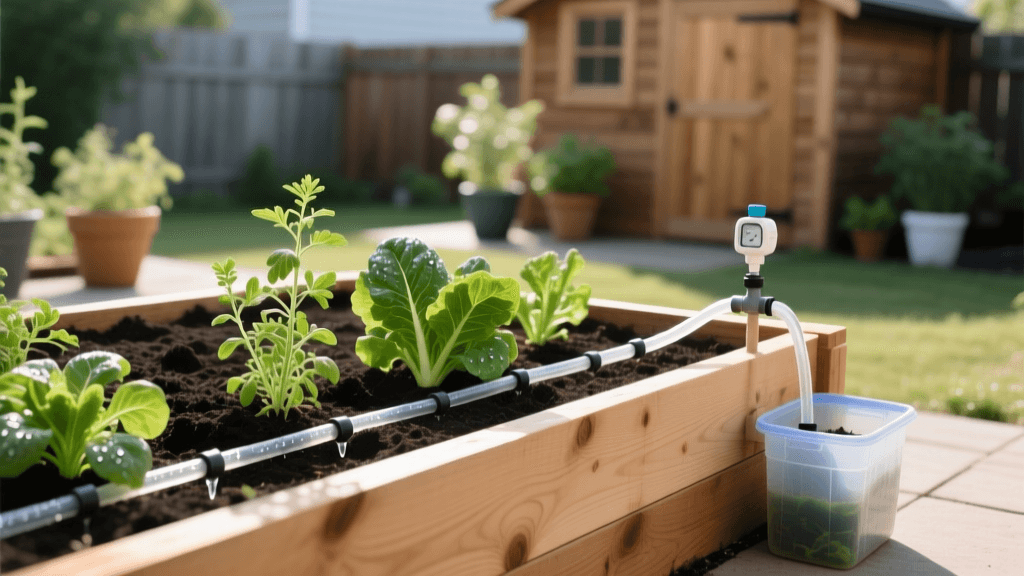
Step 2: Assemble the Head Assembly
The head assembly is the brain and heart of your drip system. It connects directly to your outdoor hose spigot. The order of connection is critical to prevent system failure: 1. Backflow Preventer: Ensures contaminated garden water does not siphon back into your home's drinking water supply. 2. Smart Timer (if using): Threads onto the backflow preventer. 3. 200-Mesh Filter: Drip emitters and micro-tubing have tiny openings that clog easily. The filter catches sediment and hard water minerals. 4. 25 PSI Pressure Regulator: Standard household water pressure ranges from 40 to 80 PSI. Drip tubing is only rated for about 30 PSI. Without a regulator, your fittings will blow apart the moment you turn on the water. 5. Tubing Adapter: Connects the 3/4-inch hose thread to the 1/2-inch poly tubing.
Step 3: Lay the Mainline Tubing
Unroll your 1/2-inch poly tubing and let it sit in the sun for about 30 minutes. The heat makes the plastic pliable and easier to work with, preventing it from kinking. Attach one end to your head assembly. Run the tubing straight down the outside or inside edge of the 8-foot length of your raised bed. Secure the tubing every 2 feet using landscape staple pins pushed firmly into the soil or hooked over the wooden bed frame.
Step 4: Punch and Connect the Laterals
Using your specialized drip hole punch tool, punch a hole into the side of the 1/2-inch mainline every 12 inches. Pro Tip: Always punch on the side of the tubing facing the garden bed, not the top or bottom, to prevent debris from settling into the hole. Insert a 1/4-inch barbed connector into each hole. Measure and cut your 1/4-inch micro-tubing to 4-foot lengths, pushing one end onto the barbed connector. Run the micro-tubing across the width of the bed. At the end of each 4-foot run, insert a small 1/4-inch end plug, or simply tie a knot in the soft vinyl tubing to seal it.
Step 5: Cap, Test, and Mulch
At the very end of your 1/2-inch mainline, fold the last inch of the tubing over twice and secure it with a figure-8 end clamp. Turn on your spigot slowly. Walk the length of the system and check for leaks. You should see a steady, slow bead of water weeping from the micro-tubing (if using porous soaker tubing) or from the inline emitters. Once confirmed, cover the tubing with 2 to 3 inches of organic mulch, such as straw or shredded bark. Mulch hides the unsightly plastic, protects it from UV degradation, and further reduces evaporation.
Smart Home Integration on a Budget
One of the best ways to modernize your outdoor space without spending thousands on professional smart landscaping is by integrating a budget-friendly smart hose timer. Devices like the Orbit B-hyve or Melnor Smart Water Timer cost around $50 and connect directly to your home Wi-Fi or a dedicated Bluetooth hub. These smart timers pull local weather data via the cloud. If a rainstorm is forecasted, the timer automatically delays your watering schedule, preventing overwatering and saving you money on your water bill. You can control the system from your smartphone while sitting on your indoor couch or even while away on vacation. This seamless integration of indoor smart home technology with outdoor garden infrastructure is a hallmark of modern, energy-efficient landscaping.
Troubleshooting Common DIY Drip Issues
Even with careful planning, DIYers may encounter a few hiccups. Here is how to solve the most common budget drip irrigation problems:
- Fittings Blowing Off: This is almost always caused by missing or failing pressure regulators. Ensure your regulator is rated for 25 PSI and is installed after the filter, not before it.
- Uneven Watering (Dry Ends): If the emitters at the end of your 1/4-inch lines are dry while the beginning is wet, your tubing runs are too long. For 1/4-inch micro-tubing, never exceed 30 feet in total length from the mainline to the end cap to maintain adequate pressure.
- Clogged Emitters: If you notice dry spots, check your 200-mesh filter. If you have exceptionally hard water, you may need to flush the system monthly by removing the end caps and letting the water run at full pressure for two minutes to blow out calcium buildup.
Seasonal Maintenance and Winterization
To ensure your budget-friendly system lasts for years, proper seasonal maintenance is required. In the fall, before the first hard freeze, you must winterize the system. Water expands when it freezes, which will split your 1/2-inch poly tubing and shatter your plastic barbed fittings. Disconnect the head assembly and smart timer and store them indoors in your garage or shed. Open all the figure-8 end caps on the mainline and the ends of the 1/4-inch laterals. Turn the water on for 30 seconds to blow out any remaining water, then turn it off and leave the ends open for the winter. In the spring, simply flush the lines again, reattach the caps, reconnect your smart timer, and your garden will be ready for a new season of highly efficient, automated watering.
Conclusion
Building a DIY drip irrigation system for your raised garden beds is one of the highest-ROI projects a home gardener can undertake. For less than $70, you can eliminate the daily chore of hand watering, drastically reduce your outdoor water consumption, and foster a healthier, more productive garden. By pairing this budget-friendly physical infrastructure with a smart home timer, you achieve a level of landscape automation that perfectly bridges the gap between outdoor horticulture and modern indoor convenience.

