
Budget-Friendly DIY Rain Barrel and Drip Irrigation
Transform Your Garden with a Budget-Friendly DIY Rain Barrel and Drip System
As the summer sun beats down and your garden-to-table vegetables begin to wilt, the temptation to leave the hose running for hours is strong. However, this habit quickly translates into skyrocketing utility bills and wasted municipal water. Bridging the gap between energy-efficient landscaping and budget-friendly DIY solutions is easier than you might think. By constructing your own rain barrel and pairing it with a gravity-fed drip irrigation system, you can harness nature's free resources to keep your outdoor living spaces and vegetable patches lush, green, and thriving.
Commercial rain barrel kits and automated irrigation systems can easily cost upwards of $200 to $400. Fortunately, with a little elbow grease, some basic hardware store supplies, and upcycled materials, you can build a highly efficient, low-pressure drip system for a fraction of the retail cost. This guide will walk you through the exact measurements, materials, and physics required to create a sustainable watering system for your home and garden.
The Financial and Environmental Case for Rainwater Harvesting
Before diving into the DIY assembly, it is important to understand the profound impact of rainwater harvesting. According to the Environmental Protection Agency (EPA), outdoor water use accounts for nearly 30% of total household water consumption, a number that can jump to 60% in arid regions during peak summer months. By capturing rainwater, you directly reduce your reliance on treated municipal water, lowering your monthly utility bills while conserving vital community resources.
Furthermore, the environmental benefits extend well beyond your property line. The U.S. Geological Survey (USGS) highlights that rainwater harvesting significantly reduces stormwater runoff. Unmanaged runoff sweeps across driveways and lawns, picking up fertilizers, pesticides, and heavy metals before depositing them into local watersheds and waterways. By intercepting this water, you protect local ecosystems while securing a chemical-free, naturally soft water source that your plants will absolutely love.
Calculating Your Roof Catchment Potential
To size your system correctly, you need to know how much water your roof can actually catch. The general rule of thumb for catchment calculation is:
Roof Area (in square feet) × Rainfall (in inches) × 0.623 = Gallons Harvested
For example, a modest 10x10 foot shed roof (100 sq ft) receiving just 1 inch of rain will yield approximately 62.3 gallons of water. This means a single summer thunderstorm can easily fill a standard 55-gallon drum, providing enough water to sustain a raised bed garden through a week of dry weather.
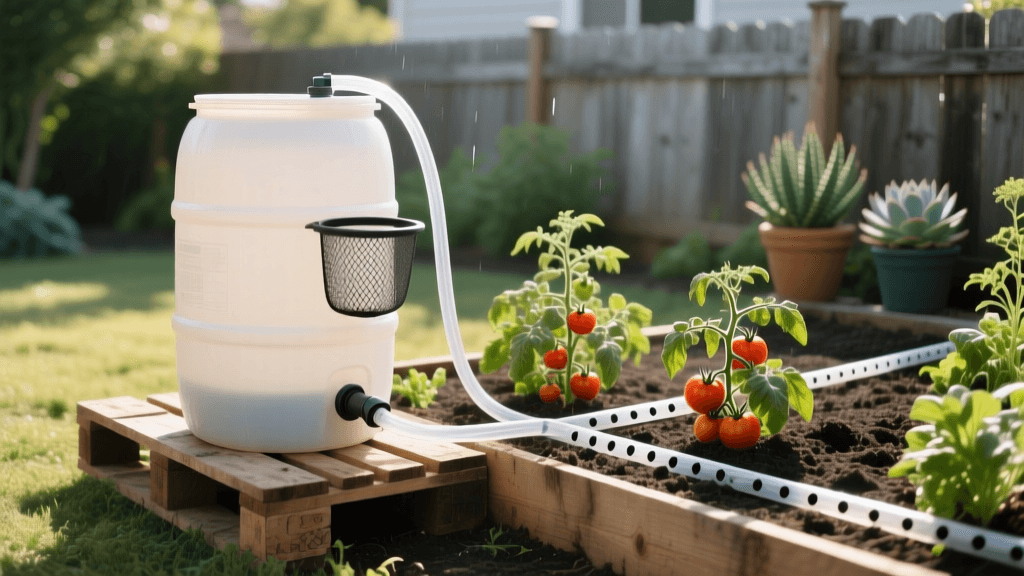
Essential Materials and Tools
To keep this project strictly budget-friendly, we are utilizing a food-grade upcycled barrel and standard hardware store fittings. Avoid using barrels that previously held toxic chemicals, pesticides, or industrial solvents. Look for High-Density Polyethylene (HDPE) drums that were used to transport food-grade liquids like vinegar, syrup, or soy sauce.
Materials List:
- 1x 55-Gallon Food-Grade HDPE Barrel with dual bungs ($15-$25 from local beverage suppliers or car washes)
- 1x 3/4-inch PVC or Brass Spigot ($8)
- 1x 3/4-inch Bulkhead Fitting ($5)
- 1x 50-foot roll of 1/2-inch Poly Drip Tubing ($15)
- 10x 1/4-inch Barbed Connectors and 1 GPH (Gallon Per Hour) Emitters ($10)
- 4x Concrete Cinder Blocks (4x8x16 inches) for the base ($8)
- 1x Downspout Diverter Kit or flexible downspout extension ($12)
- 1x Roll of Fiberglass Window Screen Mesh ($4)
- Marine-grade Waterproof Silicone Sealant ($4)
- Teflon Thread Seal Tape ($2)
Tools Required:
- Power Drill with a 3/4-inch Spade Bit and a 1-inch Hole Saw
- Adjustable Wrenches
- Utility Knife
- Hacksaw
- Drip Tubing Punch Tool
Step-by-Step Assembly Guide
Step 1: Sourcing and Prepping the Barrel
Thoroughly rinse the inside of your 55-gallon barrel. If it has a lingering odor from its previous food-grade contents, wash it with a solution of 1 part white vinegar to 10 parts water, then rinse it repeatedly with a garden hose. Ensure the top bungs (the threaded caps on the top of the barrel) are intact, as one will serve as your water inlet and the other as an air vent.
Step 2: Drilling and Installing the Spigot
Using your power drill and the 3/4-inch spade bit, drill a hole approximately 3 to 4 inches from the bottom of the barrel. This elevation ensures you can place a watering can underneath the spigot while also leaving a small reservoir of water at the very bottom that won't be siphoned into the drip lines, preventing sediment clogs. Apply a generous bead of marine-grade silicone around the outside of the hole. Insert the threaded end of your bulkhead fitting from the outside, and secure it from the inside using the provided locknut and adjustable wrench. Wrap the exterior threads of the bulkhead fitting in Teflon tape, then screw on your 3/4-inch spigot tightly.
Step 3: Building the Gravity Base
Gravity-fed drip irrigation relies on hydrostatic pressure. Water generates approximately 0.433 PSI (Pounds per Square Inch) for every foot of elevation. While standard sprinklers require 30+ PSI, low-volume drip emitters operate beautifully on 1 to 5 PSI. To achieve adequate flow for a 1/2-inch mainline drip system, elevate your barrel at least 24 to 36 inches off the ground. Stack four concrete cinder blocks on a level patch of gravel or crushed stone to create a stable, rot-proof platform. Place the barrel securely on top.
Step 4: Connecting the Downspout Diverter
Using a hacksaw, cut a section out of your home's aluminum or vinyl downspout at a height that aligns with the top of your elevated barrel. Install a Y-shaped downspout diverter, routing the flexible hose directly into the top bung of the barrel. To prevent debris and pests from entering, cut a piece of fiberglass window screen mesh and secure it over the barrel's inlet using a large hose clamp or heavy-duty rubber band. This mesh is your first line of defense against organic clogs.
Step 5: Laying the Gravity Drip Lines
Attach your 1/2-inch poly drip tubing to the spigot using a barbed hose connector. Run the mainline tubing along the base of your garden beds. Using the manual punch tool, pierce the mainline tubing near the base of each plant. Insert a 1/4-inch barbed connector into the hole, attach a short length of 1/4-inch tubing, and finish with a 1 GPH pressure-compensating emitter. Because gravity systems operate at low pressure, 1 GPH emitters are ideal; they allow water to slowly seep into the soil over several hours, deeply hydrating root zones without overwhelming the low-PSI flow rate.
Cost Breakdown: DIY vs. Retail Rain Barrel Kits
When comparing this DIY approach to off-the-shelf solutions, the financial savings become immediately apparent, leaving you with extra budget to invest in premium soil amendments or outdoor furniture.
| Component | Budget DIY Cost | Retail Kit Equivalent | Your Savings |
|---|---|---|---|
| 55-Gal Rain Barrel | $20.00 (Upcycled) | $120.00 | $100.00 |
| Spigot & Fittings | $13.00 | $25.00 (Included in kit) | $12.00 |
| Drip Irrigation Lines | $25.00 | $45.00 | $20.00 |
| Base & Diverter | $20.00 | $40.00 | $20.00 |
| Total Estimated Cost | $78.00 | $230.00 | $152.00 |
Maintenance, Mosquito Control, and Winterization
A rain barrel is a fantastic addition to your sustainable landscape, but it requires basic seasonal maintenance to remain functional and safe. Standing water is a primary breeding ground for pests. To mitigate this, the Environmental Protection Agency (EPA) strongly recommends eliminating or properly treating standing water around the home. Always ensure your inlet screen is free of tears. If water tends to sit stagnant for more than a few days, drop a quarter of a Mosquito Dunk (containing Bti, a naturally occurring soil bacterium) into the barrel. Bti is highly toxic to mosquito and fungus gnat larvae but completely safe for pets, wildlife, and your garden-to-table vegetable crops.
As autumn approaches and temperatures threaten to dip below freezing, winterization is critical. Water expands when it freezes, which will easily crack your HDPE barrel, shatter your PVC spigot, and ruin your bulkhead fitting. Before the first hard freeze, drain the barrel completely. Leave the spigot in the open position to allow any residual condensation to escape. Disconnect the downspout diverter hose and store the barrel upside down in a garage or shed to protect the plastic from UV degradation and winter weather.
Master Gardener Tip: Never use water harvested from asphalt shingle roofs or treated wood shakes for edible garden-to-table crops. Runoff from these materials can contain trace heavy metals, petrochemicals, and toxic preservatives. Stick to metal, slate, or untreated composite roofs for vegetable garden irrigation.
Final Thoughts
Building a budget-friendly DIY rain barrel and gravity drip irrigation system is one of the most rewarding weekend projects a homeowner can undertake. It seamlessly bridges the gap between indoor conservation habits and outdoor garden vitality. By upcycling materials, leveraging the simple physics of gravity, and taking control of your water usage, you are not just saving money—you are cultivating a more resilient, self-sustaining, and eco-friendly home landscape.

