
How to Build a Budget DIY Smart Drip Irrigation System
Why Upgrade to a Smart Drip Irrigation System?
Bridging the gap between a thriving garden-to-table harvest and energy-efficient landscaping requires precise water management. Traditional overhead sprinklers are notoriously inefficient, losing vast amounts of water to wind drift, runoff, and evaporation. According to the Environmental Protection Agency (EPA), outdoor water use accounts for nearly 30% of total household water use in the United States, and inefficient irrigation can waste thousands of gallons annually.
For the budget-conscious home gardener, upgrading to a smart drip irrigation system sounds like a luxury reserved for high-end landscaping projects. However, by leveraging affordable Wi-Fi-enabled hose timers and standard drip components, you can build a fully automated, weather-responsive smart drip irrigation system for under $130. The University of Minnesota Extension notes that drip irrigation delivers water directly to the root zone with up to 90% efficiency, drastically reducing weed growth and fungal diseases associated with wet foliage.
Budget Breakdown: DIY vs. Professional Systems
Before diving into the build, it is helpful to understand the cost savings associated with a DIY approach compared to hiring a professional landscaping company.
| System Type | Estimated Cost | Smart Features | Installation Difficulty |
|---|---|---|---|
| Professional Smart Drip | $800 - $1,500+ | Full Integration | None (Pro Installed) |
| Commercial Smart Sprinkler | $400 - $900 | Wi-Fi Timer | Moderate to High |
| Budget DIY Smart Drip | $90 - $130 | Wi-Fi Hose Timer | Easy (Weekend DIY) |
Materials and Tools Needed
To build a system capable of watering up to four 4x8-foot raised garden beds, you will need the following components. Prices are approximate and based on standard hardware store and online retailer averages.
- Wi-Fi Smart Hose Timer (e.g., Orbit B-hyve XD or Moen Flo): ~$45
- 1/2-inch Blank Poly Tubing (100 ft roll): ~$25
- 1/4-inch Micro-Tubing (50 ft roll): ~$12
- 2 GPH Pressure-Compensating Emitters (50-pack): ~$14
- Brass Backflow Preventer & Y-Splitter: ~$18
- Tool Kit (Hole punch, tubing cutter, barbed tees, end caps): ~$15
Pro-Tip: Always use pressure-compensating (PC) emitters. They ensure that the plant at the very end of your tubing line receives the exact same amount of water as the plant closest to the spigot, regardless of elevation changes in your yard.
Step-by-Step Installation Guide
Step 1: Prep the Spigot and Backflow Preventer
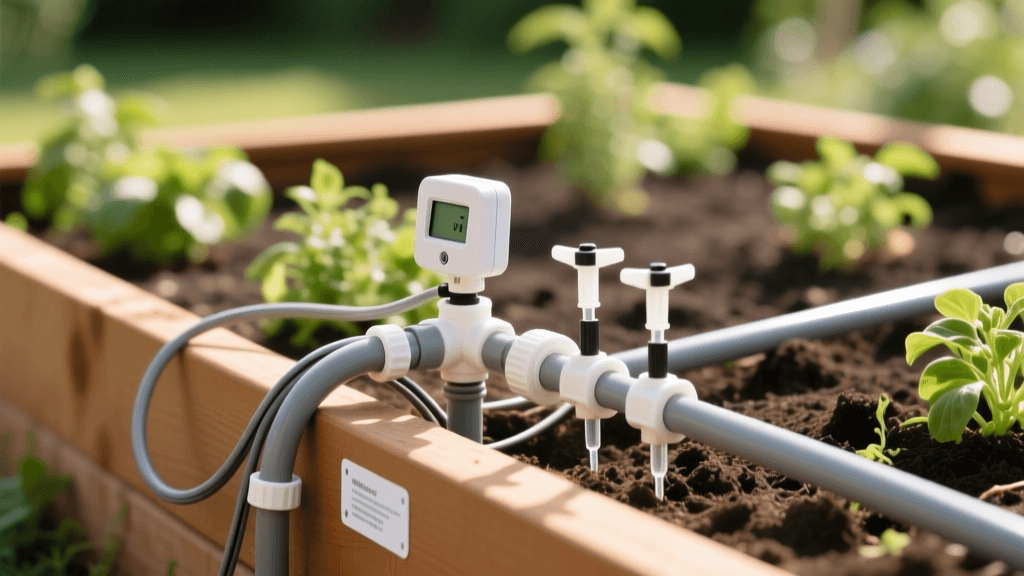
Start at your outdoor water spigot. Wrap the threads with plumber's Teflon tape to prevent leaks. Screw on the brass backflow preventer first—this is a critical safety device that stops fertilizer or soil bacteria from siphoning back into your home's drinking water supply. Attach the Y-splitter to the backflow preventer. This allows you to keep a standard hose connected for manual watering while the smart system uses the other port.
Step 2: Connect the Smart Hose Timer
Thread your Wi-Fi smart hose timer onto one side of the Y-splitter. Most modern smart timers require a 2.4GHz Wi-Fi connection. Download the manufacturer's app, connect the timer to your home network, and ensure the manual valve is turned to the 'OFF' position while you build the rest of the system.
Step 3: Lay the Mainline Poly Tubing
Unroll the 1/2-inch poly tubing and let it sit in the sun for about 30 minutes. The heat will soften the plastic, removing the memory of the coil and making it much easier to work with. Run the mainline tubing along the edge of your raised beds or garden rows. Use landscape staples to pin it down every few feet. To navigate corners, use barbed 1/2-inch elbows or tees rather than bending the tubing sharply, which can kink and restrict water flow. If you struggle to push fittings into the tubing, dip the tubing ends in hot water for ten seconds to soften the plastic.
Step 4: Punch Holes and Attach Micro-Tubing
Using the specialized hole punch tool, pierce the 1/2-inch mainline tubing directly adjacent to each plant. Insert a barbed connector into the hole, attach a length of 1/4-inch micro-tubing, and run it to the base of the plant. Snap the 2 GPH pressure-compensating emitter onto the end of the micro-tubing and stake it into the soil near the root zone. Once all emitters are connected, cap the end of the 1/2-inch mainline with an end cap or figure-8 closure.
Step 5: Program Your Smart App
Open your smart timer app and configure your watering zone. Enable 'WeatherSense' or local weather integration features. This allows the timer to pull local evapotranspiration (ET) data and automatically skip watering schedules if rain is in the forecast. Be sure to input your specific soil type and plant types into the app, as these variables dictate the baseline watering duration. The Water Use It Wisely campaign highly recommends adjusting irrigation schedules seasonally, which smart apps do automatically based on your local zip code.
Optimizing Water Delivery for Different Soil Types
The spacing of your drip emitters should be dictated by your soil composition. Water moves differently through clay, loam, and sand. Use the chart below to determine the optimal emitter spacing for your garden beds.
| Soil Type | Water Movement Pattern | Recommended Emitter Spacing |
|---|---|---|
| Heavy Clay | Wide and shallow lateral spread | 18 to 24 inches apart |
| Loam (Ideal) | Even, bulbous spread | 12 inches apart |
| Sandy Soil | Narrow and deep vertical drop | 6 to 8 inches apart |
Seasonal Maintenance and Winterization
To ensure your budget DIY system lasts for multiple growing seasons, proper winterization is non-negotiable. Water expands when it freezes, which will easily crack the plastic housing of your smart timer and split your poly tubing.
- Disconnect and Store the Timer: Before the first hard freeze, detach the Wi-Fi timer from the spigot, drain any residual water from the valve, and store it indoors in a climate-controlled environment.
- Drain the Lines: Remove the end caps from your 1/2-inch mainline tubing. Elevate the far ends of the tubing to allow gravity to drain the remaining water. If you have a long or complex layout, use an air compressor set to a very low PSI (under 20 PSI) to blow out the lines.
- Inspect Emitters and Gaskets: In early spring, turn the system on manually and walk the line. Look for emitters that are clogged with mineral deposits or debris. Soak clogged emitters in a cup of white vinegar for 30 minutes to dissolve calcium buildup. Additionally, check the rubber gaskets inside your backflow preventer and hose timer for dry rot or cracking, replacing them if necessary to prevent springtime leaks.
Conclusion
Integrating smart home technology with energy-efficient landscaping does not require a massive financial investment. By spending a weekend assembling a budget-friendly DIY smart drip irrigation system, you protect your garden-to-table crops from drought stress, eliminate the guesswork of manual watering, and significantly reduce your municipal water bill. With the right components, a bit of elbow grease, and the power of local weather data, your garden will thrive efficiently all season long.

