Landscaping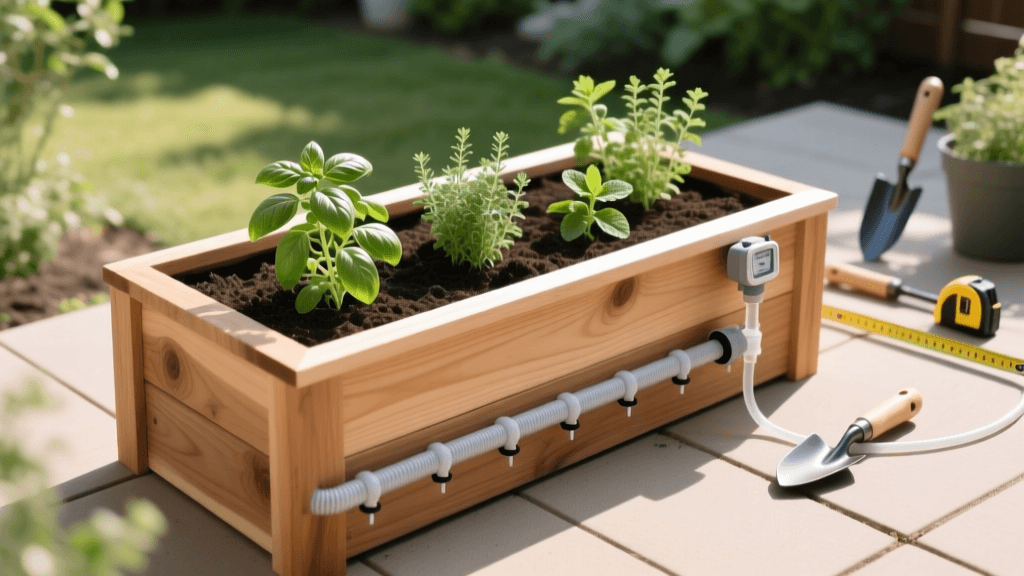
Build A Cedar Raised Planter With Drip Irrigation 2026
The Ultimate 2026 Guide to Cedar Raised Planter Boxes with Drip Irrigation
As we navigate the 2026 landscaping season, water conservation and sustainable gardening practices are no longer just trends—they are essential components of modern landscape design. With many municipalities implementing stricter watering regulations and smart-home technology becoming more accessible, integrating a high-efficiency drip irrigation system into a custom-built cedar raised planter box is one of the most impactful upgrades you can make to your outdoor living space. This comprehensive guide will walk you through the exact measurements, material selections, and irrigation engineering required to build a beautiful, long-lasting cedar planter and equip it with a precision drip system.
Why Choose Western Red Cedar and Drip Irrigation?
Western Red Cedar remains the gold standard for raised garden beds in 2026. Unlike pressure-treated pine, which can leach unwanted chemicals into your soil, untreated cedar contains natural oils that resist rot, decay, and insect damage. A well-constructed cedar planter can easily last 10 to 15 years without chemical sealants, making it perfectly safe for growing organic vegetables, herbs, and delicate ornamentals.
Pairing this premium wood with a drip irrigation system maximizes your return on investment. According to the Environmental Protection Agency (EPA), drip irrigation systems can save up to 30,000 gallons of water per year compared to traditional spray sprinklers by delivering water directly to the root zone and eliminating wind drift and evaporation. In a raised bed environment, where soil drains faster than in-ground gardens, the slow, consistent moisture delivery of drip emitters prevents the feast-or-famine watering cycle that stresses plants.
Materials and Tools Required
Before breaking ground, gather the following materials. For a standard 4-foot by 8-foot raised planter box with an integrated drip grid, you will need:
- Lumber: (6) 2x6x8 Western Red Cedar boards (untreated).
- Fasteners: 2.5-inch exterior-grade stainless steel deck screws (do not use galvanized, as they can react with cedar tannins and cause black streaks).
- Corner Braces: (4) Heavy-duty aluminum or cedar internal corner brackets.
- Irrigation Mainline: 50 feet of 1/2-inch polyethylene drip tubing.
- Emitter Tubing: 100 feet of 1/4-inch inline emitter tubing (12-inch emitter spacing) or blank tubing with punch-in emitters.
- Fittings: 1/2-inch to 1/4-inch barbed tees, couplers, and end caps.
- Hardware: 200-mesh irrigation filter, 25 PSI pressure regulator, and a hose bib adapter.
- Smart Controller: A 2026-compatible smart irrigation timer (e.g., Rachio 4 or Orbit B-hyve XR).
- Tools: Miter saw, power drill, tape measure, level, irrigation hole punch, and tubing cutter.
Step 1: Constructing the Cedar Raised Planter Box
Proper construction ensures your planter withstands the hydrostatic pressure of wet soil and the constant moisture from the drip system. Start by cutting four of your 2x6x8 cedar boards in half to create eight 4-foot sections. You will build a box that is two boards high, yielding an 11-inch depth (actual dimension of a 2x6 is 1.5 x 5.5 inches).
Lay out your first layer of four boards (two 8-footers and two 4-footers) on a flat surface to form a rectangle. Pre-drill three holes at each corner to prevent the cedar from splitting. Drive your stainless steel screws through the long boards into the ends of the short boards. Repeat this process for the second layer, ensuring the seams are staggered for structural integrity. Attach the internal corner brackets to lock the layers together vertically. For expert tips on soil preparation and bed placement, the Old Farmer's Almanac recommends orienting your bed north-to-south to maximize sun exposure across all your crops.
Once assembled, move the box to its final location. Lay down a layer of hardware cloth at the bottom to deter burrowing pests, followed by a layer of cardboard to suppress weeds, and fill with a high-quality raised bed soil mix (typically 60% topsoil, 30% compost, and 10% peat moss or coco coir).
Step 2: Designing the Drip Irrigation Layout
The key to a successful raised bed irrigation system is uniform water distribution. Because raised beds drain efficiently, you want a grid layout rather than a single perimeter loop. For a 4x8 foot bed, run your 1/2-inch mainline tubing along the inside edge of one of the 8-foot sides. From this mainline, you will branch off with your 1/4-inch emitter tubing.
Space your 1/4-inch lateral lines every 12 inches across the width of the bed. This means you will have roughly seven lateral lines running the 4-foot width of the bed. This 12-inch grid ensures that whether you are planting tightly spaced carrots or sprawling tomato plants, every root zone has immediate access to moisture.
Step 3: Installing the Tubing and Emitters
Connect your 1/2-inch mainline to the water source using the hose bib adapter, 200-mesh filter, and 25 PSI pressure regulator. Drip systems operate on low pressure; without a regulator, the fittings will blow apart under standard household water pressure (which often exceeds 60 PSI).
Use your irrigation hole punch to create holes in the 1/2-inch mainline every 12 inches. Insert a barbed tee fitting into each hole, and attach your 1/4-inch inline emitter tubing. Run the tubing across the bed and secure the ends with 1/4-inch end caps or U-shaped landscape staples. If you are planting specific shrubs or trees in the planter, you can supplement the inline tubing with adjustable punch-in bubblers placed directly at the base of the woody stems.
Comparing Drip Emitter Types for Raised Beds
Choosing the right emitter technology is critical for 2026 landscaping efficiency. Below is a comparison of the most common emitter types used in cedar planter boxes.
| Emitter Type | Flow Rate | Best Use Case | Pros and Cons |
|---|---|---|---|
| Inline Emitter Tubing | 0.9 GPH per emitter | Row crops, dense plantings, leafy greens | Pros: Uniform grid, easy to install. Cons: Less customizable for spaced plants. |
| Punch-In Button Emitters | 1.0 to 2.0 GPH | Individual potted plants, spaced vegetables | Pros: Highly customizable placement. Cons: Prone to clogging if unfiltered. |
| Adjustable Bubblers | 0 to 15 GPH | Large shrubs, dwarf fruit trees in planters | Pros: High volume, adjustable. Cons: Can wash away soil if not secured. |
| Drip Tape | 0.4 GPH per emitter | Commercial farming, single-season annuals | Pros: Very cheap, low pressure. Cons: Degrades in UV light, not durable. |
Step 4: Integrating a Smart Irrigation Controller
In 2026, manually turning a hose bib on and off is an outdated practice that leads to overwatering and root rot. Upgrading to a smart irrigation controller transforms your cedar planter into a self-sustaining ecosystem. Modern controllers utilize hyper-local weather data, evapotranspiration (ET) rates, and soil moisture sensor feedback to calculate the exact runtime needed for your specific microclimate.
Install a smart timer at your hose bib or integrate a dedicated drip zone into your main underground sprinkler manifold using a smart valve. Set the watering schedule for early morning (between 4:00 AM and 6:00 AM) to minimize evaporation and prevent fungal diseases on plant foliage. Most smart controllers now feature automatic freeze-skip and rain-skip functions, ensuring your cedar planter never receives water when the soil is already saturated or when temperatures threaten to freeze the tubing.
Maintenance and Winterization
While cedar is highly durable and drip systems are low-maintenance, a seasonal checklist will extend the life of your investment. Every spring, flush the mainline and lateral lines by removing the end caps and running the system for two minutes to clear out mineral deposits and debris. Inspect the 200-mesh filter and rinse it under a hose.
In late autumn, before the first hard freeze, it is imperative to winterize the system. Water expands when it freezes, which will split your polyethylene tubing and shatter your barbed fittings. Disconnect the smart controller, filter, and pressure regulator, and store them indoors. Use a portable air compressor set to a maximum of 20 PSI to blow out any remaining water from the drip lines. Leave the end caps off during the winter to allow any condensation or melting snow to drain freely from the cedar planter's irrigation grid.
Conclusion
Building a cedar raised planter box and outfitting it with a precision drip irrigation system is a premier landscaping project that pays dividends in water savings, plant health, and curb appeal. By following these 2026 best practices, utilizing high-quality materials, and leveraging smart irrigation technology, you will create a stunning, productive garden feature that thrives for years to come.