
Designing a Climate-Smart Outdoor Kitchen and Patio
The Rise of the Climate-Smart Outdoor Kitchen
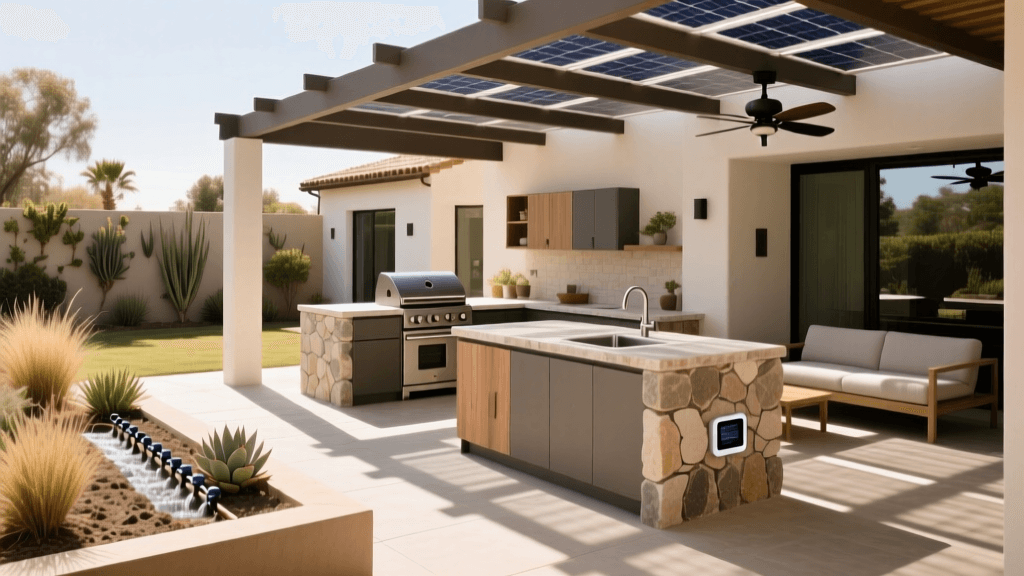
The modern outdoor kitchen has evolved far beyond a simple charcoal grill resting on a concrete slab. Today, homeowners are seeking seamless transitions between indoor and outdoor living spaces that prioritize sustainability, energy efficiency, and garden-to-table functionality. Designing a climate-smart outdoor kitchen and patio requires a holistic approach that bridges hardscaping, passive solar landscaping, smart home technology, and edible garden integration. By strategically planning your outdoor cooking and dining zones, you can create a resilient, comfortable space that reduces your environmental footprint while maximizing your property's usable square footage.
Whether you are retrofitting an existing patio or breaking ground on a new outdoor living room, this comprehensive design guide will walk you through the essential planning phases. We will cover solar orientation, energy-efficient shade structures, smart irrigation for adjacent culinary gardens, and the integration of automated outdoor lighting.
Step 1: Site Analysis and Solar Orientation
Before pouring any concrete or laying natural stone pavers, you must understand your yard's unique microclimate. The placement of your outdoor kitchen should be dictated by the sun's trajectory, prevailing wind patterns, and the proximity to your indoor kitchen. A poorly oriented patio can become an unusable heat trap in the summer or a wind tunnel in the autumn.
Map the 'solar window' in your yard—the path the sun takes between 9:00 AM and 3:00 PM during the peak summer months. Your primary cooking and dining zones should ideally be shielded from this intense afternoon glare. Furthermore, consider how your outdoor structures will impact your home's indoor energy efficiency.
According to the U.S. Department of Energy (DOE), strategic passive solar landscaping, including the placement of shade trees and architectural overhangs, can reduce unshaded patio ambient temperatures by up to 6 degrees Fahrenheit during peak summer months. Additionally, shading west-facing windows with these same structures can lower adjacent indoor cooling costs by up to 25%.
When planning your layout, position the 'hot zone' (grills, pizza ovens, and smokers) on the north or east side of the patio to avoid compounding the heat of the afternoon sun with the radiant heat of your appliances.
Step 2: Energy-Efficient Shade Structures and Landscaping
Shade is the cornerstone of a comfortable outdoor living space. When designing a climate-smart patio, you have several options ranging from high-tech motorized pergolas to biological shade provided by deciduous vines. The right choice depends on your budget, aesthetic preferences, and energy-saving goals.
Shade Structure Comparison Chart
| Structure Type | Initial Cost (Per Sq Ft) | Cooling Benefit & Energy Impact | Maintenance Level |
|---|---|---|---|
| Motorized Louvered Pergola (e.g., Struxure) | $65 - $120 | Maximum control; blocks 100% of UV rays and rain; can be angled to allow passive solar heating in winter. | Low (Annual mechanical inspection) |
| Wood Pergola with Deciduous Vines (e.g., Wisteria, Grapevine) | $30 - $50 | Excellent summer shade; leaves drop in winter to allow solar gain; biological cooling through evapotranspiration. | High (Seasonal pruning, pest management) |
| Architectural Shade Sails (High-density polyethylene) | $15 - $25 | Blocks up to 95% of UV rays; allows airflow to prevent heat trapping; does not block winter sun if removed. | Medium (Requires tension adjustments, winter removal) |
For the ultimate climate-smart design, consider a hybrid approach. Install a motorized louvered roof over the primary kitchen and dining island to ensure year-round usability and protect smart appliances from the elements. Then, use deciduous vines on adjacent trellises to create a secondary, biologically cooled lounge area.
Step 3: The Garden-to-Table Transition Zone
A true home and garden sanctuary bridges the gap between where food is grown and where it is prepared. Integrating a culinary garden directly into your patio design reduces the carbon footprint of your meals and provides unparalleled freshness. However, edible landscaping requires specific hardscaping considerations to remain accessible and visually appealing.
Raised Bed Specifications for Outdoor Kitchens
- Height: Build raised cedar or composite beds at least 18 to 24 inches high. This depth is crucial for root vegetables like carrots and parsnips, and it elevates the harvesting zone to a comfortable waist height, reducing back strain.
- Width: Keep beds no wider than 4 feet. This ensures you can reach the center of the bed from either side without stepping on and compacting the soil.
- Pathways: Maintain a minimum of 48 inches of clearance between raised beds and the outdoor kitchen counters to comply with ADA accessibility standards and allow multiple people to work in the space simultaneously.
- Soil Volume: A 4x8 foot bed that is 18 inches deep requires approximately 1.5 cubic yards of soil. Use a mix of 60% topsoil, 30% compost, and 10% pumice or perlite for optimal drainage.
Step 4: Smart Irrigation Integration
An outdoor kitchen surrounded by thirsty, poorly irrigated plants is a recipe for high water bills and damaged hardscaping. Transitioning to a smart, water-efficient irrigation system is non-negotiable for modern landscape design.
The University of California Agriculture and Natural Resources (UC ANR) strongly recommends hydro-zoning—grouping plants with similar water needs together and utilizing targeted drip irrigation rather than broadcast spraying. This prevents water from overspraying onto your patio furniture, outdoor electronics, and kitchen cabinetry.
Recommended Smart Irrigation Setup
- The Brain: Install a Rachio 3 Smart Sprinkler Controller. This Wi-Fi-enabled device connects to local weather stations and automatically skips watering cycles when rain is in the forecast, saving up to 50% more water than traditional timers.
- The Culinary Garden Zone: Use Netafim Techline CV drip tubing. This pressure-compensating tubing features built-in emitters spaced 12 inches apart and includes a check valve to prevent drainage and muddy puddles on your patio after the system shuts off.
- The Perimeter Zone: For drought-tolerant ornamental border plants, utilize Hunter MP Rotator nozzles on low-profile pop-up risers. These apply water at a slow, precise rate that matches the soil's infiltration capacity, eliminating runoff onto adjacent hardscapes.
Step 5: Zoning and Smart Lighting
The layout of your outdoor kitchen should follow the classic 'work triangle' principle adapted for exterior spaces. Divide the area into three distinct zones: the Hot Zone (grills, burners), the Cold Zone (outdoor refrigerators, ice makers, beverage stations), and the Prep Zone (stainless steel counters, sinks). Keeping the Cold Zone away from the Hot Zone reduces the energy strain on your outdoor refrigerator's compressor.
Energy-Efficient Outdoor Lighting Design
Lighting transforms a patio from a daytime cooking space into an evening entertainment hub. To maintain a climate-smart footprint, rely entirely on LED fixtures integrated with smart home transformers.
- Color Temperature: Stick to 2700K to 3000K LED bulbs for a warm, inviting glow that mimics traditional halogen lighting without the heat output or energy waste.
- Hardscape Lighting: Use low-profile LED pucks under the lips of stone seating walls and kitchen counters. This provides essential task lighting for walking and prepping without contributing to light pollution.
- Smart Control: Integrate your landscape lighting with a Lutron Caseta outdoor smart plug or a WAC Lighting smart transformer. This allows you to set schedules, dim the lights via voice commands, and ensure the lights automatically turn off at dawn.
Project Budget and Timeline
Planning a climate-smart outdoor kitchen is a significant investment. Understanding the financial and temporal commitments will help you phase your project effectively.
Estimated Costs for a 400 Sq Ft Patio
- Hardscaping & Permeable Pavers: $6,000 - $10,000 (Permeable pavers allow rainwater to infiltrate the soil, reducing stormwater runoff).
- Outdoor Kitchen Cabinetry & Counters: $8,000 - $15,000 (Using weather-proof powder-coated aluminum frames and granite or sintered stone tops).
- Smart Shade Structure (Louvered): $12,000 - $20,000.
- Smart Irrigation & Raised Beds: $2,500 - $4,500.
- Smart LED Lighting System: $1,500 - $3,000.
- Total Estimated Range: $30,000 - $52,500.
Phased Timeline
Phase 1: Design and Permitting (Weeks 1-6)
Drafting plans, finalizing solar orientation, and securing HOA or municipal permits for electrical and gas lines.
Phase 2: Hardscaping and Rough-Ins (Weeks 7-10)
Phase 3: Construction and Integration (Weeks 11-14)
Building the kitchen islands, erecting the pergola, and filling the raised garden beds with soil.
Phase 4: Planting and Tech Setup (Weeks 15-16)
Planting the culinary garden, programming the Rachio controller, and syncing the outdoor lighting to your smart home hub.
Conclusion
Designing a climate-smart outdoor kitchen and patio is an exercise in balancing luxury with environmental stewardship. By leveraging passive solar principles, integrating smart irrigation for your garden-to-table beds, and utilizing energy-efficient shade and lighting, you create a resilient outdoor living space. This thoughtful approach not only enhances your daily culinary experience but also adds lasting, sustainable value to your home. Start mapping your microclimate today, and take the first step toward a beautifully integrated indoor-outdoor lifestyle.

