Gardening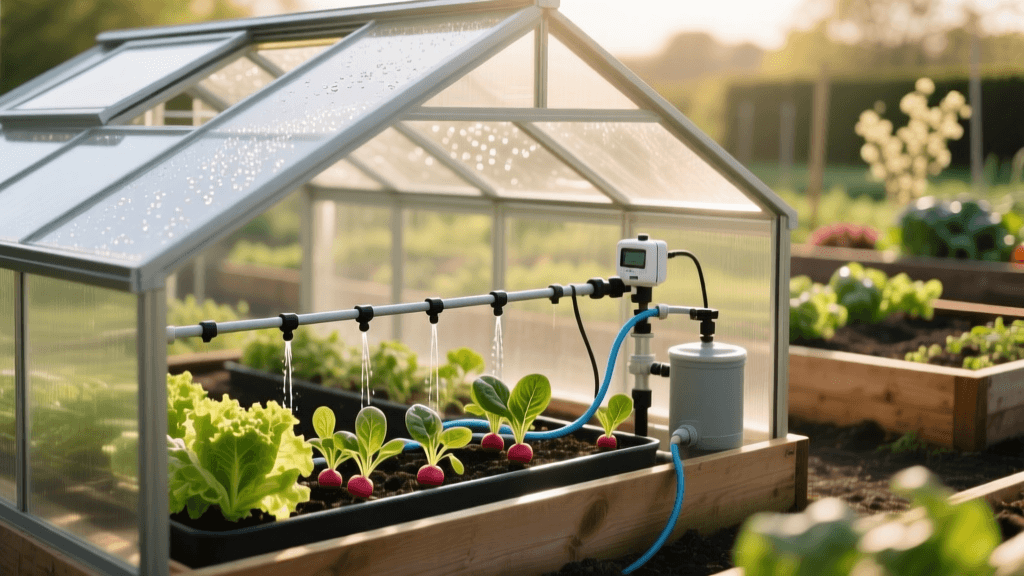
Cold Frame Irrigation Systems 2026: Drip Setup Guide
Mastering Cold Frame Irrigation for Season Extension
As we navigate the 2026 growing season, maximizing your garden's yield through season extension has never been more accessible or more vital. Cold frames remain one of the most effective, low-cost tools for pushing the boundaries of your spring and fall harvests. By trapping solar energy and creating a protected microclimate, cold frames allow gardeners to grow cold-hardy crops like spinach, kale, and carrots well into late autumn, while giving heat-loving seedlings like tomatoes and peppers a massive head start in early spring. However, there is a hidden challenge that many gardeners overlook: irrigation.
Watering inside a cold frame presents a unique set of problems. Opening the lid to hand-water releases the precious trapped heat, undoing days of solar gain in a matter of minutes. Furthermore, cold frames drastically alter evaporation rates, and the confined space makes traditional overhead sprinklers entirely impractical. To truly optimize your cold frame growing for season extension in spring and fall, you need a dedicated, automated micro-irrigation system. In this comprehensive guide, we will explore the best sprinkler and irrigation setups specifically designed for cold frames in 2026, ensuring your crops stay perfectly hydrated without compromising your microclimate.
Why Manual Watering Fails in Cold Frames
Before diving into the hardware, it is crucial to understand why traditional watering methods fall short in season extension scenarios. When you open a cold frame in late November or early March, the ambient temperature outside can be near freezing. The sudden influx of cold air shocks the plants and drops the internal soil temperature, which can stunt root development and delay growth. Additionally, hand-watering often leads to uneven moisture distribution. In the confined, humid environment of a closed cold frame, wet foliage that doesn't dry quickly becomes a breeding ground for fungal diseases like powdery mildew and botrytis.
Automated drip and micro-irrigation systems solve these issues by delivering water directly to the root zone. According to the EPA WaterSense program, drip irrigation systems can be up to 90% efficient at delivering water to plants, compared to just 50-70% for traditional sprinklers. This targeted approach keeps the foliage dry, maintains the internal ambient air temperature, and ensures that every drop of water is utilized by your season-extended crops.
Top Irrigation Systems for Cold Frame Growing
When outfitting your cold frames for 2026, you have three primary micro-irrigation options. The best choice depends on the types of crops you are growing and the specific dimensions of your frames.
1. Inline Drip Tubing and Drip Tape
For row crops like carrots, radishes, and dense plantings of spinach, drip tape or 1/4-inch inline drip tubing is the gold standard. Inline tubing features built-in emitters spaced at regular intervals (usually 6 or 12 inches). This provides a continuous, even line of moisture that is perfect for closely spaced greens. Drip tape is incredibly affordable and lays flat, making it easy to roll up and store when the cold frame is repurposed in the summer.
2. Button Drippers and Emitters
If you are using your cold frame in the spring to harden off larger, individually potted seedlings or widely spaced transplants like early brassicas, button drippers are ideal. These are punched into blank 1/4-inch or 1/2-inch tubing and can be placed at the exact base of each plant. In 2026, adjustable button drippers are highly recommended, as they allow you to dial the flow rate from 0 to 15 gallons per hour (GPH) depending on the plant's maturity and the soil's drainage capacity.
3. Micro-Sprinklers and Mist Jets
While generally avoided for mature plants due to the fungal risks associated with wet foliage, micro-sprinklers and mist jets have a specific use case in cold frames: seed starting and propagation. If you are using your cold frame as a high-humidity propagation chamber for early spring cuttings or germinating trays of seeds, a low-volume misting system will keep the growing medium consistently moist without washing away delicate seeds.
Step-by-Step Cold Frame Irrigation Setup
Designing a reliable system requires careful planning. Follow these steps to build a robust cold frame irrigation network.
Step 1: The Water Source and Temperature Management
One of the most critical, yet frequently ignored, aspects of cold frame irrigation is water temperature. Pumping 40°F water directly from an underground hose line onto 65°F cold frame soil will shock plant roots. In 2026, advanced gardeners are utilizing intermediary rain barrels or insulated holding tanks placed inside a greenhouse or garage to temper the water before it enters the cold frame drip lines. If you must use a direct spigot, consider running the mainline hose through a compost pile or a sunny, sheltered area to naturally raise the water temperature before it reaches the emitters.
Step 2: Smart Timers and Automation
Automation is the key to hands-off season extension. Modern smart hose timers, such as the latest 2026 models from Orbit's B-hyve XR line or the Rachio Smart Hose Timer, connect to your home Wi-Fi and adjust watering schedules based on local weather APIs. However, because cold frames create an artificial microclimate that shields plants from natural rainfall, you must disable the 'rain skip' feature for the specific zone feeding your cold frames. Instead, rely on a Bluetooth-enabled soil moisture sensor placed directly inside the frame to trigger watering only when the soil volumetric water content drops below your target threshold.
Step 3: Layout and Tubing Placement
According to Rain Bird's drip irrigation guidelines, proper emitter placement is vital for root zone saturation. For a standard 4x8 foot cold frame, run a 1/2-inch poly mainline down one of the long sides. From there, branch off with 1/4-inch micro-tubing across the width of the frame. Secure the lines with landscape staples every 18 inches to prevent them from shifting when you are working inside the frame or when the soil settles during spring thaws.
Comparison Chart: Cold Frame Irrigation Methods
To help you choose the right components for your specific gardening goals, review the comparison table below detailing the three primary micro-irrigation methods for cold frames.
| Irrigation Method | Best Use Case | Est. Cost (4x8 Frame) | Pros | Cons |
|---|---|---|---|---|
| Inline Drip Tubing | Row crops, dense greens, carrots | $25 - $35 | Even moisture distribution, low maintenance, durable | Fixed emitter spacing limits custom layouts |
| Button Drippers | Individual pots, transplants, brassicas | $15 - $25 | Highly customizable placement, adjustable flow rates | Emitters can clog if water is unfiltered |
| Micro-Sprinklers | Seed starting, propagation, humidity | $30 - $45 | Provides ambient humidity, covers wide areas | Wets foliage, increases fungal disease risk |
Spring vs. Fall Watering Schedules
The beauty of a cold frame is its versatility, but the irrigation requirements shift dramatically between the spring and fall seasons.
Spring Season Extension
In early spring, the sun angle is increasing, and solar gain inside the cold frame can be intense. On a sunny 45°F March day, the internal temperature of a closed cold frame can easily exceed 85°F. During this period, your irrigation system needs to run more frequently to compensate for rapid evaporation and high plant transpiration rates. Program your smart timer for short, frequent bursts in the early morning. This ensures the soil is moist enough to buffer the heat of the day, preventing the plants from wilting while the frame is closed to trap warmth.
Fall Season Extension
As you transition into late fall and early winter, the sun angle drops, and daylight hours shorten. The internal temperature of the cold frame will rarely spike, and plant growth slows to a crawl. Overwatering in the fall is the number one killer of cold frame crops, as cold, soggy soil invites root rot. Reduce your irrigation frequency by 60% to 80% compared to your spring schedule. In many freezing climates, once the soil temperature drops below 40°F, plant roots essentially go dormant and cease taking up water. At this point, you should entirely shut off and drain the cold frame irrigation system to prevent frozen, burst lines.
Winterizing and Maintenance
Even if you are growing hardy crops like mâche or claytonia deep into the winter, you must protect your irrigation infrastructure. Micro-tubing and button emitters are highly susceptible to cracking when water freezes inside them. If you live in a climate where the ground freezes solid, it is highly recommended to use quick-connect fittings at the base of your cold frame. This allows you to detach the entire internal drip network in late November, blow it out with a low-pressure air compressor, and store it in a shed until the February thaw.
For those in milder climates (USDA Zones 8-10) who run their cold frames year-round, ensure your mainline tubing is buried at least 12 inches deep, below the frost line, and use self-draining emitters that automatically empty the water from the lines once the system pressure drops to zero.
Conclusion
Integrating a dedicated drip or micro-sprinkler irrigation system into your cold frames is a game-changer for season extension. By automating the watering process, you protect your microclimate, prevent fungal diseases, and deliver precise hydration exactly where your plants need it most. Whether you are pushing your spring tomato harvest forward by a month or harvesting fresh spinach under the snow in December, a well-designed 2026 irrigation setup ensures your cold frames are working at peak efficiency all year long.