Pest Control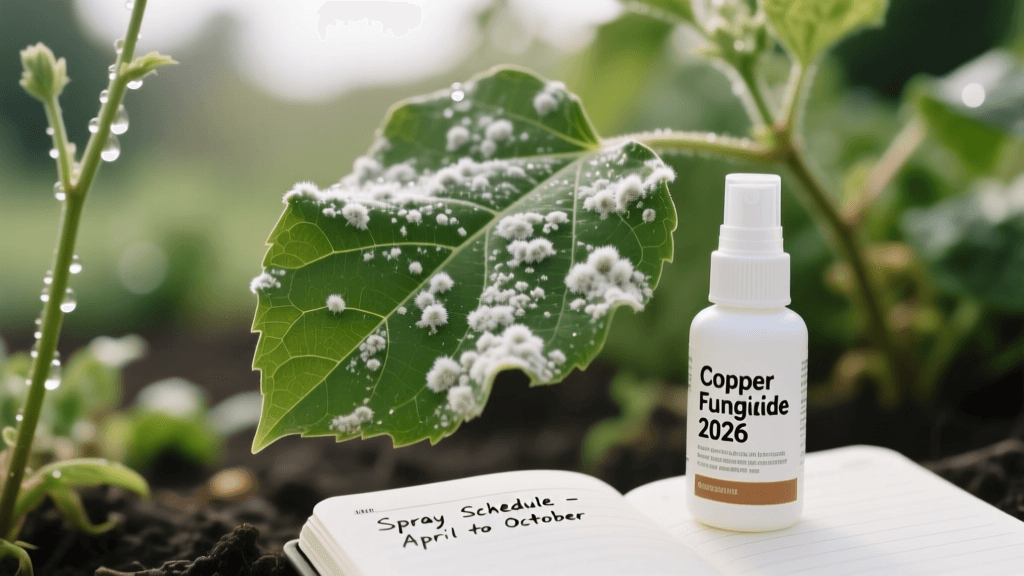
Documenting Powdery Mildew: 2026 Copper Fungicide Guide
The Intersection of Garden Photography and Pest Management
In the modern era of horticulture, the line between art and science has beautifully blurred. As we navigate the 2026 growing season, gardeners and landscape photographers alike are discovering that the camera lens is one of the most powerful diagnostic tools available for integrated pest management (IPM). Rather than relying solely on the naked eye, visual documentation allows you to track the microscopic progression of fungal diseases, precisely time your interventions, and build a historical database of your garden's health. When it comes to powdery mildew—one of the most pervasive and frustrating fungal pathogens in the landscape—combining macro photography with a strict copper fungicide spray schedule is the ultimate strategy for prevention.
Powdery mildew, caused by various species of fungi such as Podosphaera xanthii and Golovinomyces orontii, thrives in environments with high humidity and moderate temperatures. By the time the classic white, talcum-like powder is visible to the casual observer, the infection has already established itself deep within the plant's epidermal layers. However, through the lens of a macro camera, you can spot the earliest signs of mycelial growth and chlorosis (yellowing) days before a full outbreak occurs. This visual early-warning system is exactly what you need to deploy copper-based fungicides effectively, as copper is strictly a preventative measure and cannot cure an active, established infection.
Identifying Powdery Mildew Through the Macro Lens
To effectively document and identify powdery mildew, you need to look beyond the obvious white patches. Using a dedicated macro lens (typically in the 90mm to 105mm focal range), you can capture the intricate structures of the fungal conidia (spores) as they begin to germinate on the leaf surface. When photographing your plants for pest diagnostics, use a narrow aperture (f/8 to f/11) to ensure a deep depth of field, keeping both the leaf stomata and the fungal hyphae in sharp focus.
Lighting is equally critical. Powdery mildew spores reflect light differently than healthy plant tissue. By using a circular polarizing filter on your lens, you can cut through the waxy glare of the leaf's cuticle, revealing the subtle, dusty white webbing of early-stage mildew. According to the University of Minnesota Extension, powdery mildew often begins on the lower, shaded leaves where air circulation is poor. Documenting these specific microclimates in your garden with wide-angle shots, followed by macro inspections, helps you map out high-risk zones that will require the most vigilant copper spray applications.
The 2026 Copper Fungicide Spray Schedule
Copper fungicides work by releasing copper ions (Cu2+) that denature proteins and enzymes essential for fungal spore germination. Because copper does not penetrate plant tissue deeply, it must be applied to the leaf surface before the spores land and germinate. For the 2026 season, climate models suggest fluctuating spring humidity levels, meaning your spray schedule must be both proactive and highly consistent. A standard preventative schedule involves applying a copper spray every 7 to 10 days during periods of high risk, ensuring complete coverage of both the upper and lower leaf surfaces.
Below is the recommended 2026 copper fungicide spray schedule, integrated with specific photography and documentation goals to help you maintain a flawless visual journal of your pest control efforts.
| Growth Stage | Copper Fungicide Action | Photography Documentation Goal |
|---|---|---|
| Early Spring (Bud Break) | Apply preventative copper hydroxide (2-4 tbsp/gallon) as a dormant or early foliar spray. | Capture macro shots of emerging leaves; record baseline foliage health and bud structure. |
| Vegetative Growth | Reapply every 7-10 days if humidity exceeds 70% or after heavy rainfall. | Take weekly wide-angle canopy shots; use a macro lens to inspect the undersides of lower leaves. |
| Pre-Bloom / Flowering | Switch to copper octanoate to minimize risks to pollinators while maintaining protection. | Document flower bud development; note any early white mycelium spots on adjacent foliage. |
| Post-Harvest / Autumn | Apply a final cleanup spray before leaf drop to reduce overwintering spores. | Photograph fallen debris and overall plant structure to map out sanitation needs for the next year. |
Visual Pest Control Journaling: Building Your Database
Taking the photos is only the first step; organizing them into a functional pest control journal is where the real value lies. In 2026, digital asset management is seamless. When you snap a photo of a treated plant, ensure your camera's GPS and timestamp features are enabled. This EXIF metadata automatically logs the exact date, time, and location of your copper application. Pair this with a digital notebook where you record the specific copper formulation used, the mixing ratio, the ambient temperature, and the wind speed at the time of spraying.
By reviewing your visual journal from previous weeks, you can spot trends that raw data might miss. For example, if your macro photos show a recurrence of spore germination exactly eight days after your last application, you know you need to tighten your spray interval to six days. Furthermore, using a standardized color checker card in your macro shots ensures your white balance is accurate, allowing you to detect the faint yellow halos that often surround early powdery mildew colonies before the white spores even appear.
Choosing the Right Copper Formulation for 2026
Not all copper fungicides are created equal, and selecting the right one is vital for both plant safety and environmental stewardship. The National Pesticide Information Center (NPIC) notes that copper can accumulate in the soil over time, potentially reaching toxic levels for earthworms and beneficial soil microbes. Therefore, choosing a formulation that allows for lower application rates while maintaining efficacy is crucial for modern IPM.
- Copper Hydroxide: A highly effective, broad-spectrum preventative. It is excellent for early spring vegetative growth but can be harsh on tender new foliage if mixed too strongly.
- Copper Octanoate (Copper Soap): A gentler, more plant-safe option that is ideal for use during the flowering stage. It breaks down more readily and poses a lower risk to pollinators when applied in the late evening.
- Bordeaux Mixture: A traditional blend of copper sulfate and hydrated lime. While highly effective as a dormant spray for overwintering spores, it can leave a heavy, visible residue that might interfere with your aesthetic garden photography during the peak summer months.
Documenting Phytotoxicity and Environmental Impact
One of the most important reasons to maintain a visual journal is to monitor for phytotoxicity, commonly known as 'copper burn.' Copper can damage plant tissue, especially when applied during hot, humid weather or when mixed with other alkaline products. Symptoms include brown, necrotic spots on the leaves and stunted new growth. By photographing your plants 48 hours after every application, you can quickly identify if your copper concentration is too high or if environmental conditions are causing adverse reactions.
If your macro lens captures the early signs of copper burn—such as localized cell collapse and browning along the leaf margins—you must immediately adjust your schedule, reduce the mixing rate, or switch to a milder formulation like copper octanoate. Always adhere to the label instructions and consult resources like the Environmental Protection Agency (EPA) for the latest safety guidelines regarding fungicide use near water sources and sensitive ecosystems.
Ultimately, merging the art of garden photography with the science of copper fungicide application transforms you from a reactive gardener into a proactive landscape manager. By documenting the subtle visual cues of powdery mildew and rigorously tracking your 2026 spray schedule, you ensure your garden remains vibrant, healthy, and photogenic all season long.