
How To Build Budget-Friendly DIY Raised Garden Beds
The Rise of the Budget-Friendly Garden-to-Table Movement
Bridging the gap between your backyard and your dining table is one of the most rewarding aspects of homeownership. However, the skyrocketing costs of premium landscaping materials, particularly cedar and redwood lumber, have priced many aspiring gardeners out of the raised bed trend. If you want to grow your own tomatoes, basil, and peppers without spending hundreds of dollars on a single garden bed, you need a budget-friendly DIY solution that doesn't sacrifice durability or aesthetics.
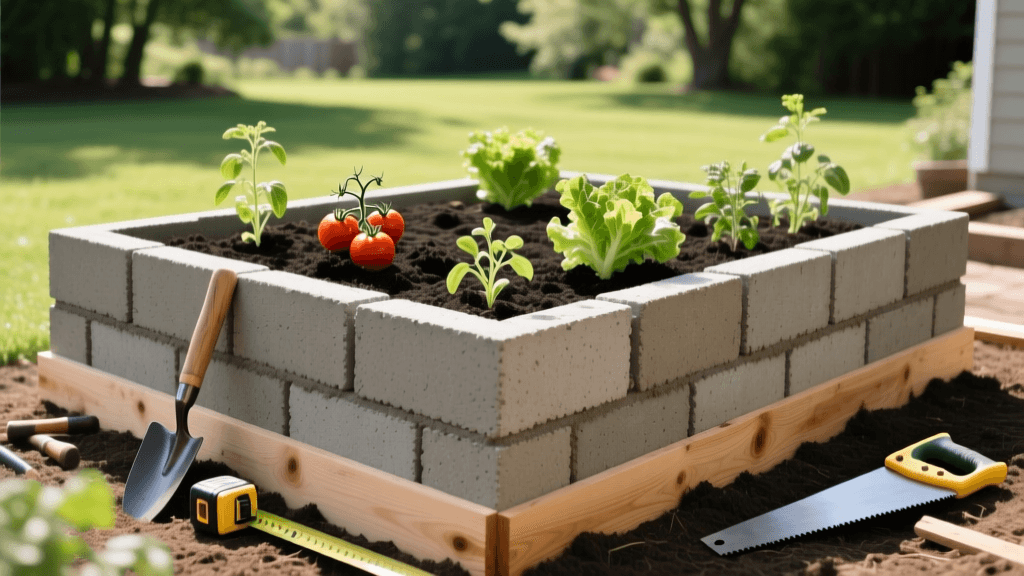
Enter the cinder block and untreated pine hybrid raised bed. This innovative design uses concrete masonry units (CMUs) for structural retaining walls and untreated pine boards as a finished cap rail. It requires zero heavy digging, no complex carpentry joints, and costs a fraction of traditional wooden or galvanized steel beds. In this comprehensive guide, we will walk you through the exact measurements, material costs, and step-by-step construction process to build a 4x8-foot raised garden bed on a strict budget.
Why Choose Cinder Blocks and Pine?
Traditional raised beds rely entirely on wood or metal to hold back thousands of pounds of wet soil. Over time, wood rots, and metal can warp or leach chemicals. By utilizing standard 8-inch cinder blocks as the primary retaining wall, you are using a material that is virtually impervious to rot, pests, and moisture damage. According to Penn State Extension, masonry-based raised beds offer exceptional longevity and thermal mass, meaning the concrete absorbs heat during the day and releases it at night, slightly extending your growing season in cooler climates.
The untreated pine is used strictly for the "cap rail"—the top edge of the bed. This provides a beautiful, natural wood aesthetic, a comfortable surface to sit on while weeding, and a barrier that keeps the rough concrete edges away from your arms and legs. Because the pine is not buried in wet soil, its lifespan is dramatically increased compared to traditional wood-walled beds.
Materials and Tools List
Before heading to the hardware store, gather the following materials. Prices are estimated based on national averages for a single 4x8-foot bed (approximately 12 inches deep).
- Concrete Blocks (8" x 8" x 16"): 20 blocks (approx. $2.50 each = $50.00)
- Untreated Pine Boards (2" x 8" x 8'): 4 boards (approx. $8.00 each = $32.00)
- Masonry Screws (Tapcons, 3-inch): 1 box (approx. $15.00)
- Heavy-Duty Cardboard: Free (sourced from local appliance or grocery stores)
- Hardware Cloth (1/2 inch galvanized mesh): 1 roll (approx. $25.00, optional but recommended if gophers or moles are present)
- Tools Needed: Tape measure, rubber mallet, 4-foot spirit level, masonry drill bit, power drill, circular saw, and a shovel.
Total Estimated Frame Cost: $122.00
Step-by-Step Construction Guide
Step 1: Site Selection and Preparation
Choose a location that receives at least 6 to 8 hours of direct sunlight daily. Avoid placing the bed directly under large trees where root competition and shade will stunt your vegetables. Once you have marked out a 4x8-foot rectangle using string and stakes, clear away any large rocks or debris. Do not dig up the grass. Instead, lay down overlapping layers of heavy-duty, tape-free corrugated cardboard directly over the grass. As noted by The Old Farmer's Almanac, this "sheet mulching" technique effectively smothers existing weeds and grass while allowing beneficial earthworms to migrate up into your new garden bed as the cardboard decomposes.
Step 2: Laying the Block Foundation
Begin placing your cinder blocks along the perimeter of your cardboard-covered rectangle. For a 4x8 bed, you will need approximately 18 blocks to form the outer wall, plus two extra blocks to reinforce the middle of the 8-foot spans to prevent bowing. Stand the blocks upright so the 8-inch dimension is vertical, giving you an 8-inch deep bed. If you want a deeper bed for root vegetables like carrots, you can stack a second layer of blocks, but this will double your block count and soil requirements. Use your rubber mallet to tap the blocks into place, and constantly check your progress with a 4-foot spirit level to ensure the top edges are perfectly even.
Step 3: Installing the Pine Cap Rail
Once the block perimeter is level and square, it is time to add the pine cap rail. Lay the 2x8 pine boards flat across the top of the cinder blocks. The boards should overhang the outside of the blocks by about an inch for a finished look. Using your power drill and a masonry drill bit, drill pilot holes through the pine and directly into the concrete blocks. Secure the boards using the 3-inch masonry screws, spacing them every 16 inches. This locks the entire frame together and prevents the boards from shifting.
Step 4: Pest Protection and Filling
If burrowing pests are an issue in your region, staple the galvanized hardware cloth to the inside of the pine cap rail so it drapes down to the cardboard base before adding soil. Now, your budget-friendly frame is complete and ready for the most important component: the soil.
The Ultimate Budget Soil Mix
A 4x8-foot bed that is 8 inches deep requires roughly 22 cubic feet of soil. Never fill a raised bed with native dirt from your yard; it will compact into a concrete-like brick and suffocate plant roots. The University of Minnesota Extension recommends a loose, well-draining mixture specifically formulated for raised containers. To keep costs low, avoid expensive pre-bagged "raised bed mix" and instead buy in bulk from a local landscape supply yard.
The Budget-Friendly 60/30/10 Soil Recipe:
- 60% High-Quality Topsoil: Provides the bulk and mineral base.
- 30% Organic Compost: Adds essential nutrients and microbial life.
- 10% Coco Coir or Peat Moss: Ensures moisture retention and aeration.
Mix these ingredients thoroughly as you shovel them into the bed. Water the soil deeply after filling to help it settle, then add a final 2-inch layer of pure compost on top before planting your seeds or transplants.
Raised Bed Cost Comparison Chart
To truly understand the value of the cinder block and pine hybrid method, compare it against other popular raised bed materials on the market. The table below breaks down the estimated costs and lifespans for a standard 4x8-foot garden bed.
| Material Type | Estimated Cost (4x8 Bed) | Expected Lifespan | DIY Difficulty |
|---|---|---|---|
| Cinder Block & Pine Cap | $110 - $140 | 20+ Years | Beginner |
| Untreated Pine (Wood Walls) | $90 - $130 | 5 - 8 Years | Intermediate |
| Western Red Cedar | $350 - $500 | 15 - 20 Years | Intermediate |
| Galvanized Steel Kit | $200 - $300 | 20+ Years | Beginner |
| Composite / Vinyl | $400 - $600 | 25+ Years | Beginner |
As the data illustrates, the cinder block method offers the longevity of steel or composite at a price point that rivals cheap, rot-prone pine boxes.
Smart Home Integration: Budget Irrigation
Bridging outdoor living with smart home technology doesn't require a massive budget. Because raised beds dry out faster than in-ground gardens, consistent watering is vital. You can easily integrate smart irrigation by laying a simple $15 drip-line tubing system along the base of your plants. Connect this to a Bluetooth-enabled smart hose timer (available for roughly $35-$45). These timers allow you to schedule precise watering cycles via your smartphone, adjusting for local weather forecasts and saving you money on your municipal water bill while ensuring your garden-to-table crops thrive.
Seasonal Maintenance and Wood Care
While the cinder blocks require zero maintenance, the pine cap rail will eventually weather to a silvery-gray color if left untreated. To extend the life of the wood and maintain a rich, natural color, apply a coat of raw, organic linseed oil once a year. Avoid chemical sealants or pressure-treated woods, especially when growing edible crops, to ensure your garden remains completely safe and organic. With minimal upkeep, your budget-friendly DIY raised garden bed will serve as the cornerstone of your outdoor living space for decades to come.

