
Build a Budget DIY Rain Barrel Drip Irrigation System
Watering your garden should not drain your wallet or your local municipal supply. As outdoor water use accounts for nearly 30% of total household water consumption, finding sustainable, budget-friendly alternatives is essential for the modern gardener. According to the Environmental Protection Agency (EPA), utilizing rainwater harvesting and targeted drip irrigation can drastically reduce your water footprint while keeping your garden-to-table vegetables thriving.
In this guide, we will walk you through building a highly effective, gravity-fed rain barrel drip irrigation system for under $80. This DIY solution bridges the gap between eco-friendly landscaping and frugal home maintenance, providing a steady, slow-release water supply directly to the root zones of your plants.
Why Choose a Gravity-Fed Rain Barrel System?
Commercial irrigation systems often require expensive pumps, complex electrical wiring, and high water pressure. A gravity-fed system relies on simple physics: water weight. By elevating your rain barrel, you create enough hydrostatic pressure to push water through low-flow drip emitters.
This approach is not only energy-efficient but also protects your soil structure. Traditional sprinklers can cause topsoil erosion and promote fungal diseases by wetting plant foliage. Drip irrigation delivers water exactly where it is needed. Research from the Texas A&M AgriLife Extension highlights that combining rainwater harvesting with drip irrigation can improve plant health, as rainwater is naturally soft, free of chlorine, and slightly acidic—perfect for nutrient uptake in vegetable gardens.
Materials and Tools Needed
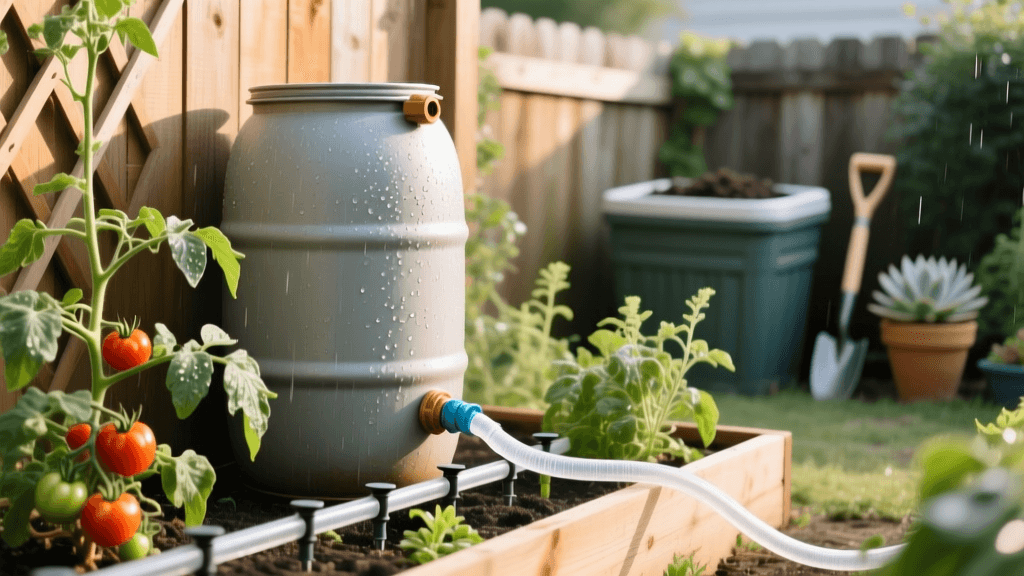
You can source most of these materials at a local hardware store or salvage them from upcycled projects. Here is your shopping list for a basic 50-gallon system:
- 50-Gallon Food-Grade Plastic Barrel: $15 - $25 (Check local car washes, breweries, or food distributors for cheap, used barrels).
- 3/4-Inch PVC Spigot and Bulkhead Fitting: $12.
- 200-Mesh Inline Water Filter: $8 (Crucial for preventing emitter clogs).
- 1/2-Inch Polyethylene Drip Tubing (50 feet): $10.
- 1/4-Inch Micro-Tubing and 2 GPH Drip Emitters (Pack of 10): $12.
- Barb Fittings, Tees, and End Caps: $8.
- Cinder Blocks (4 to 6): $8 - $12 (For elevation).
- Power Drill, 3/4-Inch Hole Saw, and Teflon Tape: Assume you have these in your DIY toolkit.
Total Estimated Cost: $73 - $87
Step-by-Step Guide to Building Your System
Step 1: Prep the Rain Barrel
Clean your salvaged barrel thoroughly with a mild bleach solution (one part bleach to nine parts water) to eliminate any residual bacteria or odors. Rinse it completely. Using your power drill and a 3/4-inch hole saw, drill a hole about three inches from the bottom of the barrel. This height ensures you can access the spigot easily while leaving a small reservoir at the bottom for sediment to settle without entering your irrigation lines.
Wrap the threads of your bulkhead fitting in Teflon tape, insert it into the hole, and secure it with the provided rubber gaskets and locknut. Screw the spigot into the bulkhead fitting, ensuring a watertight seal.
Step 2: Elevate for Gravity Pressure
Gravity-fed systems require elevation to generate pressure. The general rule of thumb in fluid dynamics is that every 2.31 feet of elevation generates 1 PSI (Pound per Square Inch) of pressure. Most standard drip emitters require a minimum of 2 to 4 PSI to function correctly.
To achieve this, stack your cinder blocks on a flat, level surface to create a base that elevates the bottom of the barrel at least 4 to 5 feet off the ground. Ensure the base is entirely level and compacted; a 50-gallon barrel full of water weighs over 400 pounds, and an unstable base can lead to catastrophic tipping.
Step 3: Connect the Drip Lines
Attach the 200-mesh filter directly to the spigot. This step is non-negotiable; organic debris from your roof gutters will quickly clog the tiny passages in your drip emitters.
Next, connect a short leader hose or a PVC adapter to transition from the 3/4-inch spigot threads to your 1/2-inch polyethylene tubing. Run the main 1/2-inch tubing along the base of your garden beds. Use a punch tool to insert barbed tees and elbows to navigate corners.
At each plant base, punch a hole into the 1/2-inch mainline, insert a barb fitting, and run a 2-foot length of 1/4-inch micro-tubing to the root zone. Attach a 2 GPH (Gallons Per Hour) pressure-compensating emitter to the end of the micro-tubing. Finish the mainline with a flush valve or end cap.
Adding Smart Home Integration on a Dime
While gravity-fed systems are inherently analog, you can easily bridge the gap into smart home automation without buying expensive proprietary controllers. Because your system operates on low pressure, you cannot use standard solenoid valves. Instead, look for a low-pressure, battery-operated hose timer with Wi-Fi or Bluetooth capabilities (such as the Orbit B-hyve or similar generic brands, typically costing around $35 to $45).
Install the smart timer directly onto the spigot, followed by the mesh filter and the drip lines. This allows you to schedule early-morning watering sessions via your smartphone, ensuring minimal evaporation. Early morning watering is highly recommended by horticulturalists, as it allows plant foliage to dry during the day, reducing the risk of powdery mildew and blight in your garden-to-table crops. Some smart timers even integrate with local weather APIs to automatically skip watering if rain is in the forecast, maximizing your water conservation efforts.
The Physics of Low-Pressure Drip Irrigation
One common mistake DIYers make is attempting to use standard sprinkler heads or soaker hoses on a gravity-fed system. Soaker hoses require 10+ PSI to sweat water evenly along their length. By sticking to low-flow, pressure-compensating drip emitters, you ensure that the plant at the very end of the line receives the exact same amount of water as the plant closest to the barrel. According to the University of Minnesota Extension, drip irrigation can reduce water usage by up to 50% compared to conventional sprinkler systems by minimizing evaporation and runoff.
Cost Comparison: DIY vs. Store-Bought Systems
How does this budget-friendly project stack up against commercial alternatives? Below is a breakdown of the costs associated with outfitting a 100-square-foot garden bed with a rain-harvesting drip system.
| Component | Budget DIY System | Commercial Kit (Pump + Timer) |
|---|---|---|
| Water Storage (50 Gal) | $20 (Upcycled) | $120 (Branded Rain Barrel) |
| Elevation / Base | $8 (Cinder Blocks) | $45 (Metal Stand) |
| Filtration & Spigot | $20 | $35 |
| Drip Tubing & Emitters | $25 | $40 |
| Pressure / Pump | $0 (Gravity) | $85 (12V Transfer Pump) |
| Total Estimated Cost | $73 | $325 |
By leveraging upcycled materials and gravity, you save upwards of $250, money that can be reinvested into high-quality heirloom seeds, smart timers, or organic compost.
Seasonal Maintenance and Winterization
To ensure your DIY system lasts for years, routine maintenance is required. Every spring, open the end cap of your mainline and let the barrel flush out any accumulated sediment. Clean the mesh filter cartridge with a soft brush and warm water.
Winterization is critical if you live in a climate with freezing temperatures. Water expands when it freezes, which will crack your PVC spigot, filter housing, and drip emitters. Before the first hard frost, drain the barrel completely. Disconnect the filter and store it in your garage. Leave the spigot in the open position and remove the end caps from your poly tubing to allow any residual moisture to drain and expand safely without rupturing the lines.
Conclusion
Creating a budget-friendly DIY rain barrel and drip irrigation system is one of the most rewarding weekend projects a homeowner can undertake. It reduces your reliance on municipal water, lowers your utility bills, and provides your garden with the pure, unchlorinated water it craves. By utilizing upcycled materials, the simple power of gravity, and affordable smart-home timers, you can cultivate a lush, productive outdoor space without breaking the bank.

