Lawn Care
Documenting Dog Urine Spot Repair: Gypsum & Seed Guide 2026
The Challenge of Dog Urine Spots and the Power of Documentation
For dedicated lawn care enthusiasts and pet owners alike, few sights are as frustrating as the yellow and brown rings left behind by dog urine on an otherwise pristine lawn. In 2026, modern lawn care has evolved beyond simple maintenance; it has become a journey of horticultural science and visual storytelling. Garden documentation and photography are now essential tools for tracking soil health, sharing progress with online communities, and refining our turf management techniques. When dealing with the concentrated nitrogen and salt overload of dog urine spots, a methodical repair process using gypsum and reseeding offers a highly reliable cure. By pairing this repair strategy with structured garden photography, you can create a stunning visual diary of your lawn's resilience, turning a common nuisance into an engaging garden journal project.
The Science: Why Gypsum Works for Urine Burns
Dog urine contains high levels of urea (a nitrogen compound) and soluble salts. While nitrogen is a key component of lawn fertilizers, the sheer concentration in a single urine spot acts like a severe fertilizer burn. It dehydrates the grass blades, kills the crown, and disrupts the soil's osmotic balance. According to turfgrass experts at the Royal Horticultural Society, the salt accumulation left behind is often what prevents immediate regrowth and causes long-term soil compaction in that specific micro-zone.
This is where gypsum (calcium sulfate dihydrate) becomes a lawn care hero. Unlike lime, gypsum does not significantly alter soil pH, which is crucial because urine spots are not necessarily highly acidic or alkaline—they are salty. The calcium ions in gypsum displace the excess sodium ions in the soil, allowing them to be flushed below the root zone. This process, known as flocculation, improves soil structure, breaks up compaction, and restores the osmotic balance necessary for new seed germination. Documenting this chemical and physical transformation through macro photography and soil observation logs is a fantastic way to understand your lawn's unique micro-environments.
Step-by-Step Repair: Gypsum Application and Reseeding
To properly repair the damage and capture the process for your garden journal, follow these actionable steps:
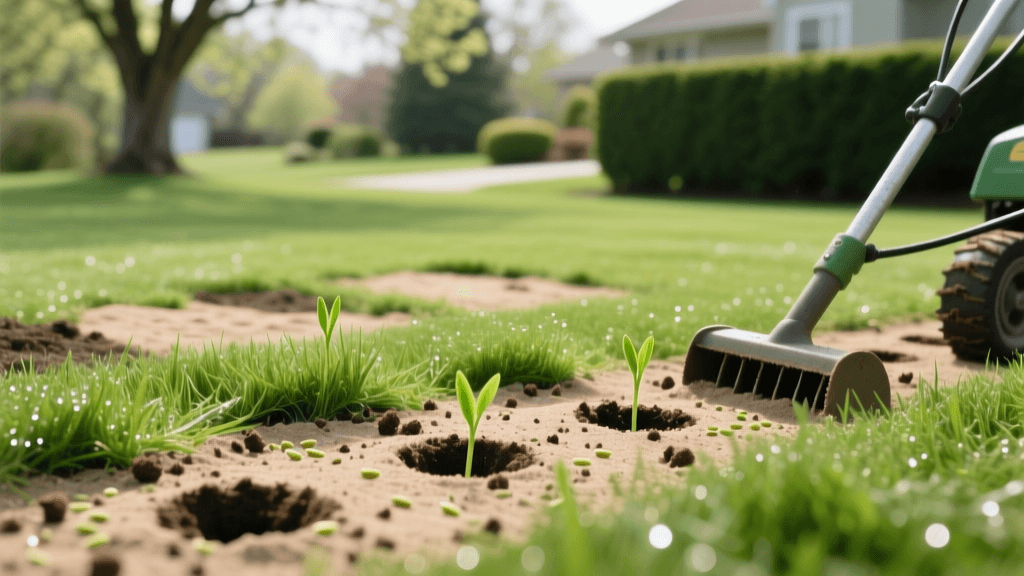
Step 1: Rake and Remove Dead Material
Use a steel tine rake to vigorously remove all dead grass, thatch, and loose debris from the urine spot. You need to expose bare soil for the gypsum and seed to make direct contact. Photo Tip: Take a top-down, wide-angle shot of the cleared patch. Place a recognizable reference object (like a specific garden trowel or a color checker card) next to the spot to provide scale for your before-and-after comparisons.
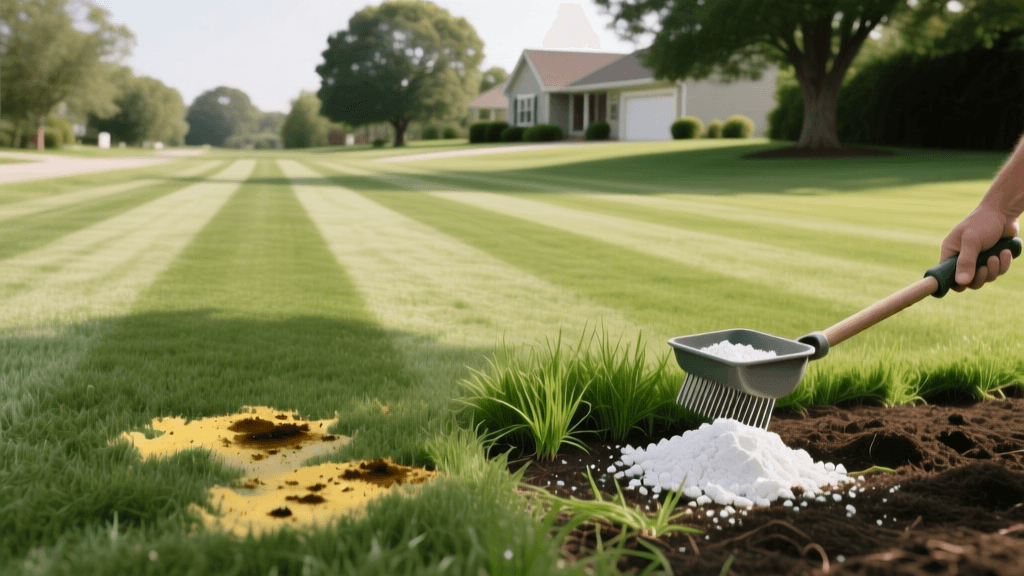
Step 2: Apply Pelletized Gypsum
Apply a high-quality pelletized gypsum product, such as Espoma Organic Gypsum or Greenway Biotech (typically retailing around $18 to $22 for a 40-pound bag in 2026). Apply at a rate of 1 to 2 cups per square foot of damaged area. The pelletized form is easier to spread evenly and photograph than fine powder. Photo Tip: Use a macro lens to capture the texture of the gypsum pellets resting on the dark, prepared soil. This highlights the amendment stage of your documentation.
Step 3: Deep Watering and Flushing
Water the area deeply for at least 10 to 15 minutes. The goal is to dissolve the gypsum and push the displaced sodium salts deep into the subsoil, away from the future root zone. Allow the soil to drain for 24 hours before seeding to prevent seed rot.
Step 4: Reseed and Mulch
Sow your chosen grass seed at the manufacturer's recommended overseeding rate. Lightly rake the seed into the top 1/8 inch of soil and cover with a thin layer of weed-free straw or a 2026 biodegradable seed starter mat. Photo Tip: Capture the contrast between the green seed mix, the white gypsum remnants, and the brown mulch. This layered texture makes for compelling macro garden photography.
The Photography Angle: Documenting Your Lawn’s Recovery
Creating a cohesive garden journal requires consistency. If you want to create a time-lapse video or a side-by-side photo essay for a blog or social media, your camera setup must remain identical throughout the 8-week recovery period.
- Fixed Focal Points: Drive a small, unobtrusive garden stake into the ground just outside the frame of your shot. Use this stake to measure the exact distance and height of your camera or smartphone for every weekly photo.
- Lighting and Golden Hour: Shoot your weekly updates during the 'golden hour' (the first hour after sunrise or the last hour before sunset). The low, directional light casts micro-shadows that highlight the texture of newly sprouted grass blades, which flat midday sun completely washes out.
- Color Calibration: Auto-white balance can drastically change the perceived 'green' of your lawn from week to week based on cloud cover. Use a grey card or a dedicated color checker pass in your first shot, and manually lock your white balance settings (or shoot in RAW and sync the white balance in post-production) to ensure accurate color progression.
- Macro Germination Shots: Modern 2026 smartphones (like the latest iPhone and Samsung Galaxy models) feature incredible built-in macro modes. Alternatively, attach a clip-on macro lens (such as the Moment Macro Lens) to capture the exact day the seed coat splits and the first radical root emerges.
Choosing the Right 2026 Seed Blends for Urine Resistance
Not all grasses handle nitrogen spikes equally. When reseeding urine spots, selecting the right cultivar is vital. According to turf research highlighted by Penn State Extension, certain cool-season grasses exhibit better wear and salt tolerance. Perennial ryegrass and tall fescue are generally more resilient to the initial nitrogen burn than fine fescues or Kentucky bluegrass. In 2026, look for advanced seed blends like Pennington Smart Seed or Scotts Turf Builder that feature endophyte-enhanced tall fescue varieties. These modern cultivars are bred not only for drought resistance but also for deeper root systems that can better access the flushed salts and recover from localized stress.
Documentation Timeline & Photography Checklist
Use the following structured table to guide both your lawn care actions and your photography sessions over the critical 8-week recovery window.
| Week | Lawn Care Action | Photography Focus | Garden Journal Data to Log |
|---|---|---|---|
| 0 | Rake, apply gypsum, seed, and mulch. | Wide shot of cleared damage; macro of gypsum and seed mix. | Soil temp, gypsum brand/amount, seed cultivar. |
| 1 | Daily light watering (keep top inch moist). | Macro shots of swelling seeds and initial root radicals. | Daily water volume, ambient weather conditions. |
| 2 | Reduce watering frequency; increase depth. | First green shoots (sprouts) emerging through mulch. | Sprout height (mm), color hex code of new growth. |
| 4 | First mow (set mower to highest setting). | Before-and-after mow comparison; texture of cut blades. | Mower deck height, clipping health and color. |
| 6 | Apply light, balanced starter fertilizer. | Canopy density shots; shadow play during golden hour. | Fertilizer N-P-K ratio, application rate. |
| 8 | Full integration and standard maintenance. | Wide landscape shot showing seamless patch integration. | Overall patch density, final visual success rating. |
Sharing Your Garden Journal in 2026
Once your 8-week documentation is complete, you will have a wealth of visual and quantitative data. In 2026, garden blogging and social media sharing thrive on authenticity and data-driven results. Compile your weekly photos into a seamless time-lapse video using standard editing software. Pair this video with the data from your garden journal—such as the exact soil temperatures and watering volumes—to provide immense value to your audience. Platforms like Instagram Reels, TikTok, and dedicated horticulture forums favor content that not only shows a beautiful 'after' shot but educates the viewer on the 'how' and 'why'. By treating your lawn care challenges as structured, photogenic experiments, you elevate your garden from a simple yard into a living, documented laboratory.