
Fall Garden Cleanup: Prevent Pests and Soil Diseases
The Critical Role of Autumn Sanitation in Garden Health
As the vibrant hues of autumn settle over your landscape, the transition from the active growing season to winter dormancy begins. For home gardeners and landscape enthusiasts, fall is not merely a time to put the garden to bed; it is the most crucial window for seasonal maintenance that directly dictates the ecological health of your outdoor space in the coming year. Bridging the gap between a thriving garden-to-table harvest and long-term landscape vitality requires a strategic approach to fall cleanup. Neglecting this vital seasonal chore can lead to a buildup of soil-borne pathogens and provide a safe haven for overwintering pests, ultimately compromising plant health and reducing future yields.
According to the Cornell University College of Agriculture and Life Sciences (CALS), 'Sanitation is one of the most important cultural practices for disease management. Removing and destroying infected plant debris eliminates the primary source of inoculum for many fungal and bacterial diseases.' By adopting a proactive, health-focused approach to autumn garden maintenance, you can drastically reduce your reliance on chemical interventions in the spring, fostering a more resilient, organic, and productive ecosystem right outside your door.
Identifying and Removing Diseased Plant Material
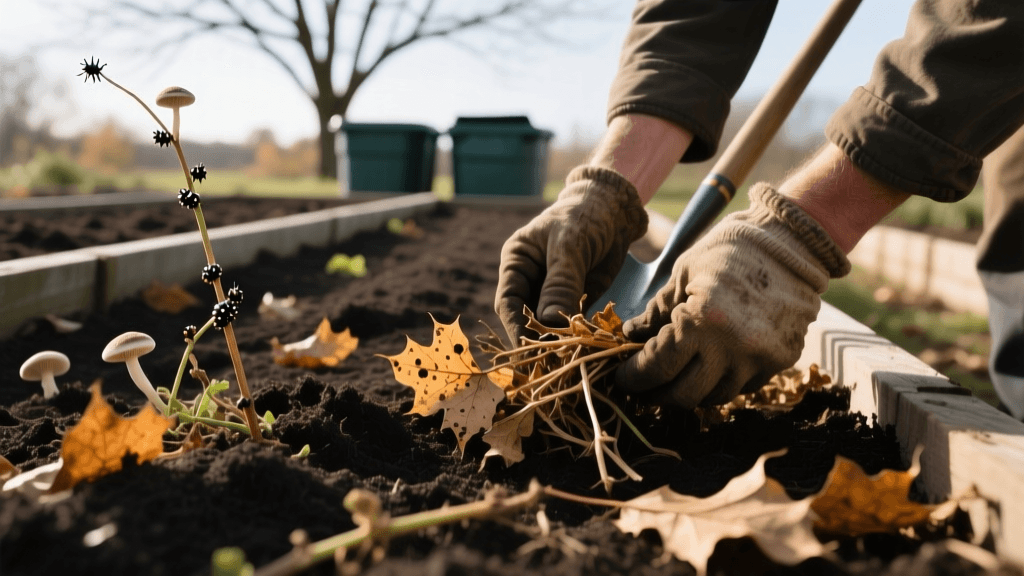
The first step in any health-centric fall cleanup protocol is the meticulous removal of spent foliage, particularly from crops susceptible to persistent pathogens. Tomatoes, peppers, and squash are notorious for harboring diseases like early blight (Alternaria solani), late blight (Phytophthora infestans), and powdery mildew. Furthermore, the debris left behind by cucurbits often houses the pupae of destructive pests like the squash vine borer (Melittia cucurbitae).
Actionable Removal Steps:
- Inspect and Segregate: Walk through your raised beds and in-ground plots. Identify any plants showing signs of fungal spotting, wilting, or insect boring. These must be handled differently from healthy senescing foliage.
- Cut at the Soil Line: For healthy plants, use a pair of sharp, sterilized bypass pruners to cut the stalks at the soil line. Leaving the root systems in the ground allows them to decompose slowly, feeding the soil microbiome and improving soil aeration.
- Extract Diseased Roots: If a plant was plagued by soil-borne issues like verticillium wilt or root-knot nematodes, carefully dig out and remove the entire root mass to prevent the pathogens from overwintering in the soil profile.
Debris Disposal: Protecting the Ecosystem
How you dispose of garden debris is just as important as how you remove it. Improper composting of diseased material can result in a finished compost that actively spreads pathogens across your entire property next spring. Most home compost piles do not reach the sustained 140°F to 160°F required to kill tough fungal spores and insect eggs.
| Debris Type | Disposal Method | Health & Safety Rationale |
|---|---|---|
| Healthy Annual Foliage | Home Compost Bin | Provides excellent carbon-rich 'brown' material to balance nitrogen-rich kitchen scraps for a healthy microbial compost. |
| Diseased Foliage (Blight/Mildew) | Municipal Green Waste or Trash | Municipal facilities use industrial thermophilic composting that reaches pathogen-killing temperatures. Trash prevents local contamination. |
| Pest-Infested Stalks (e.g., Borers) | Burn (where legal) or Trash | Destroys pupae and larvae. Do not compost, as larvae can survive winter and emerge in spring to decimate new crops. |
| Weeds with Mature Seed Heads | Trash or Hot Compost Only | Prevents the introduction of thousands of viable weed seeds into your garden beds next season. |
Soil Testing and Nutrient Balancing
Seasonal maintenance is incomplete without assessing the foundational health of your garden: the soil. Autumn is the optimal time for soil testing. If your soil requires pH adjustments, particularly the addition of elemental sulfur to lower pH or agricultural lime to raise it, these amendments require several months of moisture and microbial activity to react and integrate into the soil profile. Applying them in the fall ensures they are fully bioavailable by spring planting.
Recommended Testing Protocol:
- Timing: Test your soil in late October to mid-November, after the final harvest but before the ground freezes solid.
- Tools: For a quick baseline, use an at-home kit like the Luster Leaf 1601 Rapitest Test Kit (approximate cost: $15-$20), which measures N-P-K and pH. For a comprehensive health analysis including micronutrients and organic matter percentage, send a composite sample to your local university extension office (approximate cost: $15-$25).
- Amendment Application: Based on your results, apply necessary minerals. If your soil is deficient in calcium, which can lead to blossom end rot in next year's tomatoes, incorporate gypsum (calcium sulfate) at a rate of 1 to 2 pounds per 100 square feet.
Sowing Cover Crops for Microbiome Health
Bare soil is unhealthy soil. When garden beds are left exposed to harsh winter winds and freezing rain, the delicate soil structure degrades, and beneficial mycorrhizal fungi starve. Sowing a fall cover crop—often referred to as 'green manure'—is a premier seasonal maintenance practice that bridges the gap between autumn cleanup and spring vitality.
Cover crops prevent erosion, suppress winter weeds, and scavenge leftover nitrogen, holding it in their tissues until they are turned back into the soil. For the home garden, Winter Rye (Secale cereale) and Hairy Vetch (Vicia villosa) are exceptional choices. Winter rye provides massive amounts of biomass and deep root penetration to break up compacted clay, while hairy vetch, a legume, works with rhizobia bacteria to fix atmospheric nitrogen directly into the soil.
- Seeding Rate: Broadcast Winter Rye at a rate of 2 pounds per 1,000 square feet. For Hairy Vetch, use 1 pound per 1,000 square feet.
- Timing: Sow seeds 4 to 6 weeks before your area's typical hard killing frost to allow for adequate root establishment.
- Spring Termination: Mow or crimp the cover crop 2 to 3 weeks before spring planting, allowing the residue to decompose and feed the soil food web.
Tool Sanitization and Winter Storage
Garden tools are notorious vectors for transmitting viral and bacterial diseases from one plant to another, and from one season to the next. Proper seasonal maintenance of your tools protects the health of your future garden and extends the lifespan of your equipment.
'Always disinfect pruning tools between plants when working with diseased tissue. A 70% isopropyl alcohol solution is highly effective and less corrosive than bleach.' — Plant Pathology Guidelines, University of California Agriculture and Natural Resources
Before storing your tools for the winter, scrub off all soil and sap using a stiff wire brush and warm soapy water. Once dry, wipe down all metal blades and cutting surfaces with 70% isopropyl alcohol. For wooden handles, rub in a generous coat of boiled linseed oil to prevent cracking and splintering. Store tools in a dry, climate-controlled shed or garage, ideally hanging them up to prevent moisture accumulation on the edges.
Winterizing Smart Irrigation Systems
Modern home gardens frequently rely on smart irrigation controllers and drip lines to maintain optimal soil moisture during the heat of summer. However, failing to properly winterize these systems can lead to cracked pipes, ruined solenoid valves, and stagnant water pockets that harbor harmful anaerobic bacteria and mosquito larvae.
Smart System Blowout Protocol:
- Shut Off and Drain: Turn off the main water supply to the irrigation system. Open all manual drain valves located at the lowest points of your piping.
- Air Compressor Blowout: Connect an air compressor to the system's blowout port. Crucial Safety Note: Never exceed 50 PSI for polyethylene drip lines or 80 PSI for PVC pipes, as high pressure can cause explosive micro-fractures that compromise the system's integrity.
- Smart Controller Hibernation: Use your smart home app to put your irrigation controller into 'Rain Delay' or 'Winter Mode.' This prevents the smart sensors from attempting to open frozen valves during unseasonably warm winter spells.
- Sensor Protection: Remove wireless soil moisture sensors (such as those from Rachio or Ecowitt) from the freezing ground. Clean the metal probes with a damp cloth, remove the batteries to prevent acid leaks, and store them indoors.
Conclusion: Setting the Stage for Spring Vitality
Seasonal maintenance in the fall is an investment in the long-term health of your home and garden ecosystem. By rigorously removing diseased debris, balancing soil chemistry, planting protective cover crops, and properly winterizing your smart infrastructure, you eliminate the root causes of many common springtime garden failures. This proactive, health-focused approach not only saves you time and money on chemical pesticides and fertilizers but also ensures that when the spring thaw arrives, your garden beds are teeming with biological life, ready to support a vibrant, flourishing, and bountiful landscape.

