
Gardening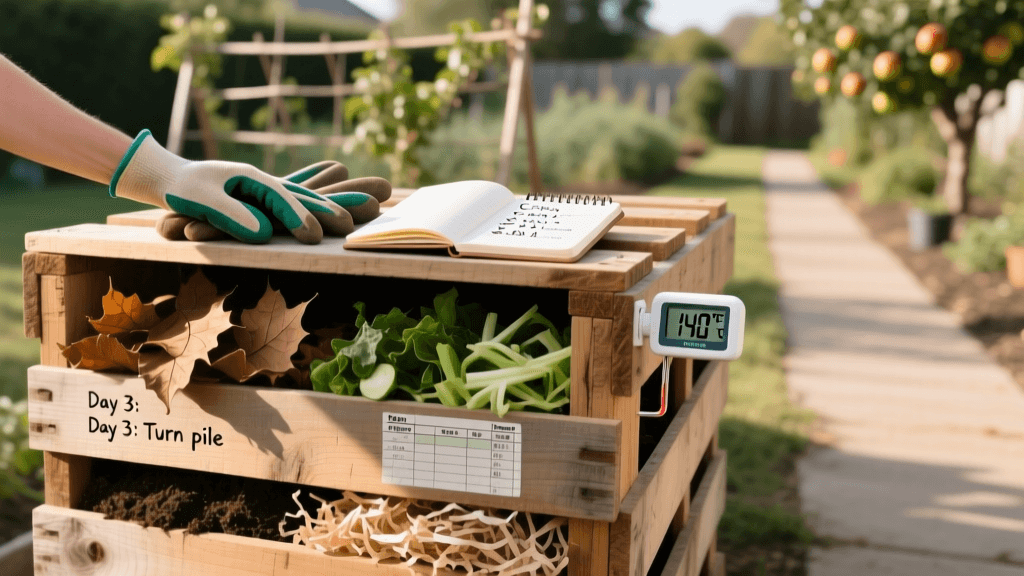
How to Hot Compost in 18 Days: The Berkeley Method
Introduction to the Berkeley Hot Composting Method
Composting is a cornerstone of sustainable gardening, transforming kitchen scraps and yard waste into nutrient-dense humus. However, traditional cold composting can take a year or more to yield usable results. For gardeners who need high-quality compost quickly, the Berkeley 18-day hot composting method is the gold standard. Developed in the 1950s by Dr. Clarence Golueke at the University of California, Berkeley, this systematic approach leverages thermophilic (heat-loving) bacteria to break down organic matter in less than three weeks.
This practical how-to guide will walk you through the exact science, materials, measurements, and turning schedules required to master the Berkeley method. Whether you are preparing soil for a spring vegetable garden or looking to amend heavy clay beds, this fast-track composting technique will yield dark, crumbly, and biologically active compost in record time.
Why Choose Hot Composting Over Cold Composting?
Cold composting is essentially a passive pile where materials decompose slowly at ambient temperatures. While it requires minimal effort, it fails to reach the temperatures necessary to destroy weed seeds, soil-borne pathogens, and harmful fungi. Hot composting, by contrast, actively manages the environment for microbes. By maintaining pile temperatures between 135°F and 160°F (57°C to 71°C), you achieve three critical benefits:
- Pathogen and Weed Seed Destruction: Sustained high heat sterilizes the compost, ensuring you do not accidentally introduce diseases or weeds into your garden beds.
- Speed: The accelerated microbial activity breaks down complex lignins and cellulose in just 18 days, compared to the 12 to 18 months required for cold piles.
- Nutrient Retention: Rapid decomposition minimizes the leaching of water-soluble nutrients like nitrogen, resulting in a more potent fertilizer for your vegetables and flowers.
Essential Tools and Estimated Costs
To execute the Berkeley method successfully, precision is key. You cannot rely on guesswork. Here is the required equipment list with estimated costs for a home gardener:
- Long-Handled Pitchfork ($35 - $45): Essential for aerating and turning the dense pile without straining your back.
- Compost Thermometer with 20-inch Probe ($25 - $40): A standard meat thermometer will not suffice. You need a long probe to read the core temperature of a 3-foot pile accurately.
- Heavy-Duty Tarp ($15 - $20): Used for mixing materials and covering the pile during heavy rain to prevent waterlogging.
- Garden Hose with Spray Nozzle or Watering Can ($20): For precise moisture management during the building phase.
- Bypass Loppers or Chipper/Shredder ($40+): To chop woody materials into uniform 1-inch to 2-inch pieces.
Total Initial Investment: Approximately $135 to $165.
Mastering the Carbon-to-Nitrogen (C:N) Ratio
The engine of hot composting is the balance between carbon (browns) and nitrogen (greens). Carbon provides the energy (carbohydrates) for microbes, while nitrogen provides the protein necessary for rapid cellular reproduction. The ideal C:N ratio for the Berkeley method is between 25:1 and 30:1. If the ratio is too high (too much carbon), the pile will not heat up. If it is too low (too much nitrogen), the pile will become anaerobic, slimy, and emit a strong ammonia odor.
| Material Type | Category | Approximate C:N Ratio |
|---|---|---|
| Dry Autumn Leaves | Brown (Carbon) | 60:1 |
| Wheat Straw | Brown (Carbon) | 75:1 |
| Shredded Newspaper | Brown (Carbon) | 175:1 |
| Fresh Grass Clippings | Green (Nitrogen) | 15:1 |
| Coffee Grounds | Green (Nitrogen) | 20:1 |
| Vegetable Kitchen Scraps | Green (Nitrogen) | 25:1 |
| Chicken Manure | Green (Nitrogen) | 7:1 |
Step-by-Step Guide to Building Your 18-Day Pile
Step 1: Size Matters (The 3x3x3 Rule)
Thermophilic bacteria require a critical mass to generate and retain heat. Your compost pile must be a minimum of 3 feet wide, 3 feet long, and 3 feet high (27 cubic feet). Any smaller, and the pile will lose heat to the surrounding air faster than the microbes can generate it. Conversely, do not exceed 5 feet in any dimension, as the core will become deprived of oxygen, leading to anaerobic conditions and foul odors. Build the pile all at once; do not add new materials to a hot pile once the process has begun.
Step 2: Chop and Mix Thoroughly
Surface area is the enemy of slow decomposition. Use your loppers or shredder to chop all stalks, twigs, and leaves into pieces no larger than 2 inches. Instead of traditional lasagna layering, the Berkeley method recommends mixing the browns and greens thoroughly on your heavy-duty tarp before forming the pile. This ensures that nitrogen-rich materials are in direct contact with carbon-rich materials, allowing microbes immediate access to a balanced diet.
Step 3: Moisture Management (The Sponge Test)
Microbes need water to survive, but too much water fills the air pockets required for oxygen circulation. As you build the pile, water each 6-inch layer lightly. Perform the 'Sponge Test': grab a handful of the mixed compost (wearing gloves) and squeeze it tightly. You should extract exactly one or two drops of liquid. If water streams out, the pile is too wet; add more dry browns. If it crumbles and no moisture appears, it is too dry; add water and mix again. Target a moisture content of 40% to 60%.
The 18-Day Turning Schedule
The most critical component of the Berkeley method is the introduction of oxygen through systematic turning. The pile will naturally heat up within 48 hours. Follow this strict schedule to ensure even decomposition and prevent the core from overheating and killing off your beneficial bacteria.
| Timeline | Action Required | Target Core Temperature |
|---|---|---|
| Days 1 to 4 | Do not disturb. Allow the pile to heat up naturally. | Rising to 135°F - 150°F |
| Day 5 | First Turn: Move the outside of the pile to the center. | 140°F - 160°F |
| Days 6 to 18 | Turn the pile every 48 hours (every other day). | Maintain 135°F - 155°F |
| Day 18 | Final Turn. Pile should be dark, earthy, and shrinking. | Dropping below 110°F |
Pro-Tip for Turning: When turning, use your pitchfork to physically invert the material. The cooler, drier outer edges must be buried in the center of the new pile, while the hot, decomposed center is moved to the outside. This guarantees that all materials are subjected to the pathogen-killing heat of the core.
Troubleshooting Common Hot Compost Issues
Even with careful planning, environmental variables can disrupt the composting process. Here is how to diagnose and fix common problems:
- The Pile Smells Like Ammonia or Rotten Eggs: This indicates an anaerobic environment or an excess of nitrogen (low C:N ratio). Fix: Turn the pile immediately to introduce oxygen, and mix in 2 to 3 cubic feet of dry, shredded carbon material like straw or dry leaves.
- The Pile Fails to Heat Up: This is usually caused by a lack of nitrogen, insufficient moisture, or a pile that is too small. Fix: Check the moisture with the Sponge Test. If it is dry, add water. If moisture is adequate, turn the pile and mix in a nitrogen boost, such as blood meal, alfalfa meal, or fresh grass clippings.
- The Pile is Ashy or Has White Mold: This is often a sign of actinomycetes, which are beneficial bacteria that break down tough woody debris. However, if it looks excessively dry and dusty, the pile is lacking water. Fix: Water thoroughly while turning.
Curing and Application in the Garden
Once the 18 days are complete, the compost will look dark and smell like rich forest soil. However, it is not yet ready for direct seed planting. The microbial activity is still high, and the compost may temporarily tie up soil nitrogen as it finishes stabilizing. Allow the compost to 'cure' in a shaded, well-drained area for 2 to 4 weeks. After curing, apply it as a 1-inch top dressing to your lawn, mix it into your raised beds at a 30% volume ratio with native soil, or use it to brew aerated compost tea for your container gardens.
Expert Insights and Authoritative Citations
The science behind hot composting is well-documented by leading agricultural institutions. Proper temperature management is not just about speed; it is a vital phytosanitary measure.
'To ensure the destruction of plant pathogens and weed seeds, the compost pile must reach and maintain thermophilic temperatures of 131°F to 170°F (55°C to 77°C) for a minimum of three consecutive days. The frequent turning schedule of the Berkeley method ensures that all exterior materials are cycled through the hot core, achieving uniform pathogen reduction.'
— Cornell Waste Management Institute, 'Guide to Successful Composting'
Furthermore, the UC Davis College of Agricultural and Environmental Sciences emphasizes that particle size reduction and initial moisture content are the primary limiting factors in home composting systems. By adhering strictly to the 2-inch particle size rule and the 3x3x3 dimensional requirements outlined in this guide, home gardeners can replicate commercial-grade composting results in their own backyards, drastically reducing their reliance on synthetic, petroleum-based fertilizers.

