
How to Diagnose and Fix Backyard Patio Drainage Issues
The Hidden Dangers of Poor Patio Drainage
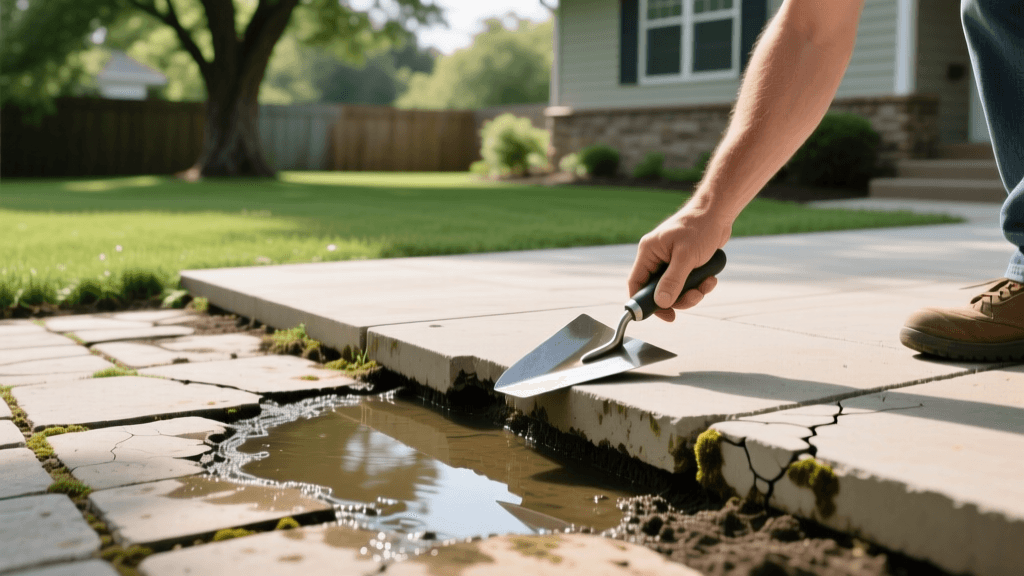
Water pooling on your backyard patio is more than just a nuisance; it is a direct threat to your home's structural integrity and your expensive outdoor living space. When rainwater or irrigation runoff fails to drain properly, it can seep into your foundation, cause basement flooding, and create a breeding ground for mosquitoes. Furthermore, standing water accelerates the deterioration of outdoor furniture, wooden decks, and hardscape materials. Diagnosing and fixing patio drainage issues requires a systematic approach to identify whether the problem stems from improper grading, compacted soil, or inadequate hardscape design. In this comprehensive guide, we will explore the root causes of poor drainage, provide actionable solutions with cost estimates, and outline step-by-step DIY repairs to keep your outdoor oasis dry and protected.
Diagnosing the Root Cause of Patio Pooling
Before you start digging trenches or buying materials, you must accurately diagnose why water is accumulating on your patio. The three most common culprits are negative grading, impermeable surfaces, and concentrated roof runoff.
1. The Gravity and Slope Test
The most critical factor in patio drainage is the slope, also known as the grade. Water must flow away from your home's foundation. To test this, use a string line and a line level, or a laser level. Place a stake near the house and another at the edge of the patio. Measure the height difference. A proper hardscape should have a minimum slope of one-eighth inch per linear foot, or roughly a two percent grade. If the patio is perfectly flat or slopes toward the house (negative grading), water will inevitably pool or infiltrate your foundation.
2. The Soil and Permeability Check
If your patio is made of permeable materials like gravel or spaced pavers, but water still pools, the issue lies beneath the surface. Compacted clay soil acts like a bowl, trapping water. Dig a small test hole about twelve inches deep near the patio edge and fill it with water. If it takes more than four hours to drain, you have heavy clay soil that requires subsurface drainage solutions rather than just surface grading.
3. Gutter and Downspout Audit
Sometimes the patio is fine, but the roof is overwhelming it. Check your gutters during a heavy rainstorm. If downspouts are dumping hundreds of gallons of water directly onto or adjacent to the patio, no surface slope will handle the volume. Downspouts must be diverted away from the hardscape using rigid PVC extensions or flexible corrugated tubing buried just below the soil surface.
Proven Solutions for Common Drainage Problems
Once you have identified the problem, you can select the appropriate solution. Here are the most effective fixes for common patio drainage problems, complete with material and labor estimates.
Problem: Negative Slope Toward the Home
Solution: Mudjacking or French Drains. If a concrete slab is sinking toward the house, mudjacking (slab jacking) involves drilling small holes into the concrete and pumping a cementitious slurry underneath to lift it back to the correct grade. This costs between $3 and $6 per square foot. Alternatively, installing a French drain at the base of the patio intercepts water before it reaches the foundation. A French drain consists of a perforated pipe surrounded by gravel, buried in a trench lined with landscape fabric. Expect to pay $20 to $30 per linear foot for professional installation, or about $5 to $10 per linear foot for a DIY approach.
Problem: Surface Pooling on Impermeable Concrete
Solution: Channel or Trench Drains. For large concrete patios where re-grading is impossible, a trench drain is the best solution. These are linear drains covered by a metal or plastic grate that catch surface water and route it to a safe discharge area. They are highly effective for managing heavy rainfall on impermeable surfaces.
Problem: Saturated Soil Beneath Pavers
Solution: Dry Wells. If water percolates through pavers but hits a clay hardpan, a dry well can help. A dry well is a large underground chamber filled with gravel or a plastic crate that collects water and allows it to slowly dissipate into the surrounding soil over time.
Drainage Solution Comparison Chart
| Solution | Estimated Cost | DIY Difficulty | Best Application |
|---|---|---|---|
| French Drain | $5 - $30 / linear ft | Intermediate | Stopping groundwater and foundation seepage |
| Trench Drain | $30 - $150 / linear ft | Advanced | Managing surface water on concrete slabs |
| Mudjacking | $3 - $6 / sq ft | Professional Only | Lifting sunken concrete slabs |
| Dry Well | $200 - $600 total | Intermediate | Handling runoff from permeable pavers |
Step-by-Step: Installing a Patio Trench Drain
Installing a trench drain is a highly effective way to save a flooding concrete patio. Here is a step-by-step guide to doing it yourself.
Step One: Planning and Marking. Determine the path of the drain. It should cross the lowest point of the patio or run along the edge where water pools. Mark the cut line with chalk. Ensure the discharge point is at least ten feet away from the home and slopes downward.
Step Two: Cutting the Concrete. Using a gas-powered concrete saw with a diamond blade, cut along your chalk lines. The trench should be slightly wider than your drain channel. Always wear a respirator, ear protection, and safety goggles.
Step Three: Excavation and Base Preparation. Remove the concrete strip and dig out the soil beneath to a depth of about twelve inches. Create a solid base by adding two inches of compacted crushed stone. This prevents the drain from shifting under heavy loads.
Step Four: Setting the Drain and Pipe Connection. Assemble the trench drain channel and connect it to a solid PVC pipe that will carry the water away. The PVC pipe must have a minimum slope of one-eighth inch per foot to ensure gravity pulls the water to the discharge zone. Set the drain channel in the trench, ensuring the top of the grate is flush with or slightly below the patio surface to catch all runoff.
Step Five: Backfilling and Sealing. Pour quick-setting concrete or hydraulic cement around the edges of the drain channel to secure it in place. Trowel it smooth to match the existing patio. Allow it to cure for twenty-four to forty-eight hours before driving or walking heavily on it.
Integrating Smart Irrigation to Prevent Patio Flooding
Often, patio drainage issues are exacerbated by outdated or poorly calibrated sprinkler systems that overwater adjacent garden beds, sending excess runoff onto the hardscape. Upgrading to a smart irrigation controller, such as the Rachio 3 or Rain Bird ST8I-2.0, can drastically reduce the water volume hitting your patio. These Wi-Fi-enabled devices connect to local weather stations and automatically skip watering schedules when rain is in the forecast. Furthermore, integrating wireless soil moisture sensors into the garden beds bordering your patio ensures that the sprinklers only activate when the soil truly needs it. By reducing artificial water accumulation by up to thirty percent, smart home integration alleviates the burden on your physical drainage systems and promotes energy-efficient landscaping.
Expert Guidelines and Authoritative Standards
When designing any drainage solution, it is crucial to follow established landscaping and structural guidelines. According to the University of Minnesota Extension, the ground around a home should slope away at a minimum rate of six inches over the first ten feet to prevent foundation water intrusion. If your patio abuts the house, the hardscape itself must maintain a continuous positive grade away from the foundation. Additionally, the International Residential Code (IRC) mandates that impervious surfaces like patios must not direct water onto neighboring properties or public walkways. Always check local municipal codes before tying your patio drainage into city storm sewers.
Seasonal Maintenance to Keep Water Flowing
To ensure your drainage system functions year-round, implement a seasonal maintenance routine. In early spring and late fall, flush out trench and French drains with a high-pressure garden hose to remove silt, leaves, and debris. Inspect the grates for cracks or warping, especially after winter freeze-thaw cycles that can cause frost heave. If you have a dry well or rain barrel integrated into your patio's drainage, clean the inlet filters monthly during the rainy season. By proactively maintaining your drainage infrastructure, you protect your home's foundation, extend the lifespan of your outdoor furniture, and ensure your garden-to-table entertaining space remains pristine and usable after every storm.

