
How to Diagnose and Fix Patio Drainage and Water Pooling
The Hidden Dangers of Patio Water Pooling
Water pooling on your paver, stone, or concrete patio isn’t just annoying to look at—or risky to walk on. Over time, it can loosen the base, stain surfaces, and even affect your home’s foundation. In cold climates, standing water freezes and thaws, pushing pavers out of place or cracking concrete. It can also bring minerals to the surface of stone, leaving chalky white stains (efflorescence), or wash away the gravel and sand underneath. A dry, level patio makes outdoor time more comfortable—and helps keep water where it belongs: away from your house.
Step 1: Diagnose the Root Cause of Poor Drainage
Before buying materials or calling a contractor, figure out why the water’s sticking around. Most drainage problems come down to one of three things: the patio isn’t sloped right, the base has settled, or the joints or drains are blocked.
The Slope Test
Most pooling happens because the patio doesn’t tilt enough to shed water. The Penn State Extension recommends a minimum slope of 1/4 inch per foot (about 2%) away from the house. To check yours:
- Place a 4-foot carpenter’s level on the patio, with one end against the house or highest point.
- Lift the far end until the bubble centers.
- Measure the gap between the level and the patio surface. With a 4-foot level, that gap should be 1 inch for the right slope.
- If it’s less than 1 inch—or if the patio tilts toward the house—you’ve got a grading issue.
Soil Compaction and Base Failure
If your patio started out level but now has low spots or little ponds (“birdbaths”), the base probably shifted. A stable patio needs 4 to 6 inches of compacted crushed stone underneath. If the soil below wasn’t tamped down well before that stone went in, it slowly compresses over time—especially after heavy rain or freeze-thaw cycles—leaving depressions where water collects.
Clogged Weep Holes and Joint Sand Erosion
On paver patios, water is meant to seep through the gaps between stones. If the sand in those joints has washed out—or if weeds and moss have filled them up—the surface stops draining properly. On concrete patios, blocked weep holes in nearby retaining walls or planter boxes can back water onto the slab instead of letting it escape.
Step 2: Targeted Solutions for Patio Drainage Problems
Once you know what’s causing the problem, pick the fix that matches your situation, budget, and how much work you want to do yourself.
Solution A: Mudjacking (Slab Jacking) for Concrete Patios
If your concrete patio has sunk but is still intact, mudjacking lifts it back into place without tearing it out. A contractor drills small holes (1–2 inches wide) and pumps a cement-and-sand slurry underneath. The pressure gently raises the slab to its original height.
- Timing: Usually done in one afternoon; you can walk on it again in 24–48 hours.
- Estimated Cost: $3 to $6 per square foot—much less than replacing the whole slab.
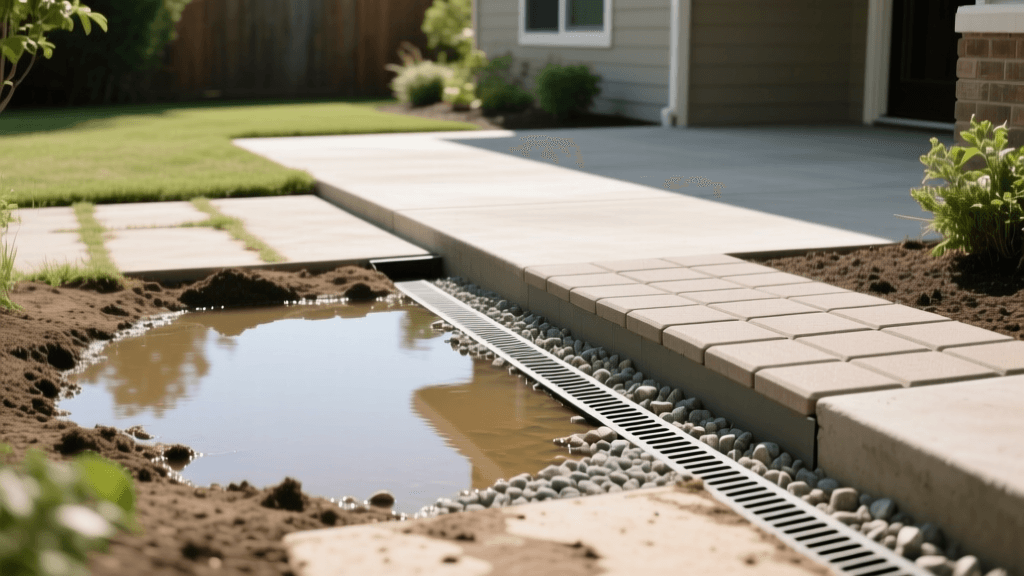
Solution B: Installing a Channel Drain
If water pools along the edge of your house or a retaining wall—even when the patio is flat—a channel drain catches it before it backs up. It’s a long, narrow trench with a metal or polymer grate on top, connected to a pipe that carries water away.
- Product Recommendation: The NDS 5-inch Pro Series Channel Drain holds up well under foot traffic and snaps together easily for DIYers.
- Installation: You’ll cut a trench into the patio surface, set the drain in fresh concrete, and run a PVC pipe downhill to a lower spot in your yard—or into a dry well.
- Estimated Cost: $10 to $20 per linear foot if you do it yourself; $30 to $50 if you hire someone.
Solution C: French Drains for Perimeter Runoff
If your lawn stays soggy and spills onto the patio, a French drain intercepts that water before it reaches the hardscape. It’s a perforated pipe buried in gravel and wrapped in landscape fabric.
- Measurements: Dig the trench 12–18 inches deep and 12 inches wide, sloping down about 1 inch for every 8 feet toward where the water will exit.
- Materials: 4-inch corrugated perforated pipe works fine for most DIY jobs. For something sturdier and easier to clear later, go with rigid PVC (SDR 35).
Solution D: Regrading and Polymeric Sand Replacement
If your paver patio only has shallow puddles and the base feels solid, you may not need major work. Refreshing the joint sand and adjusting the top layer can restore drainage and stability.
- Product Recommendation: Sakrete Polymeric Sand or Alliance Gator Dust. These sands harden slightly when dampened, locking pavers in place while still letting water through.
- Process: Scoop out old sand down to about 1/8 inch below the paver edges, sweep in new sand, tamp it with a plate compactor, then mist lightly with a hose.
Comparison Chart: Patio Drainage Solutions
Use the table below to compare options based on your problem, budget, and comfort level with tools and digging.
| Solution | Best Used For | Est. Cost (DIY vs Pro) | DIY Difficulty | Longevity |
|---|---|---|---|---|
| Mudjacking | Sunken concrete slabs | Pro: $3 - $6 / sq ft | Not DIY Friendly | 5 - 10 Years |
| Channel Drain | Water pooling against house | DIY: $15 / lin ft | Intermediate | 20+ Years |
| French Drain | Yard runoff flooding patio | DIY: $10 / lin ft | High (Labor Intensive) | 10 - 15 Years |
| Polymeric Sand | Paver joint erosion | DIY: $1.50 / sq ft | Beginner | 3 - 5 Years |
| Permeable Pavers | Total patio replacement | Pro: $15 - $25 / sq ft | Expert / Pro Only | 25+ Years |
Preventative Maintenance for Outdoor Living Spaces
Fixing the drainage is only half the job. A little upkeep each season keeps things working longer.
- Spring: Clear leaves, dirt, and gunk from channel drain grates and French drain catch basins. Run a hose through the pipes to make sure water flows freely to the outlet.
- Summer: Watch for ant hills or weeds in paver joints. Ants tunnel under pavers and can cause small dips. A perimeter insecticide helps if they’re nesting there.
- Fall: Make sure downspout extensions send roof runoff at least 4 to 6 feet away from the patio edge. That water adds up—and can undermine the base over time.
- Winter: Skip rock salt (sodium chloride) on concrete and pavers. It speeds up freeze-thaw damage. Calcium magnesium acetate (CMA) melts ice without harming the surface or nearby plants.
Expert Insight: 'Proper hardscape drainage is not just about keeping your patio dry; it is an essential component of residential water management. By directing surface water away from the foundation and into designated rain gardens or dry wells, homeowners can significantly reduce the risk of basement flooding and soil erosion.' — Adapted from Penn State Extension Stormwater Management Guidelines.
Conclusion
Fixing patio drainage starts with a simple slope test—and ends with the right fix for your setup. Whether you’re adding an NDS channel drain to protect your foundation or re-sanding pavers to get water flowing again, catching the problem early saves time and money. Pair good installation with basic seasonal care, and your patio can stay dry, safe, and usable for years.

