
Designing Your Garden-To-Table Outdoor Prep Kitchen
The Rise of the Garden-to-Table Prep Zone
The garden-to-table movement has fundamentally transformed how homeowners interact with their outdoor spaces. No longer is the backyard just a place for passive relaxation or generic barbecuing; it has evolved into a dynamic, productive landscape where culinary creativity meets horticultural passion. For the avid home gardener, the journey from soil to skillet is deeply rewarding, but it often involves carrying muddy vegetables through the house, staining indoor kitchen counters, and creating a chaotic mess. The solution lies in designing a dedicated, functional garden-to-table outdoor prep kitchen. This specialized space bridges the gap between your raised beds and your dining area, providing a seamless workflow for harvesting, washing, prepping, and plating fresh produce. By thoughtfully planning this transitional zone, you can protect your indoor sanctuary while elevating your outdoor cooking experience to a professional level.
Mapping the Workflow: Four Essential Zones
When planning your outdoor prep kitchen, it is crucial to treat the space as a highly functional extension of your indoor culinary workflow. A successful design relies on the concept of zoning, ensuring that each step of the garden-to-table process has a dedicated, ergonomic footprint. Here are the four essential zones you must incorporate into your layout:
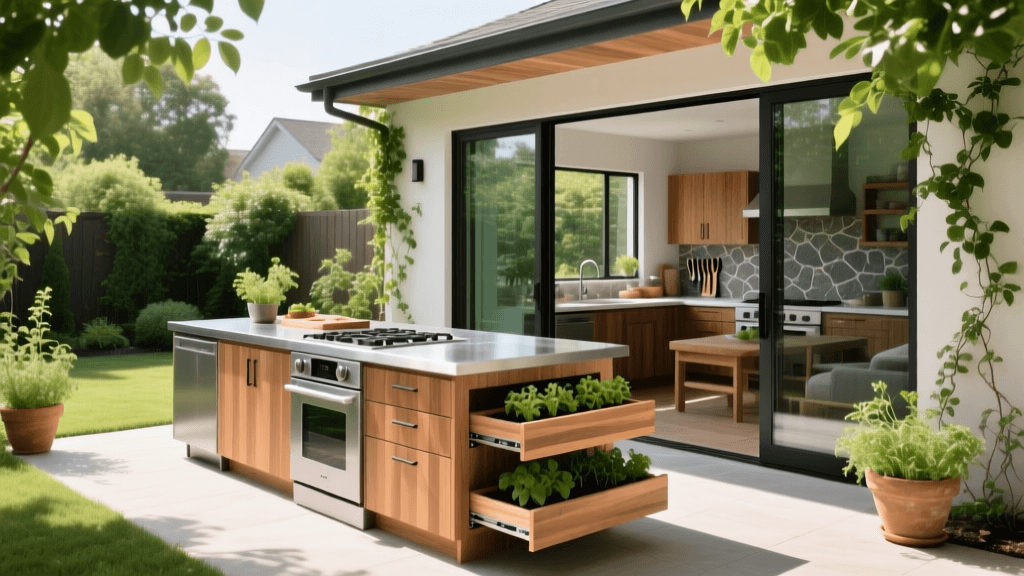
- Zone 1: The Harvest Drop-Off - This is the entry point for your freshly picked produce. Design this area with heavy-duty, slatted wooden crates or ventilated stainless steel bins positioned at waist height. This prevents back strain when unloading heavy baskets of root vegetables, tomatoes, or squash directly from the garden.
- Zone 2: The Washing Station - Dirt and debris must be removed before produce enters the clean prep zone. Install a deep, single-basin farmhouse sink equipped with a commercial-style pull-down sprayer. Consider integrating a secondary mesh drain board where leafy greens and root crops can air-dry or be scrubbed with a stiff-bristled vegetable brush under running water.
- Zone 3: The Prep and Chopping Block - This is the heart of the outdoor kitchen. You need expansive, unbroken counter space for slicing, dicing, and marinating. Incorporate a dedicated, end-grain teak or sealed maple chopping block that can be easily removed, sanded, and oiled. This zone should also include weatherproof, soft-close drawers for storing outdoor-specific knives, peelers, and mandolines.
- Zone 4: The Plating and Serving Pass - The final stage before the food reaches the outdoor dining table. This area should feature a slightly elevated counter or a pass-through window if the kitchen is adjacent to the dining patio. Include warming drawers or a shaded, insect-proof enclosure to keep finished dishes at the optimal temperature while you plate the final courses.
Selecting Countertop Materials for Harvest Prep
Choosing the right surface material is perhaps the most critical decision in your outdoor kitchen design. Unlike indoor countertops, outdoor surfaces must endure extreme temperature fluctuations, intense UV radiation, freezing rain, and the acidic nature of fresh garden produce like tomatoes and citrus. Furthermore, the surface must be non-porous to prevent bacterial growth when handling raw vegetables and meats. Below is a comprehensive comparison of the top materials suited for a garden-to-table prep kitchen:
| Material | Average Cost per Sq. Ft. | Durability Rating | Maintenance Requirements | Best Application |
|---|---|---|---|---|
| Sealed Concrete | $65 - $135 | High | Requires annual penetrating sealer application | Rustic, farmhouse-style garden kitchens |
| Marine-Grade Polymer | $100 - $200 | Very High | Extremely low; simple soap and water wash | Coastal climates and high-humidity zones |
| Stainless Steel (304 Grade) | $150 - $250 | Extreme | Requires regular polishing to prevent water spots | Heavy-duty chopping and commercial-style prep |
| Porcelain Slab | $50 - $120 | High | Virtually maintenance-free; UV and scratch resistant | Modern aesthetics and direct sunlight exposure |
Integrating Smart Technology and Lighting
To truly bridge the gap between rustic gardening and modern convenience, your outdoor prep kitchen should leverage smart home technology. Energy-efficient landscaping and smart irrigation are already staples of modern yard design, and your outdoor kitchen should follow suit. Start by installing a smart water controller, such as the Rachio 3, connected to a dedicated drip line for a nearby culinary herb wall. This ensures your basil, thyme, and rosemary are perfectly hydrated without wasting water. For lighting, integrate a Wi-Fi-enabled smart lighting system like Philips Hue Outdoor. You can program the system to shift from bright, cool-white task lighting over the chopping block during evening prep, to a warm, dimmed ambient glow over the serving pass when dinner is plated. Additionally, consider installing a smart, touchless faucet. When your hands are covered in soil or raw poultry marinade, a motion-sensor faucet prevents cross-contamination and conserves water, a vital feature for eco-conscious homeowners.
Food Safety and Authoritative Guidelines
Designing an outdoor kitchen requires strict adherence to food safety protocols, especially when dealing with fresh, unwashed garden produce and raw proteins. According to the United States Department of Agriculture (USDA), outdoor food preparation demands rigorous attention to the 'Danger Zone'—the temperature range between 40°F and 140°F where bacteria multiply rapidly. The USDA advises that perishable foods left outdoors in temperatures above 90°F should not sit for more than one hour before being consumed or refrigerated. To comply with these authoritative guidelines, your outdoor prep kitchen design must include a dedicated, weather-rated outdoor refrigerator, such as those manufactured by True Residential or Marvel, capable of maintaining a consistent internal temperature of 38°F regardless of the ambient outdoor heat. Furthermore, ensure your layout separates the 'dirty' washing zone from the 'clean' plating zone to prevent soil-borne pathogens like E. coli from contaminating ready-to-eat salads and fresh herbs.
Budgeting and Project Timeline
Planning a high-functioning outdoor prep kitchen requires a realistic budget and a phased timeline. A basic setup featuring a prefabricated polymer island, a standard stainless steel sink, and basic task lighting will typically cost between $4,500 and $8,000, with a build time of two to three weeks. However, a fully customized, smart-integrated garden-to-table kitchen with masonry veneer, 304-grade stainless steel countertops, a commercial pull-down faucet, and an outdoor-rated refrigerator will range from $18,000 to $35,000 or more. The timeline for a high-end project usually spans eight to twelve weeks, accounting for permitting, utility trenching for gas and water lines, and custom material fabrication. To keep costs manageable, consider tackling the hardscaping and utility rough-ins in the late fall, allowing you to purchase appliances and cabinetry during winter holiday sales, and completing the aesthetic finishes just in time for the spring planting and harvest season.

