Gardening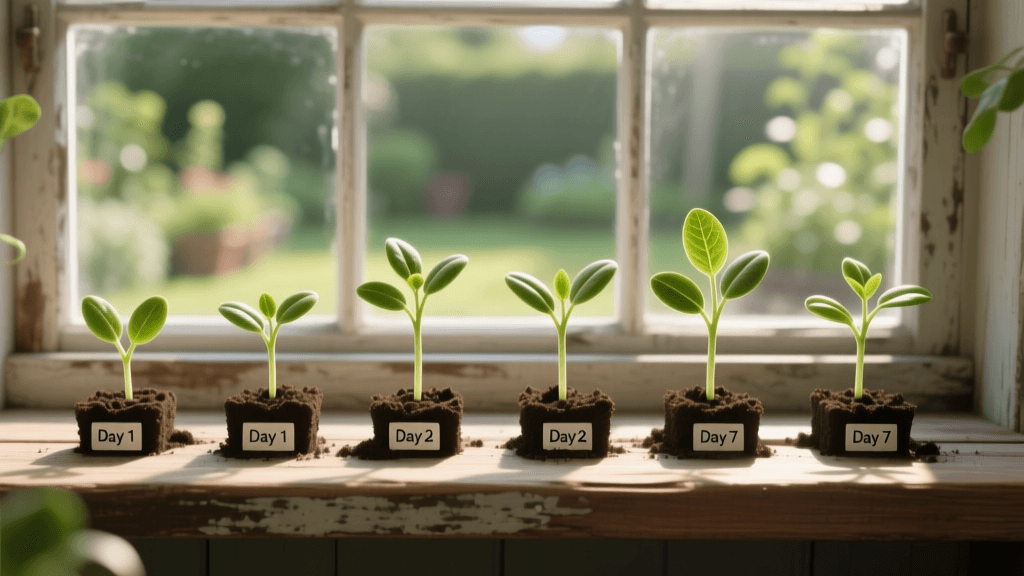
7-Day Seedling Hardening Off Schedule & Photo Guide 2026
The Intersection of Horticulture and Visual Documentation
As we navigate the 2026 growing season, the practice of garden journaling has evolved far beyond pen and paper. Today, the most dedicated horticulturists and botanical enthusiasts rely on high-resolution visual documentation to track plant health, diagnose environmental stress, and celebrate the microscopic miracles of growth. One of the most critical, yet frequently misunderstood, phases of a plant's early life is the hardening off process. Transitioning tender indoor seedlings to the harsh, unpredictable outdoor environment requires a delicate touch. By combining a structured 7-day hardening off schedule with targeted garden photography, you can create a stunning visual diary while ensuring your plants survive the shock of transplantation.
According to Penn State Extension, hardening off is the process of reducing the temperature and humidity around seedlings to prepare them for the outdoors. But what does this biological shift actually look like? Through the lens of a macro camera, we can witness the thickening of the epidermal cuticle, the lignification of cell walls, and the production of protective anthocyanins. This guide will walk you through a precise 7-day transition schedule for 2026, paired with a daily photography shot list to help you document this fascinating acclimation period.
The Biology of Acclimation Through a Macro Lens
Before diving into the schedule, it is essential to understand what you are trying to capture. Indoor seedlings are grown in a utopian environment: consistent temperatures, zero wind, and filtered light. Their leaves are thin, and their stems are soft. When introduced to the outdoors, they must rapidly adapt to UV radiation, wind desiccation, and temperature fluctuations.
When you photograph seedlings during this transition, you are looking for specific visual cues:
- Cuticle Thickening: The waxy outer layer of the leaf develops to prevent water loss. Under a macro lens with a polarizing filter, this newly formed wax often presents as a subtle, silvery sheen.
- Anthocyanin Production: Many seedlings, particularly tomatoes and brassicas, will develop a purple or reddish tint on their stems and the undersides of their leaves. This is a natural sunscreen produced to protect against intense UV rays.
- Stomatal Regulation: While invisible to the naked eye, the plant's ability to open and close its stomata (pores) in response to wind and sun dictates its turgor pressure. Visually, this translates to the plant's ability to remain upright and rigid during midday heat rather than wilting.
The 2026 7-Day Hardening Off Schedule & Shot List
The following table outlines the daily horticultural requirements for hardening off seedlings, paired with specific photographic assignments to document the process. This schedule assumes you are starting with healthy, 6-to-8-week-old seedlings that have been grown under LED grow lights.
| Day | Horticultural Task | Photography & Documentation Task |
|---|---|---|
| Day 1 | Place in deep shade outdoors for 2 hours. Protect from all wind. | Macro shot of leaf surface texture; set up time-lapse camera for baseline tracking. |
| Day 2 | Place in dappled shade for 4 hours. Introduce gentle ambient breeze. | Time-lapse capture of leaf movement in the wind; photograph stem base for thickness. |
| Day 3 | Place in morning sun (before 10 AM) for 3 hours, then shade. | Capture morning light hitting the leaf edges; look for early signs of anthocyanin (purpling). |
| Day 4 | Extend morning sun to 5 hours. Afternoon shade only. | Mid-day turgor pressure check: photograph the plant at 1 PM to check for wilting. |
| Day 5 | Full morning and early afternoon sun (6-8 hours total). | Macro shot of new growth emerging at the apical meristem; compare to Day 1 photos. |
| Day 6 | Full sun exposure all day. Bring in if severe weather threatens. | Golden hour silhouette shots; document the thickened, rigid structure of the main stem. |
| Day 7 | Full sun exposure. Leave outdoors overnight if nighttime temps remain above 50°F. | Final comparative side-by-side photos; capture morning dew on the hardened cuticle. |
Days 1-3: Shade, Shelter, and Baseline Documentation
The first three days are all about minimizing shock while introducing the plant to outdoor air quality and temperature drops. Your primary goal as a photographer is to establish a visual baseline. Use a dedicated macro lens—such as the 90mm f/2.8 Macro G OSS for Sony shooters or the built-in microscope mode on the rugged OM System TG-7—to capture the initial thinness of the leaf tissue. Place a neutral gray card behind the seedling to ensure your white balance remains consistent throughout the 7-day shoot, which is crucial for accurately tracking color changes like stress-induced purpling.
Days 4-5: Introducing Direct Sun and Wind
As you introduce direct sunlight, the plant's transpiration rate will skyrocket. The University of Wisconsin-Madison Extension notes that wind is often more damaging to unhardened seedlings than sun, as it strips moisture from the leaves faster than the roots can replace it. During your Day 4 and Day 5 photography sessions, focus on the structural integrity of the stem. You should begin to see the stem thickening and taking on a slightly woodier appearance (lignification). Set your camera to a narrow aperture (f/8 to f/11) to ensure both the stem and the primary leaves are in sharp focus.
Days 6-7: Full Exposure and the Overnight Test
By Day 6, your seedlings should be handling full sun without drooping. This is the time to capture the triumph of acclimation. The waxy cuticle will now reflect light differently than it did on Day 1. On Day 7, leaving the plants out overnight (provided temperatures are safe) allows you to capture stunning macro images of morning dew resting on the newly hardened, water-resistant leaf surfaces. These dew drops act as natural magnifying glasses, highlighting the cellular structure of the leaf in your final documentation.
Essential Camera Gear for Outdoor Seedling Documentation in 2026
Documenting a 7-day outdoor process requires gear that can withstand the elements while delivering exceptional close-up image quality. Here is a curated list of equipment ideal for the 2026 garden photographer:
- Camera Body: Weather-sealed mirrorless bodies like the Sony Alpha a7 IV or the OM System OM-1 Mark II are essential. They can handle unexpected spring drizzles without failing.
- Macro Optics: A 1:1 macro lens is non-negotiable for capturing cellular changes. Alternatively, high-quality clip-on macro lenses for smartphones, such as the Moment Macro Lens, offer incredible accessibility for daily garden journaling.
- Intervalometer: To capture the subtle wilting and recovery of seedlings throughout the day, an intervalometer is required. Many modern cameras have this built-in, but standalone wireless triggers offer more reliability for multi-day shoots.
- Power Solutions: Running a time-lapse for 8 hours a day will drain standard camera batteries. Utilize high-capacity, weather-resistant power banks like the Anker 737 or dedicated dummy-battery setups connected to portable solar generators.
Setting Up a 7-Day Time-Lapse Station
A time-lapse sequence of the hardening off process is a centerpiece for any digital garden journal. To execute this, mount your camera on a heavy-duty tripod that will not shift in the wind. Position the camera at a 45-degree angle to the seedling tray, ensuring the background is a static, non-distracting element like a wooden fence or a dark shade cloth.
Set your interval to one frame every 10 minutes. Over an 8-hour outdoor session, this yields 48 frames per day. Across 7 days, you will compile 336 frames, which translates to roughly 14 seconds of buttery-smooth video at 24 frames per second. This footage will vividly reveal the daily rhythm of the plant: the slight drooping during peak afternoon heat, the rapid recovery in the evening, and the gradual stiffening of the stems as the week progresses.
"The camera does not just record the garden; it teaches us how to see the invisible mechanisms of plant survival. A time-lapse of a seedling hardening off is a masterclass in botanical resilience."
Diagnosing Stress Through Visual Data
One of the most practical applications of photographing your seedlings during this transition is the ability to diagnose environmental stress before it becomes fatal. By reviewing your daily images on a calibrated monitor, you can spot the early warning signs of trouble:
- Sunscald: Appears as bleached, papery, or translucent patches on the leaf tissue. If your Day 3 or 4 photos show this, you have moved the plant into direct sunlight too quickly. Retreat to shade immediately.
- Windburn: Manifests as browning, crispy edges on the leaves, often accompanied by a stunted, hunched growth posture. This indicates the plant's cuticle has not yet thickened enough to retain moisture against the wind.
- Chilling Injury: If you leave seedlings out on Day 7 and the nighttime temperatures drop unexpectedly, your photos the next morning may reveal dark, water-soaked lesions on the leaves, a clear sign of cellular rupture due to cold.
Conclusion: Building a Legacy of Growth
Hardening off seedlings is often viewed as a tedious chore, a risky waiting game between the safety of the indoors and the promise of the garden bed. However, by adopting the mindset of a visual documentarian, you transform this 7-day schedule into an engaging scientific observation. The 2026 growing season offers the perfect opportunity to merge horticultural best practices with modern photographic technology. Whether you are compiling a digital portfolio, contributing to citizen science projects, or simply keeping a meticulous garden journal, capturing the hardening off process will forever change how you appreciate the resilience of the plants you grow. Grab your camera, set your intervalometer, and let the seedlings tell their story of survival.